Want to learn earthen plaster?
|
When you learn how to create gorgeous clay plasters from the earth around you, you begin an amazing journey into natural building.
|
Here’s an innovative earthbag project to whet the more arty side of your appetite. Rhonda in our Mud Home Facebook group is making something rather stunning happen over in Mexico. This is an exceptionally well-designed build, with so many original architectural features, I wanted to showcase it. Rhonda was also incredibly informative in her documenting, which is very helpful for others, so a public shout out to her for that. 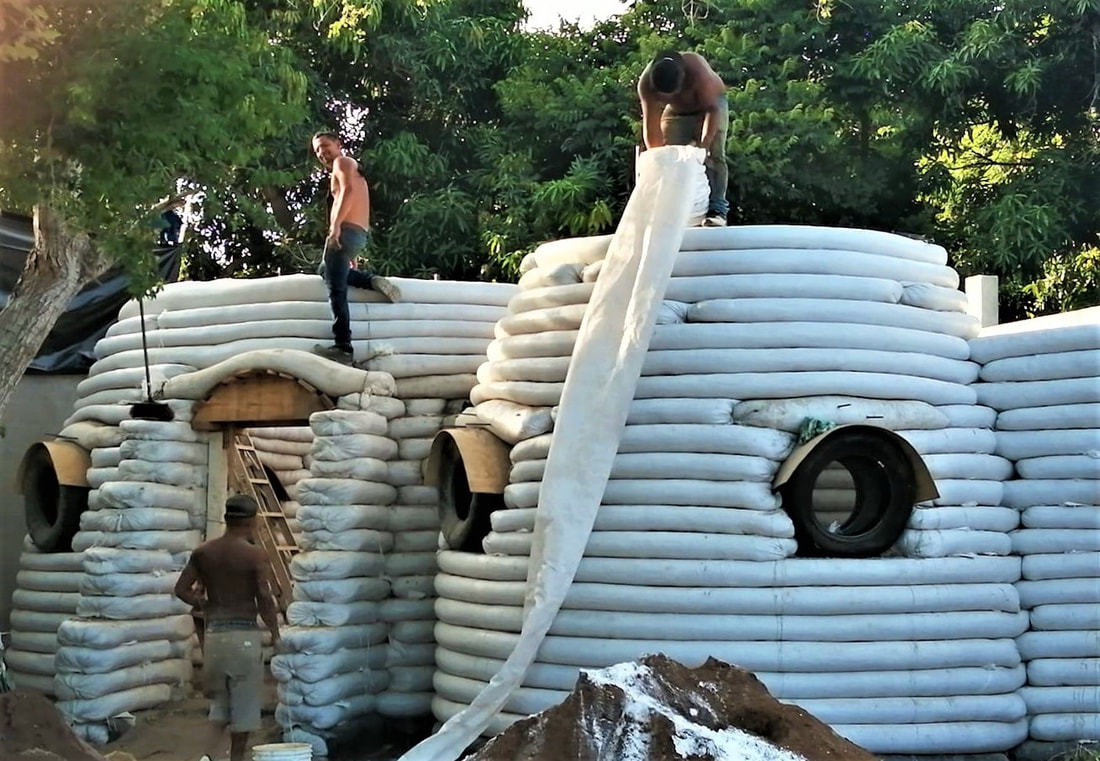 Rhonda’s dome home mushrooming up. The Mexican Dream But let's rewind a bit. How did this earthbag marvel begin? As always, it starts with a dream. Five years ago, after many visits to the country, Rhonda moved to Mexico. “I fell in love with the more simple way of living. Mexico taught me that all of the stuff I had accumulated in my past life in Canada and the United States was completely unnecessary, all the kitchen gadgets, 25 pairs of shoes, the matching set of pots and pans, everything that we think we can't live without or that we need to be happy.” Oh and ain’t that the truth, eh? So our muddy artist ditched the Western fixation on ‘more more more’ and moved to Nayarit on Mexico’s west coast. “It’s the best decision I ever made,” she says. “There are always language barriers and issues that come up, but I happily accept them as challenges and experiences.” We’ve been watching somewhat agog in our little Facebook group as this earthbag dome world has mushroomed out of the dust. Pretty much all you see below was built in the month of November. One of the greatest boons of the earthbag building technique is it boasts both strength and flexibility. You can do things with it that you can’t do easily with many other techniques. One of those architectural delights is the dome. A Word on Domes Now, before we go any further, and before a thousand more people rush out and decide to build a dome because hey they’re sexy, a word of caution. Domes are not for every climate. They pose many waterproofing issues for one thing, I'll be covering them in more detail next month, but in the meantime, don't say I didn't warn you.  Rhonda on her dome. Why Earthbag? “For many years I investigated different methods of more natural ways of building,” says Rhonda. “There seem to be more and more popping up these days, different ideas all very interesting in their own way. It wasn't until I read your book Mud Ball and found your website that I became really intrigued and started soaking up all the information I possibly could.” Rhonda sculpts dolls for a living, so it’s no surprise she would want to work with earthbag, which like cob often attracts artists because both allow the builder to literally sculpt a house. You are no longer restricted to post and beam structures, or inflexible building materials. The whole shelter becomes something to mould. “I love that it's possible to experiment and include lots of different techniques artistically like sculpting and painting and stonework, just to name a few. Really your imagination is the only limit,” Rhonda says. And let’s face it, this might be her first build, but her imagination is certainly enjoying some legroom, even so. So how did she and her team build it?  Gravel-filled bags for the stem wall, with pipework for grey water recycling. The Foundations “We did two levels of gravel-filled bags below grade, and another two levels of gravel-filled bags above grade. Black plastic was added over the bags after the below grade levels were finished,” explains Rhonda. She’s really chosen the correct foundation and stem wall approach. I’ve said it many times, it’s hard to beat the rubble trench foundation for natural builds. It simply works. It’s cheaper than Portland cement, a million times better for drainage, fairly fool-proof and a lot more environmentally kind. I can’t see one good reason not to use it. More on gravel foundations here. 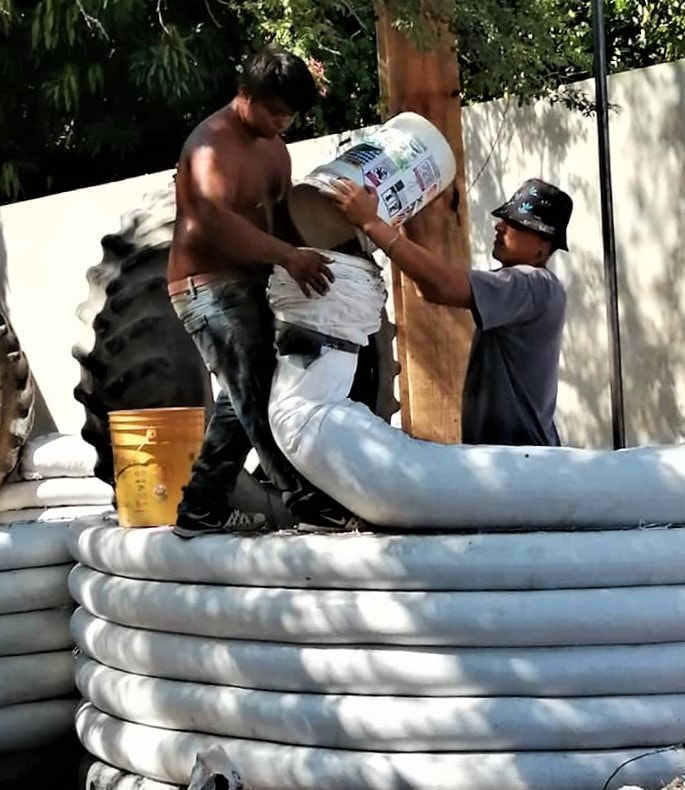 Filling the PP tubes. The Earthbag Domes These domes are made from earthbag PP tubing filled with stabilised earth. “I went with continuous bags and 50cm wide,” explains Rhonda. "After the gravel bag layers, we continued filling all of the next levels with dirt and lime. We added some plumbing and are going to be separating grey water out for recycling,” The domes will comprise skylights embedded into the top. In this case the upper ring of the dome (where the skylight will sit) has been reinforced with a small concrete ring (bond beam). Bond beams at the point where a dome tapers in are sometimes used (or required by codes) to prevent the dome from splaying out under the pressure of the domed roof. These can also be made from wood, which I prefer not only for eco reasons, but because wood typically has more give than reinforced concrete. In this case though, the ring is so tiny and tight, Rhonda is right in my opinion to choose cement. You'd be hard-pressed to make a structurally sound wooden circle that small. "The other reason I didn't use a wooden bond beam is because we have a huge termite problem in Mexico. They eat up everything in a matter of a couple weeks and the only way to keep them out is to spray with some very hazardous concoction," explained Rhonda. And it's true, sometimes Portland is the lesser of two evils. 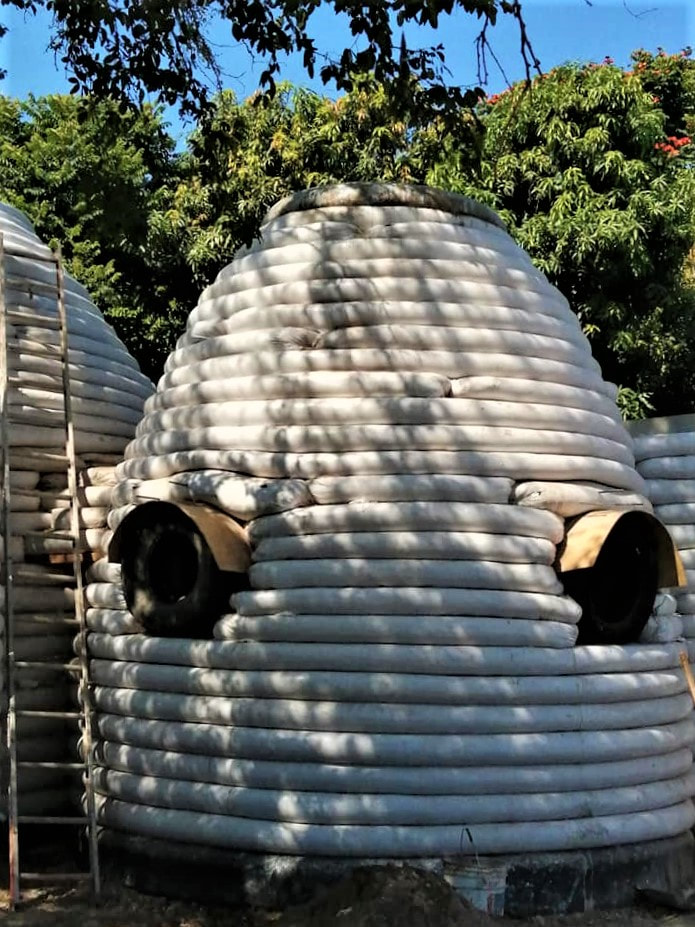 A dome with a small bond beam. The Keyhole Doorways It’s not just the cluster of domes that is interesting in this build. For me it's the other features that are truly inspiring. I don’t think I’ve ever seen anyone make anything like Rhonda’s stunning keyhole doorways. 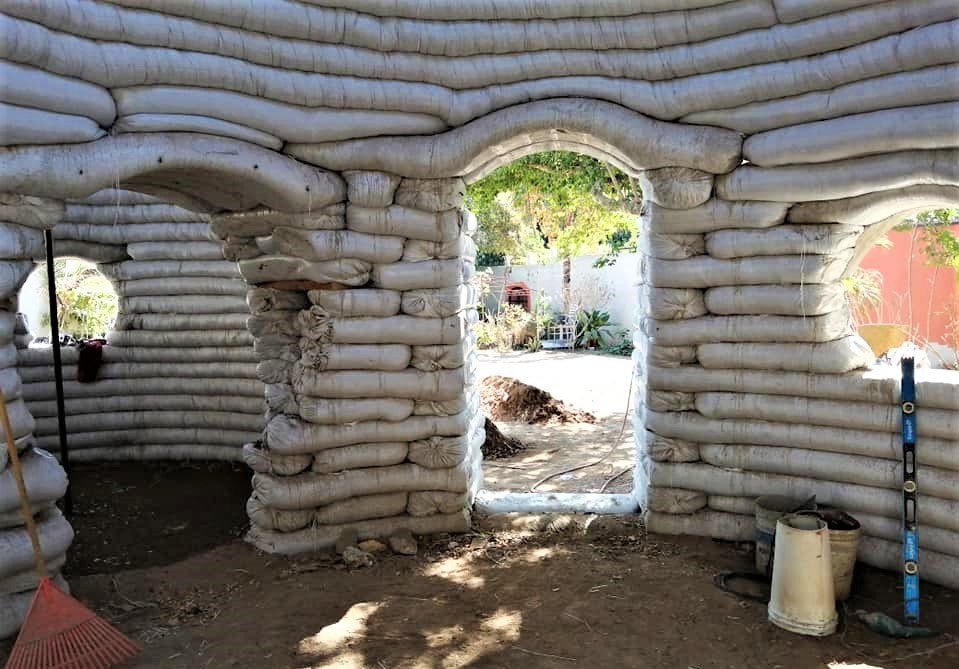 Doors and windows, any shape you like. How did they make them? The doorways are so clever. They were made using moulds that were engineered from tyres resting on wooden frames. The tyres were old disused ones, which made them a much cheaper recycled option than making wooden forms. “I was able to find free tires for window and door forms and we wired two tires together for all of the window openings to make them wider because we're using wider bags. I'm using the tractor tires for the door into the indoor garden and one also going into the bedroom,” explains Rhonda. 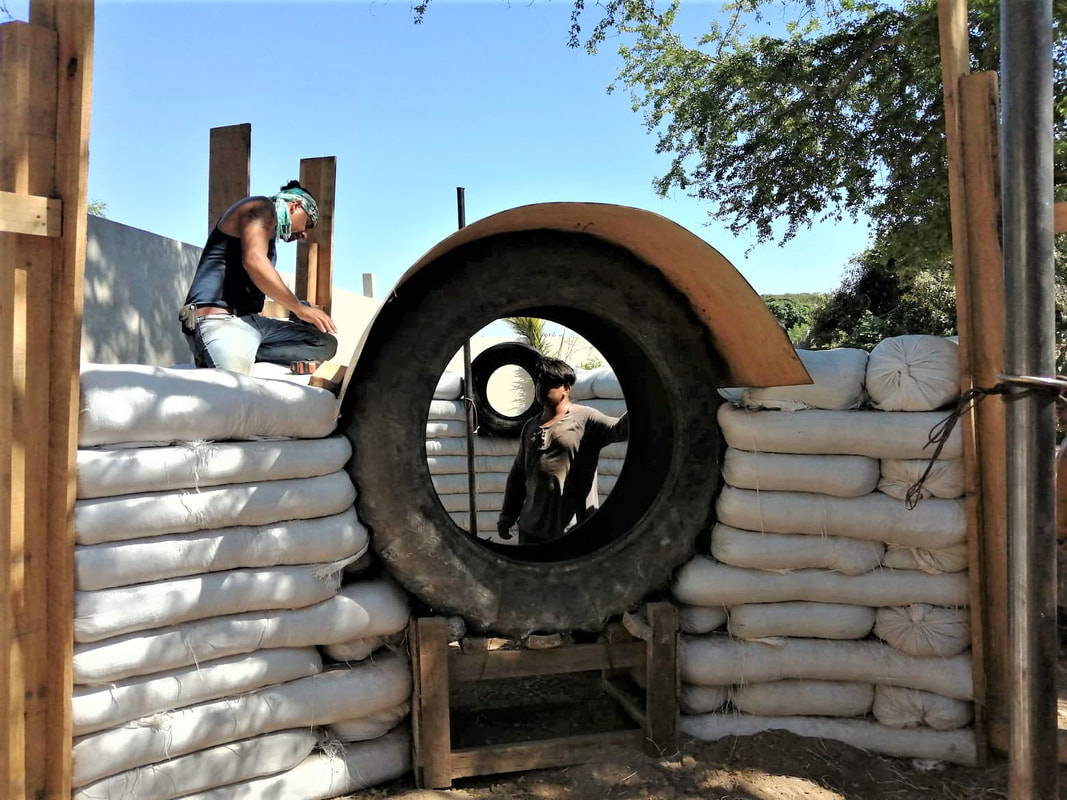 Tyre mould for the doorways. This keyhole doorway is particularly exciting because it joins two intersecting earthbag domes.  Doorway intersecting two domes. What’s next? “This first one, La Casa Montañita, will be my home and a very special build for me,” says Rhonda. But it won’t end here. It never does:) “I am planning to build on the same piece of property a Superadobe pool and a structure for art retreat and class students to stay in. I will offer and host classes for many types of art, sculpting, painting, doll making, stone mosaics and who knows maybe even Superadobe. I'm addicted to this method of building and it's countless possibilities. I'm sure there are many new projects in my future.” Things to take away from this inspiring build: 1. Using wider bags: As Rhonda says, “I love the wider bags for the walls but it does make the work a lot heavier. We are also using an extremely heavy tamper and double rows of 35 kilo barbed wire so the bags are super solid.” When you use wider sacks in earthbag, it means you have to dig and fill a lot more dirt. But...wide tubes are going to be less of a strain than wide bags, because tubes don’t get ‘lifted’ onto the wall after they are filled. This is worth bearing in mind. 2. Stabilised earth: Take note, if you don’t have enough clay on your land for any reason, you can also stabilise your earth using lime in the mixture. 3. Planning and design: There are usually two camps: one lot spend their life overthinking everything and doing nothing (groan); the other bunch (ahem, me) leap straight in and muddle through, the downside being more potential cock-ups and extra expense (but hey, at least something manifests). Then there is this rather admirable subset of folk, of which Rhonda is one, who plan things superbly well, and actually execute their plans as well. I have nothing but respect for such people. For the rest of us, it pays to know which side of the overthinking/reckless-and-rash boundary you sit, so that you can push yourself in the other direction. 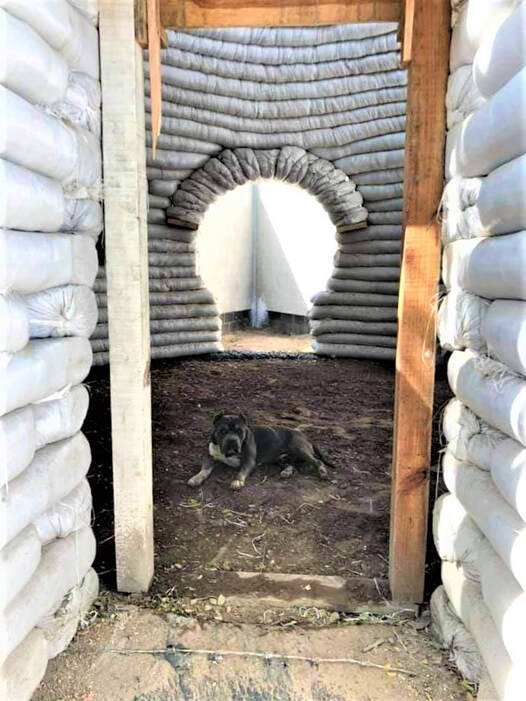 The pooch in the arch. See more on Rhonda’s dolls here: https://creamsodabjd.com Keep up with her sculpted eco builds here: https://www.smudgez.com Related articles you may find useful My Free Earthbag Building Guide: http://www.themudhome.com/earthbagbuilding.html More on the polypropylene sacks: http://www.themudhome.com/the-sacks.html Gravel/rubble trench foundations: http://www.themudhome.com/gravel-foundations.html  Funky earthbag staircase, another of Rhonda's super features. Do you enjoy The Mud Home?
If you find these articles inspiring or useful please consider joining us on Patreon. Your support pays for the running of this website, my virtual help, and my sustenance. A big thank you to all The Mud Sustainers, and everyone chipping in and keeping these posts and articles coming.
3 Comments
Yay! The cob hen coop is finished. There's even a bit of grass growing on that roof. So here it is: How to make a smallish (1.5m diameter) cob chicken coop, including a living roof and limecrete floor (yes my hens live in style). Note to all the folk who love to read this stuff, but never do it: This is the one time you should quit the procrastinating, and just give it a go. A cob coop/kennel is perfectly doable alone, it costs basically nothing, and you don't need a permit for it. That's it. I've just set a match to all your excuses:) No garden? Make a small cat house in the park or something! An animal shelter is a super way to practice using cob. It’s basically a miniature version of a house, so you get to try out all the techniques on a manageable scale before committing to a more ambitious structure. Yup, it really is time to get your hands dirty! 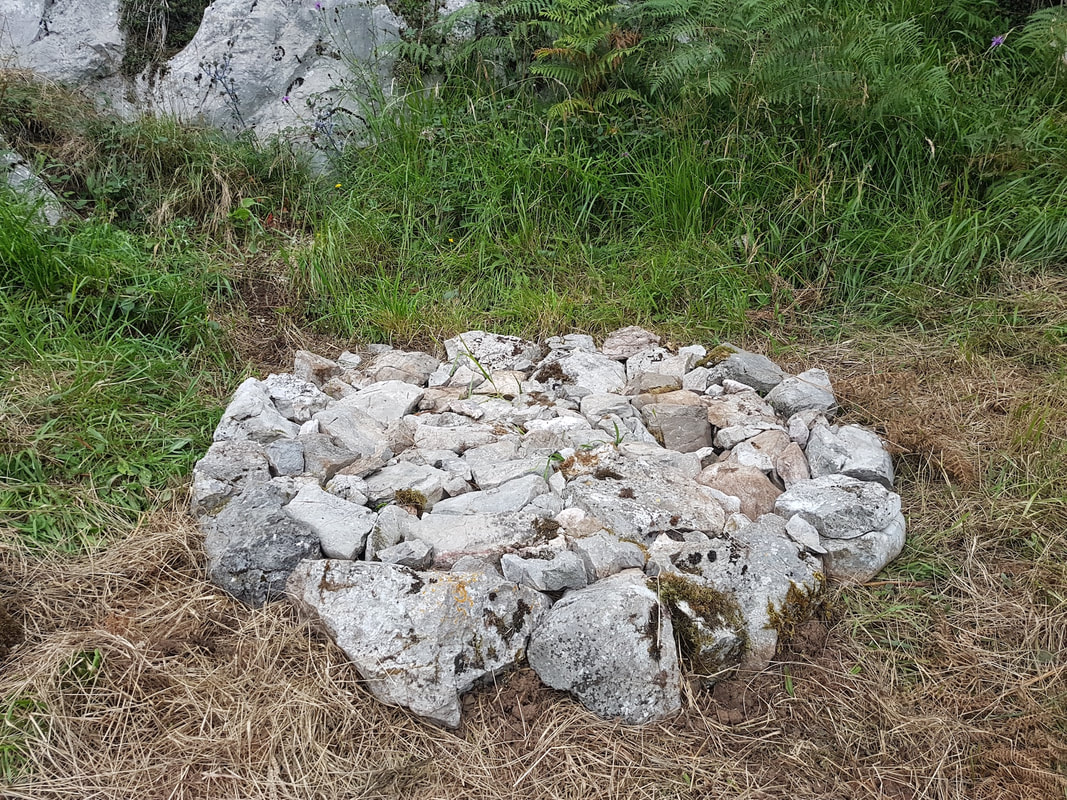 Foundation. First, dig a small trench/circle for the foundation. This is a hen house, not a castle, so it really only needs to be 10-20cm deep. Fill it with nice fat rocks. Then fill in the gaps with smaller rocks. 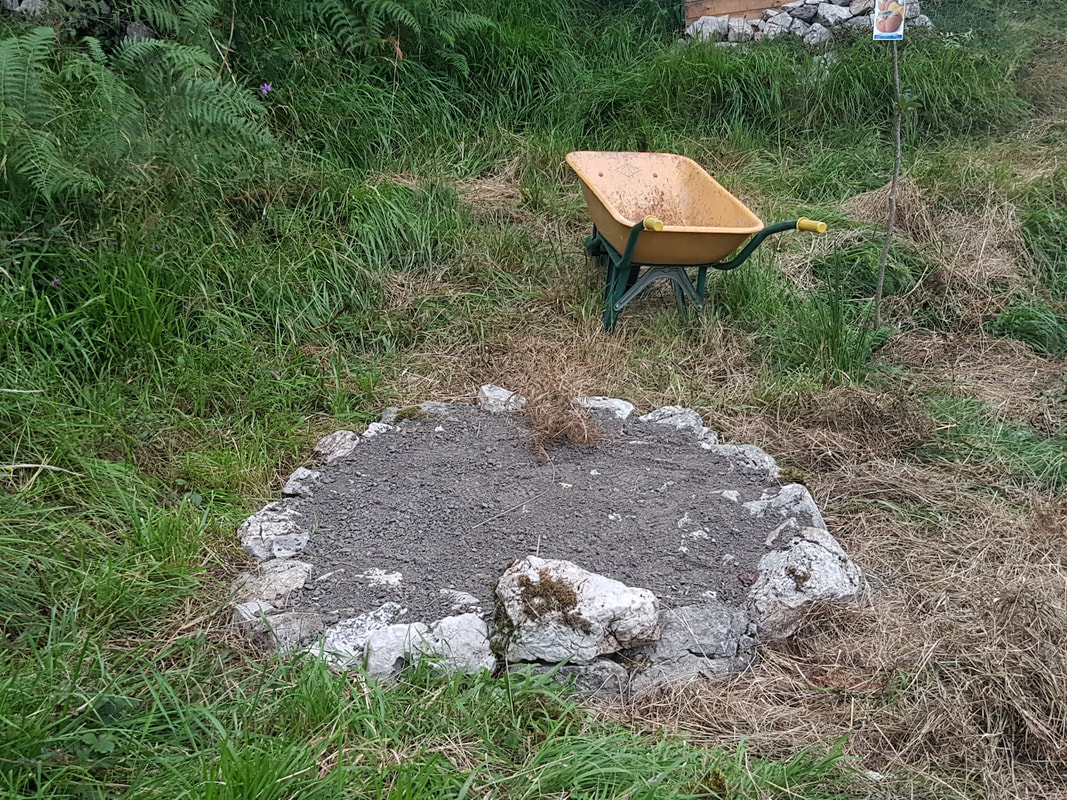 Gravel. Adding gravel over the top isn’t strictly necessary, but it fills in all the tiny gaps and creates a nice flat surface to build on. This is especially useful if you’re adding a limecrete/earth floor. 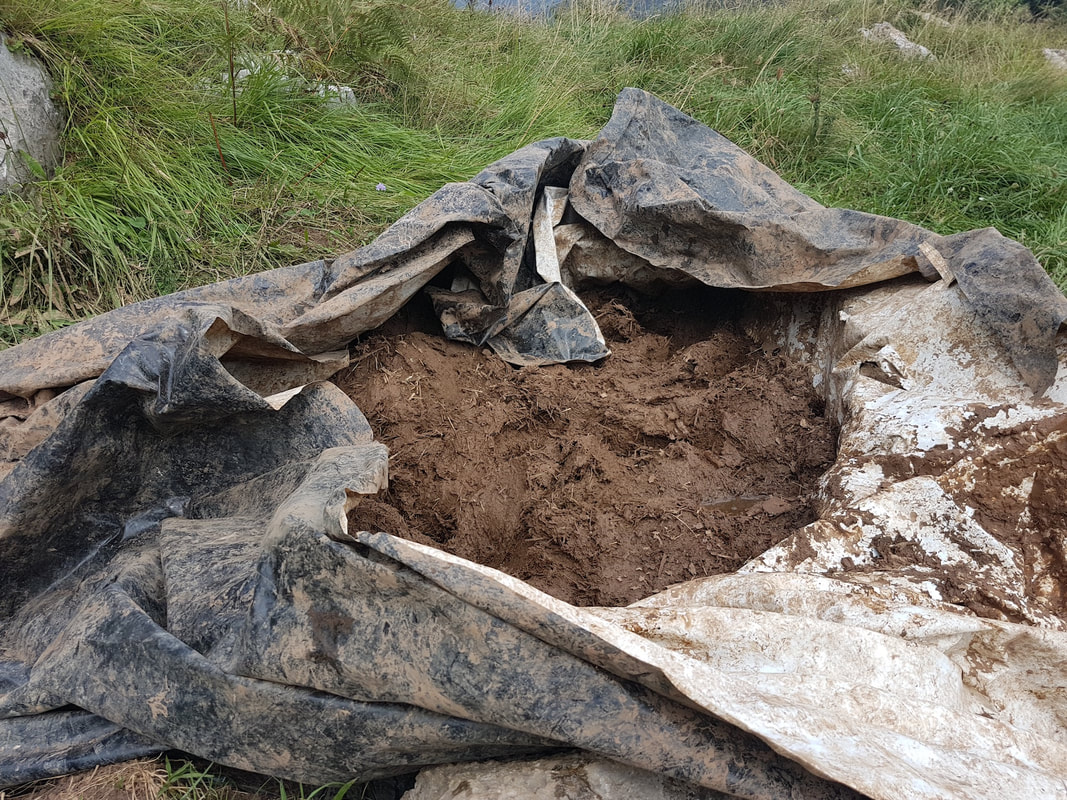 Cob. Mix up some cob. I used roughly one part clay, one part soil, one part straw, some horse manure ,and two parts sand. But each person’s mix is different, so if you want to understand more about cob and earth plaster mixes, sign up for the free earth plaster course. 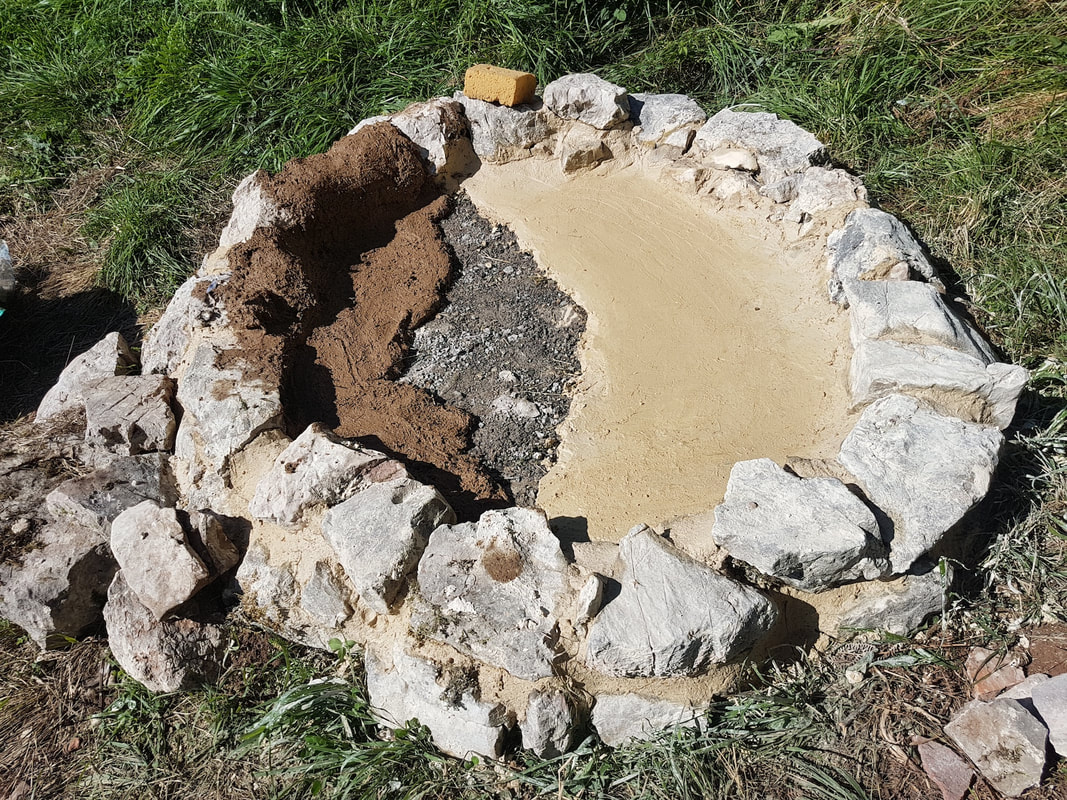 Limecrete and earthen floor. Now add another ring of rocks for a stem wall (to raise the cob off the ground so it is protected from rainwater runoff). This is an important feature with all mud buildings, so don’t skip this part unless you especially like watching cob disintegrate in water. I wanted to test out both a limecrete and earthen floor in my climate, so I made the chicken coop floor half and half. I also wanted to test out whether a vapour barrier was a good idea or not. Hence I laid some plastic between the gravel and the mixture in one half of the coop, but slapped the mixture straight down onto the gravel on the other half. Now that I’ve seen how it functions, I think these natural floors work much better without the vapour barrier (others disagree). What I’m seeing is, the half of the floor where I stuck the vapour barrier doesn’t dry out properly because the damp can’t evaporate. 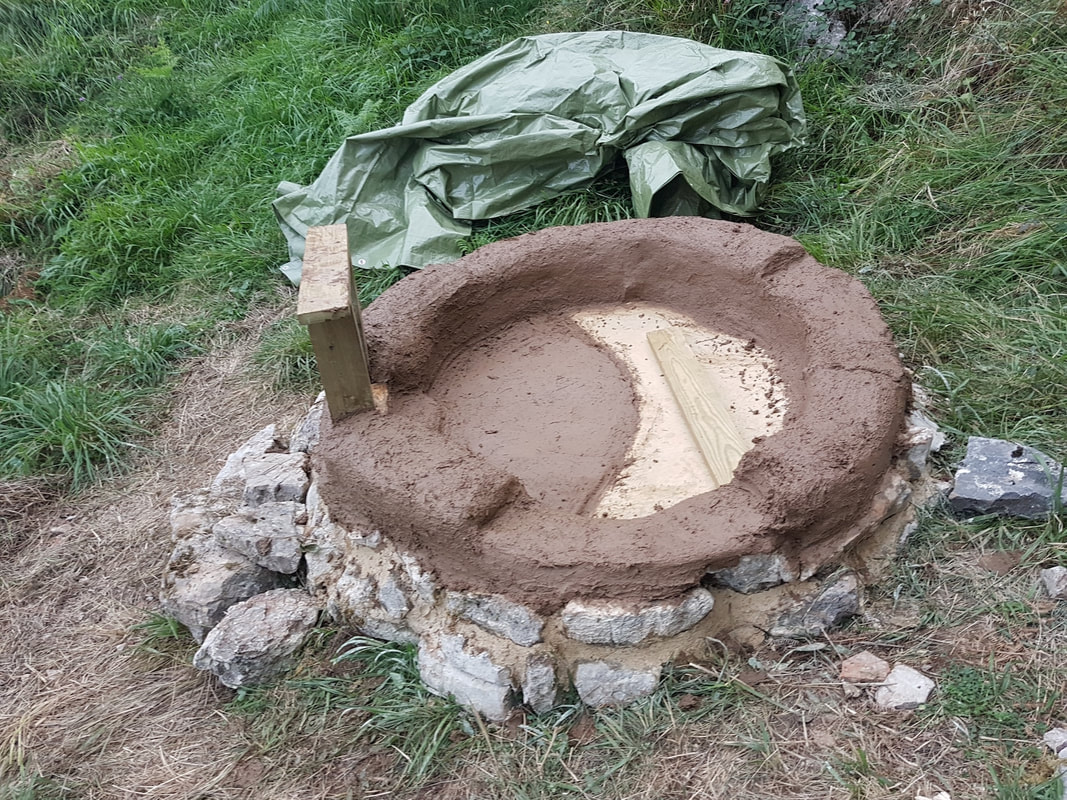 Building up the cob walls. Take your cob mixture and slap it on top of your stem wall to create your first mud layer. Wait for this to dry before adding the next layer on top. In my climate (damp) I found I could lay about 30cm (height) of cob mixture at one time, after which it began to buckle.  Attaching door frames. Make sure they’re anchored in. Add your door frames wherever you want them. These need to be properly anchored into the cob mixture. You can see from the photo how I created small lintels above and below the door, which extend into the cob. These were nailed into the cob mixture below. I also added nails (see the red lines) into the side of the door frames so the cob has something to stick to. 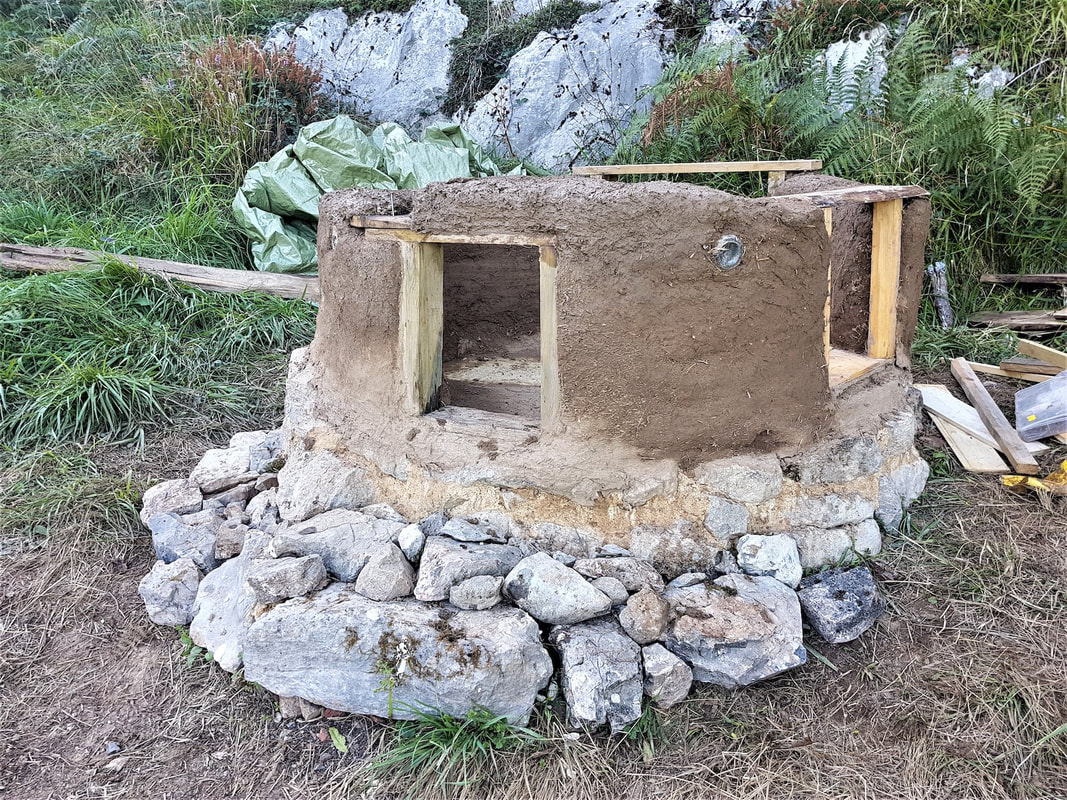 Keep building up and around the frames until they’re completely embedded into the structure. 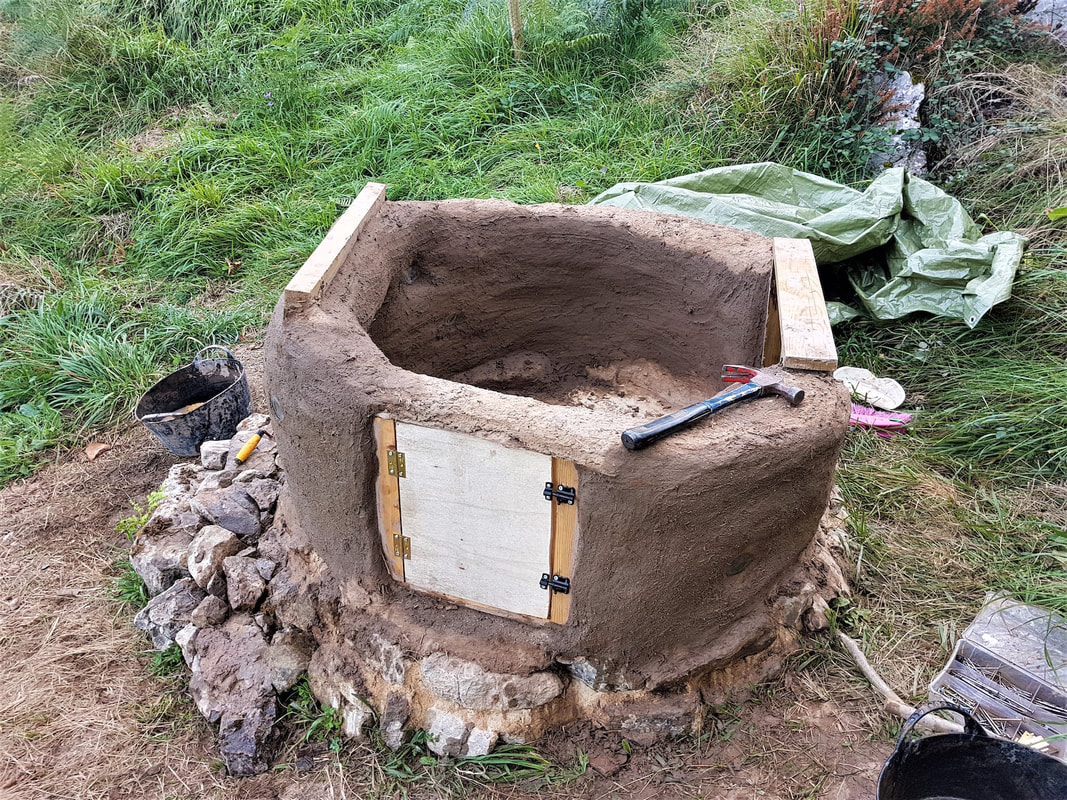 Prepping for the roof. Once you reach the top, add some ‘wall plates’ for your roof to sit on. Again these should be anchored into the cob. I nailed mine in. 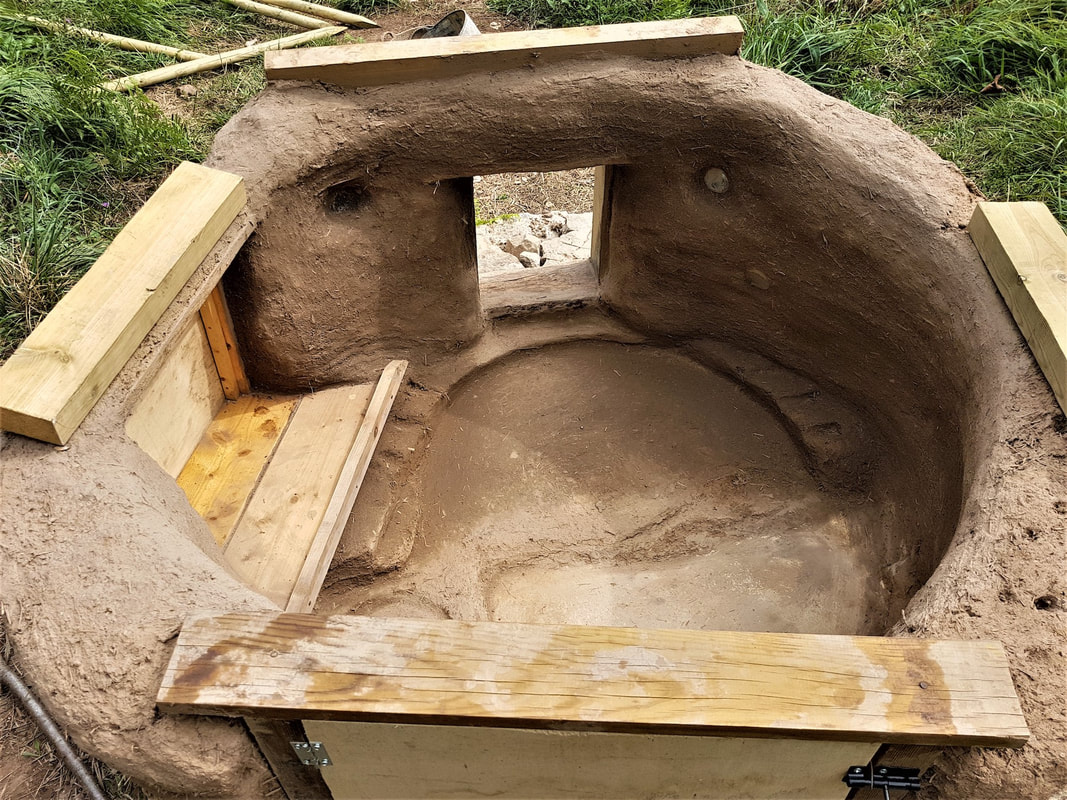 Interior. Before the roof goes on (if it’s a smallish coop), sculpt the inside. It’s a lot easier this way.  Add joists. Add your roof joists. I used bits of old wood I had laying around. Make sure they’re level, and that the roof is sloping gently from front to back. 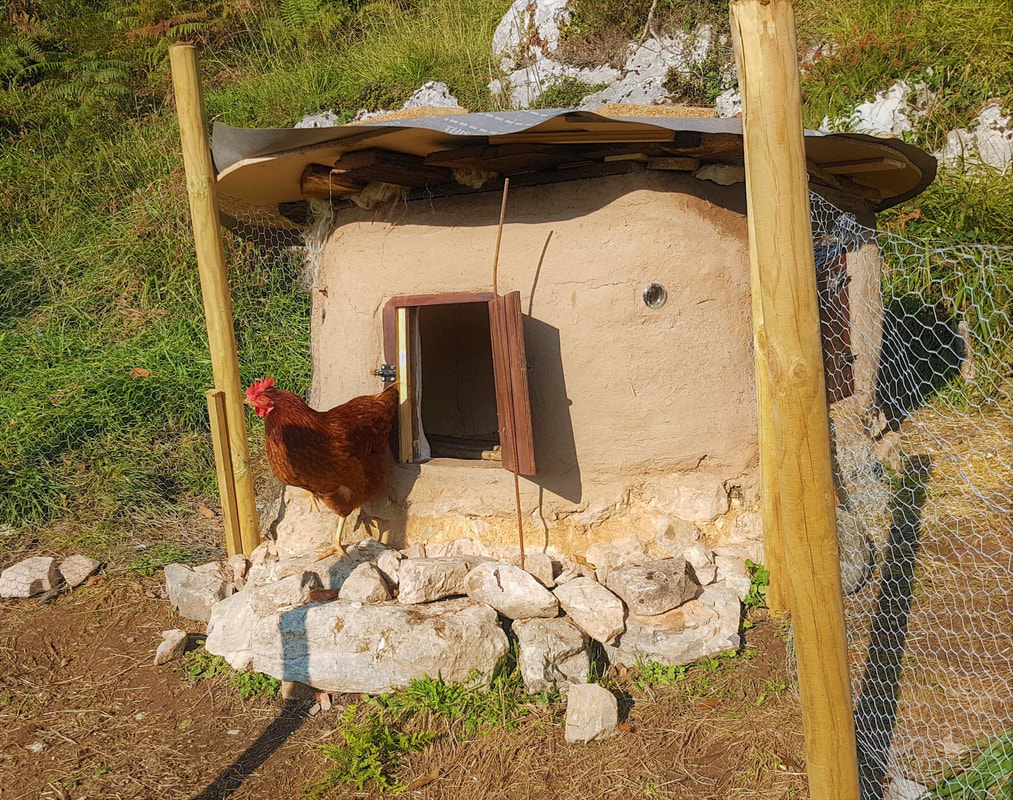 Cover the roof. Use some sort of roofing board to cover the joists. Cut it to the shape you want and screw it in place. Then add a water proof membrane of some kind. You can add hens as well at this stage, if you want. 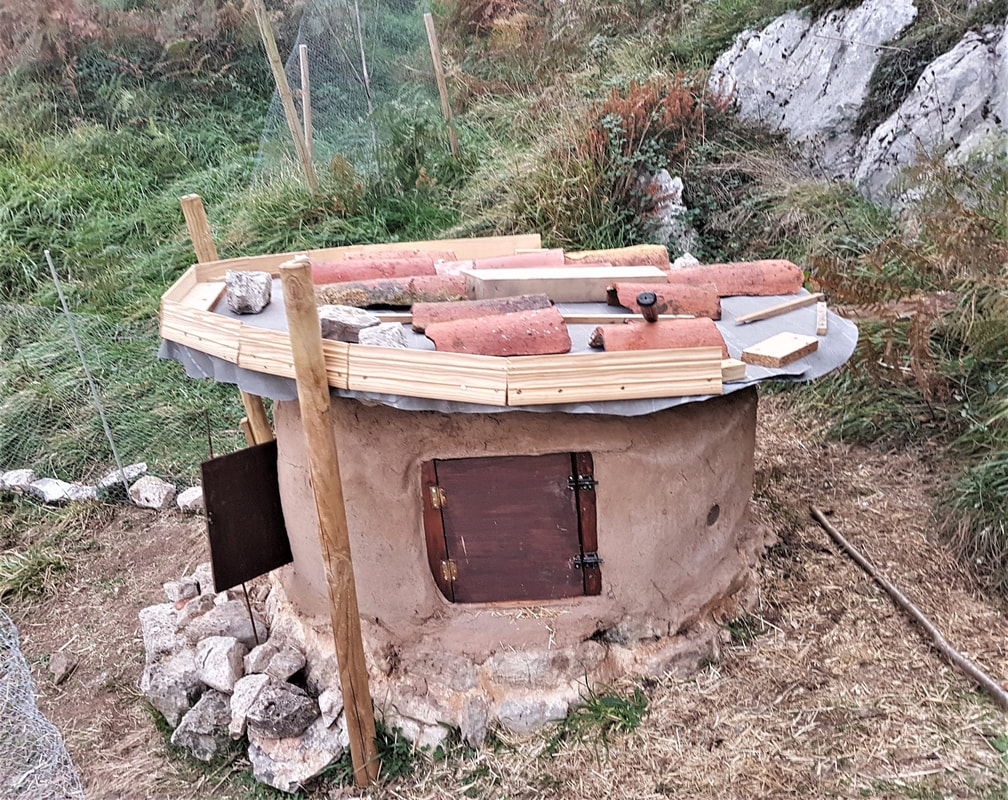 The rim. Attach a rim to the edge of the roofing board to create a kind of tray for the dirt to sit in. In this case I used skirting board, but hey, use your imagination and whatever you have to hand. 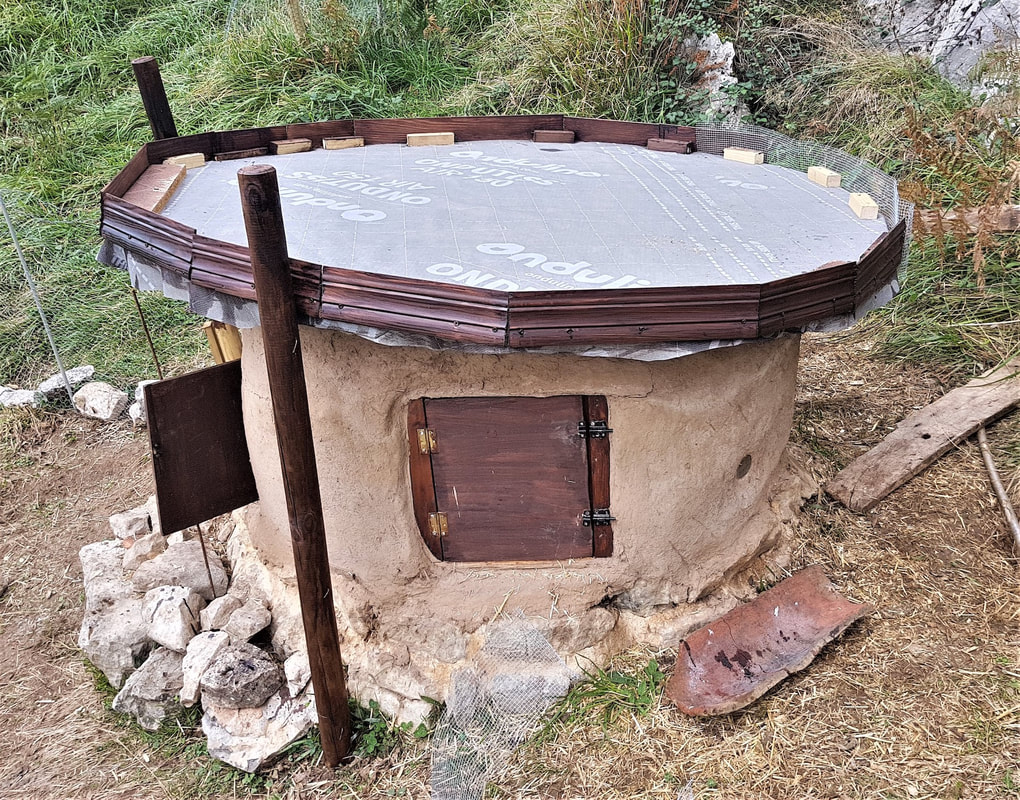 Drainage. Remember to add mesh at the back so that water can drain out. 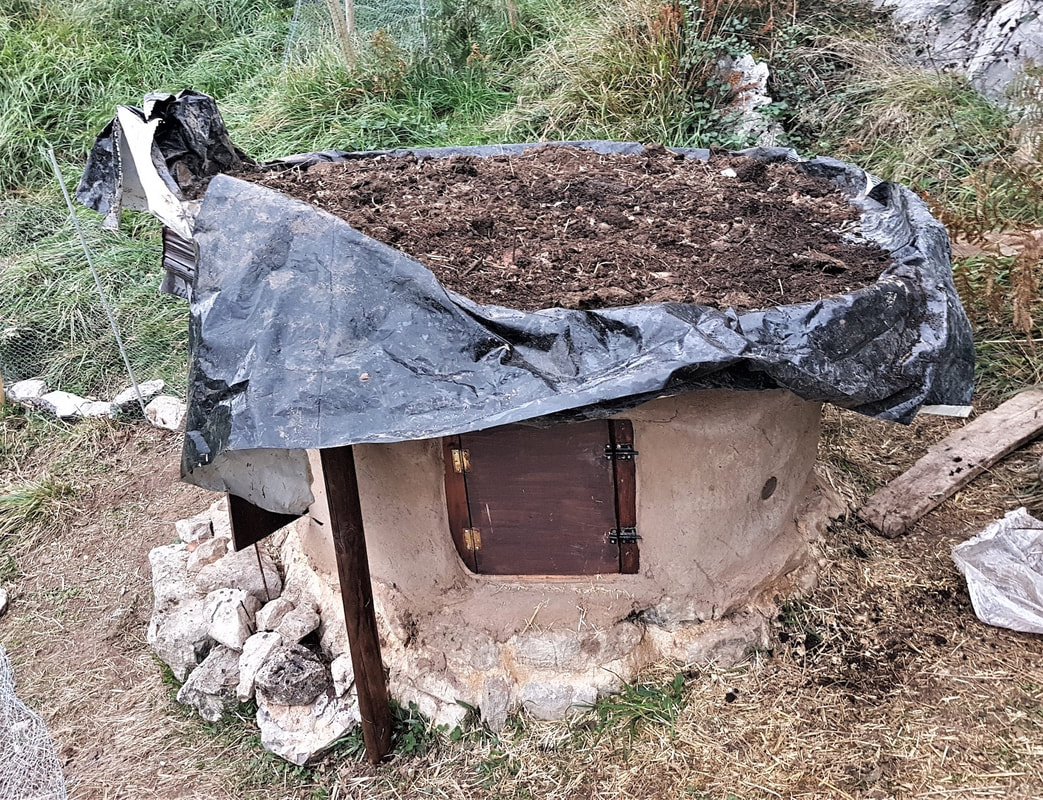 Root barrier. For a living roof you need a root barrier. Bitumen based membranes, Onduline, or roofing felt won’t be enough because roots will soon eat through them. Sadly plastic is the only way here (as far as I know). Normally on a human house you’d want a drainage layer here (see how to make a living roof here). Because this is a tiny hen coop, I didn’t bother with that and stuck the dirt straight in. 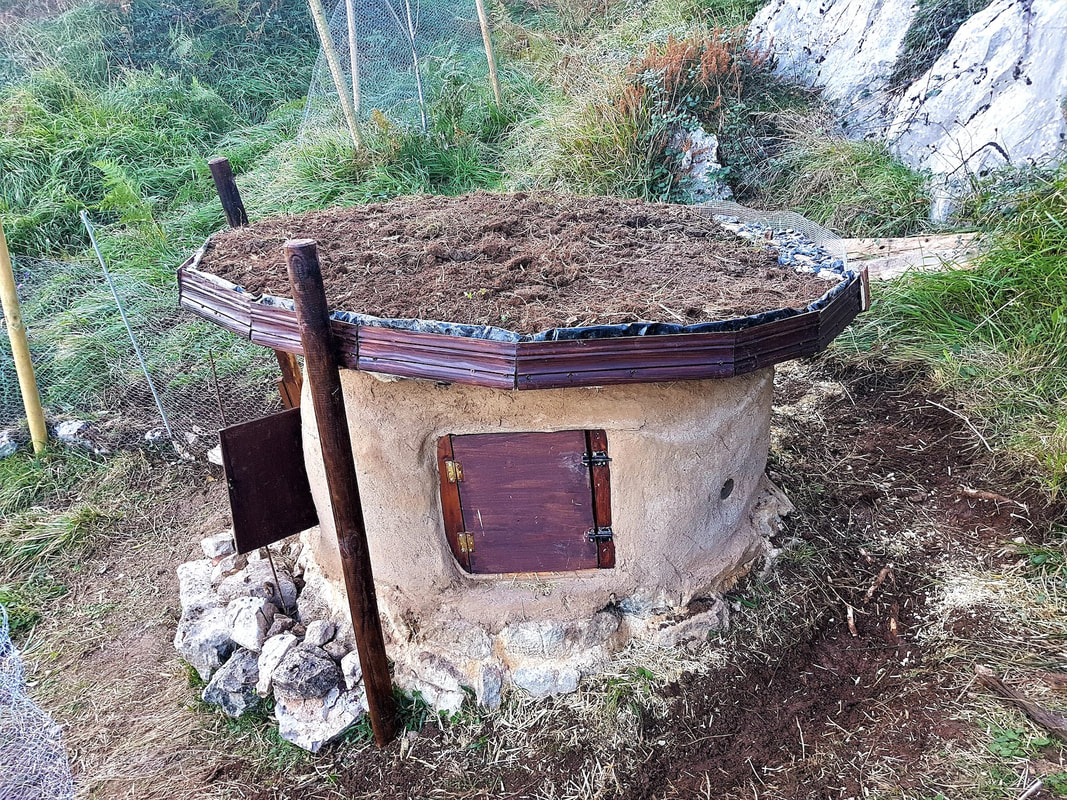 Tidy up the edges, and away you go! In about six months the roof should be green. But in the meantime, the hens are happy and snug.
Do you enjoy The Mud Home? If you find these articles inspiring or useful please consider joining us on Patreon. Your support pays for the running of this website, my virtual help, and my sustenance. A big thank you to all The Mud Sustainers, and everyone chipping in and keeping these posts and articles coming. Step by step how my roof was made Roofing is the trickiest and most important part of a house build. As I’m sure you know, the roof of my old barn is on! It’s covered in beautiful traditional Spanish curved tiles too (collected from anyone I could lay my grubby, pertinacious hands on). But I’m not going to lie; I’m not a fan of tiles. Living roofs will always be my favourite. There are so many advantages to them, and they are a heck of a lot easier to construct. Even so, in many places in the world, the tiled roof is the norm. So here’s exactly how we (ahem, Brian) made mine.  Levelling the walls. 1. Raising the roof and squaring the trapezium I wanted to slightly increase the height and pitch of my roof without impacting the character of my old barn. So first the walls were built up and levelled using clay bricks mortared with limecrete. As every single wall is wonky (the barn is basically a trapezium), this was trickier than it appeared. The roof (which is rectangular) needed to squat on the barn at a slight angle. This is of course a neurotic’s nightmare. So if you like everything minutely straight, all I can say is don’t buy an old building. Me? I like the incongruity, and it’s perfectly in keeping with the nobbled, nothing-is-straight personality of my old Asturian barn. 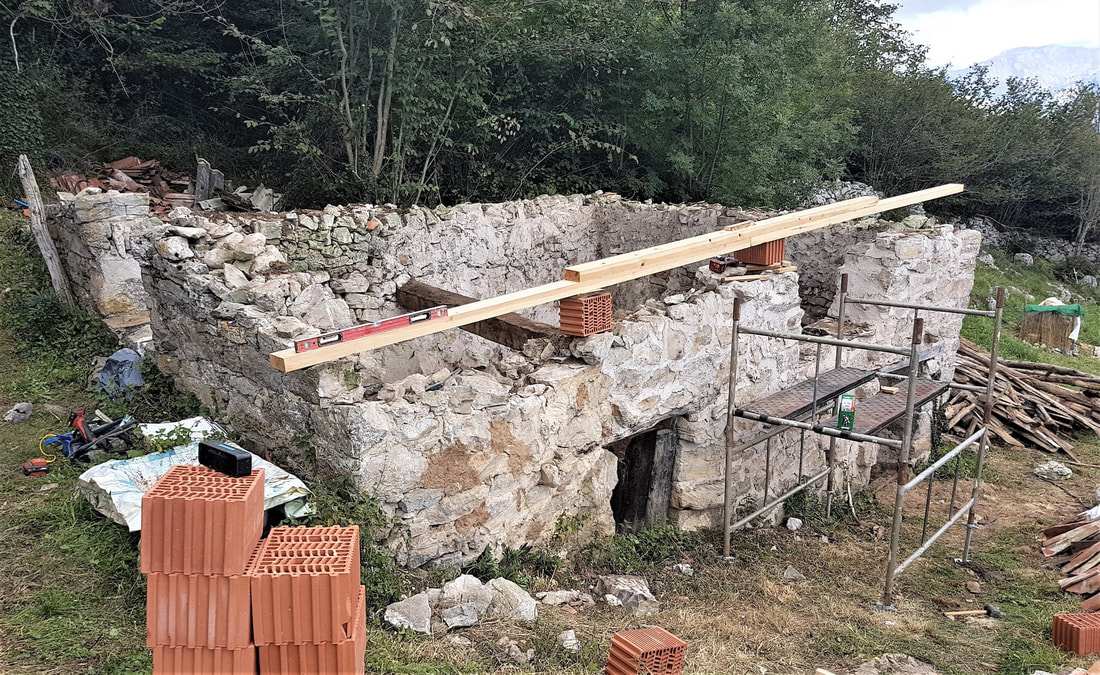 2. Adding the wall plates (15cm x 15cm) Next, two 15cm x 15cm wall plates (horizontal wooden beams that rest on the walls) were mortared onto the bricks with NHL (hydraulic) lime. Why hydraulic? I wouldn’t recommend lime putty here, even with a pozzolan, a) because it takes too long to cure fully and you need that roof structurally sound fast, b) NHL lime is more cementitious than soft lime putty, and in heavy structural jobs like holding a roof on, that’s what you need. Important note: You can't just mortar the wall plates on and hope for the best. They need to be tied down to the wall. I mention this at the bottom of the post, but it's since become clear people don't read that far:)) I'm still tying the thing down, but once it's done, I'll share that bit too. 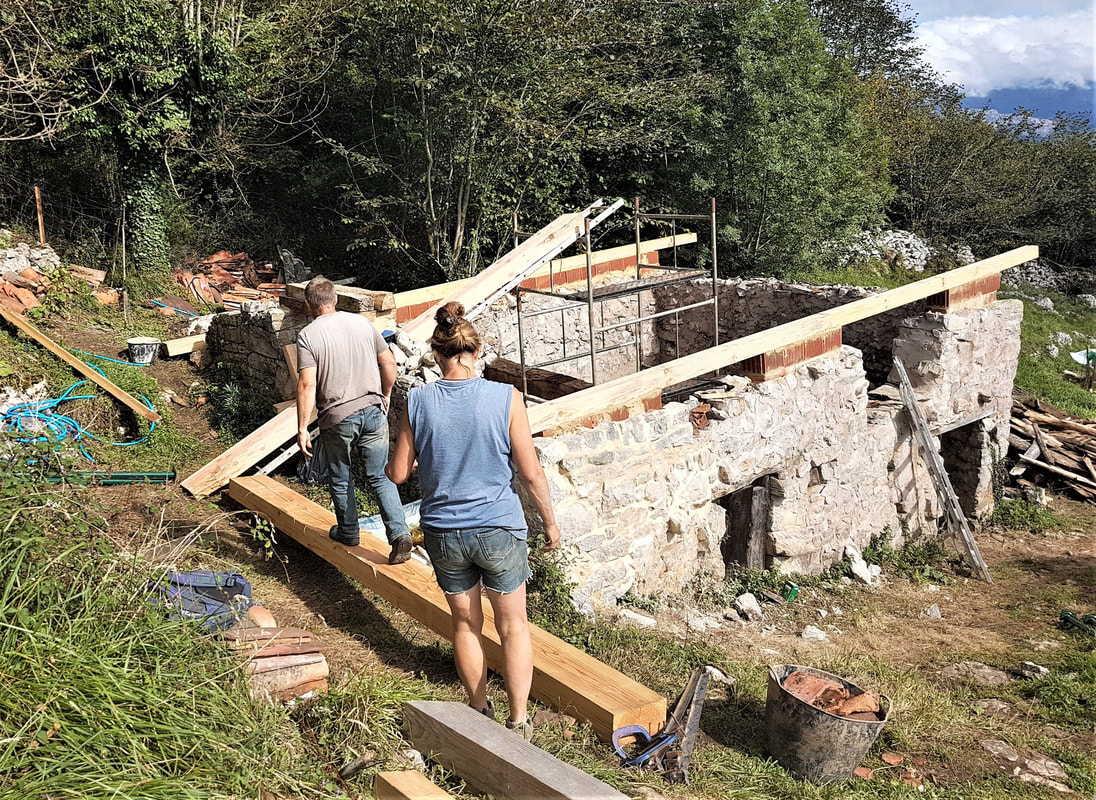 Wall plates (15cm x 15cm). 3. The ridge beam (15cm x 30cm) Once the walls had been levelled and the wall plates were attached, things turned rather exciting on Mud Pico. We needed to lift the massive central ridge beam up and across the middle of the barn. It was a momentous day sloshing with adrenalin, and frankly by noon I thought someone would die (or at the very least suffer a hernia). We couldn’t use a full 8-metre beam because we had no cranes nor machine lifting tools, just human muscle. For those in the rich West, who to my Turkish way of thinking seem to be extremely dependent on machines to do everything, just note: where there’s a will, there’s a way. 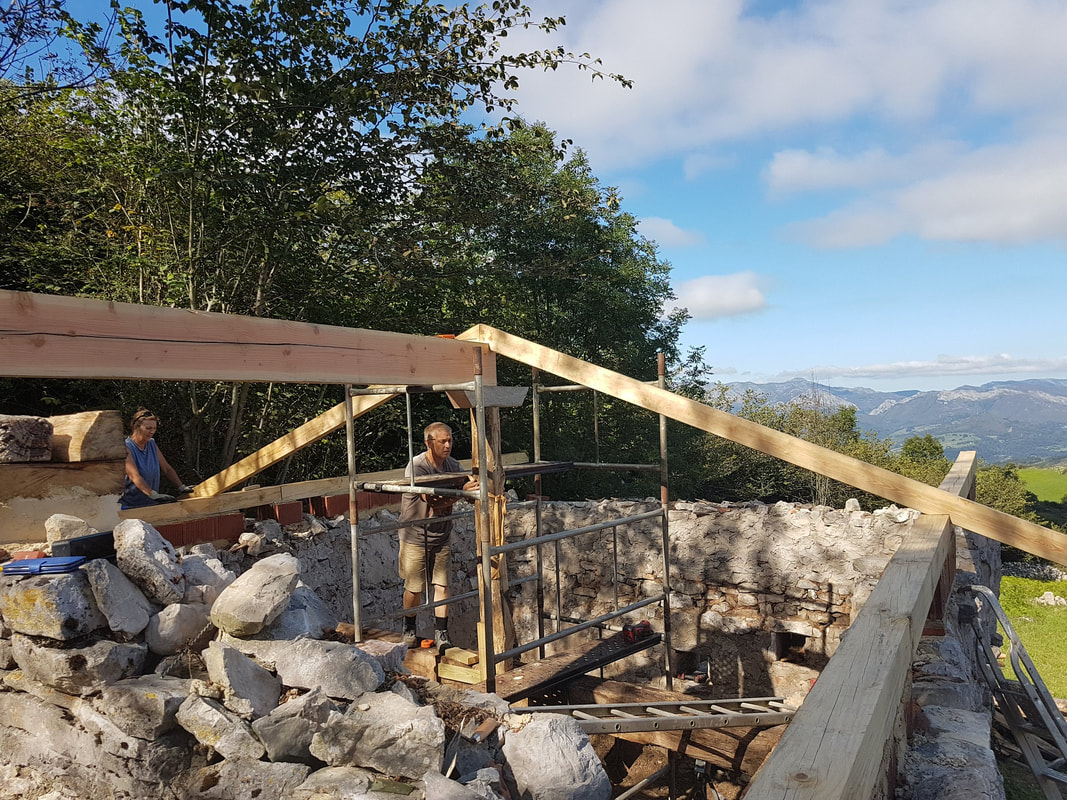 The ridge beam (15cm x 30cm). So in fact there are two 4-metre-long 15 x 30s joined together to create the 8-metre ridge beam. The beam is supported in the middle by a vertical central pillar (two fat pieces of ancient chestnut), which all rests on a horizontal 200-year-old massive chestnut beam that runs through the middle of the barn. Important note: The two ridge beams aren’t just screwed together using brackets! Notice they are bolted top to bottom onto that horizontal angled wooden brace, which then rests on the vertical central chestnut pillars. 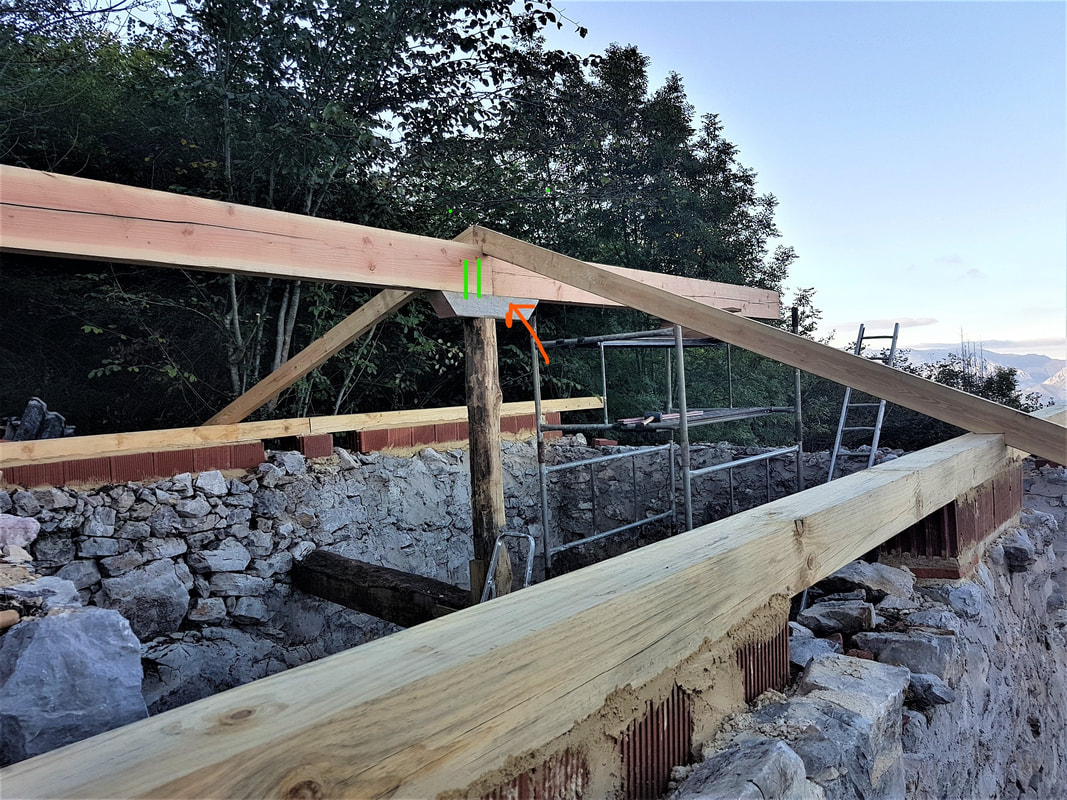 The two joined ridge beams rest on a central pillar. The red arrow points to the brace. The green lines show where bolts are. 4. The rafters (7cm X 15 cm) My roof comprises 32 rafters (16 on each side), and all have been bird-mouthed to fit onto the wall plate and the ridge beam. Each of those bird-mouths was hand-sawed by Brian. For those doing the math, yes that’s 64 bird mouths in 7 x 15 rafters. And yes, that is indeed hard work:) It seemed like the poor guy was sawing for about a week. Brian, however, was stoic in the face of this brutality, merely murmuring between the clouds of sawdust things like, “who needs a gym?” 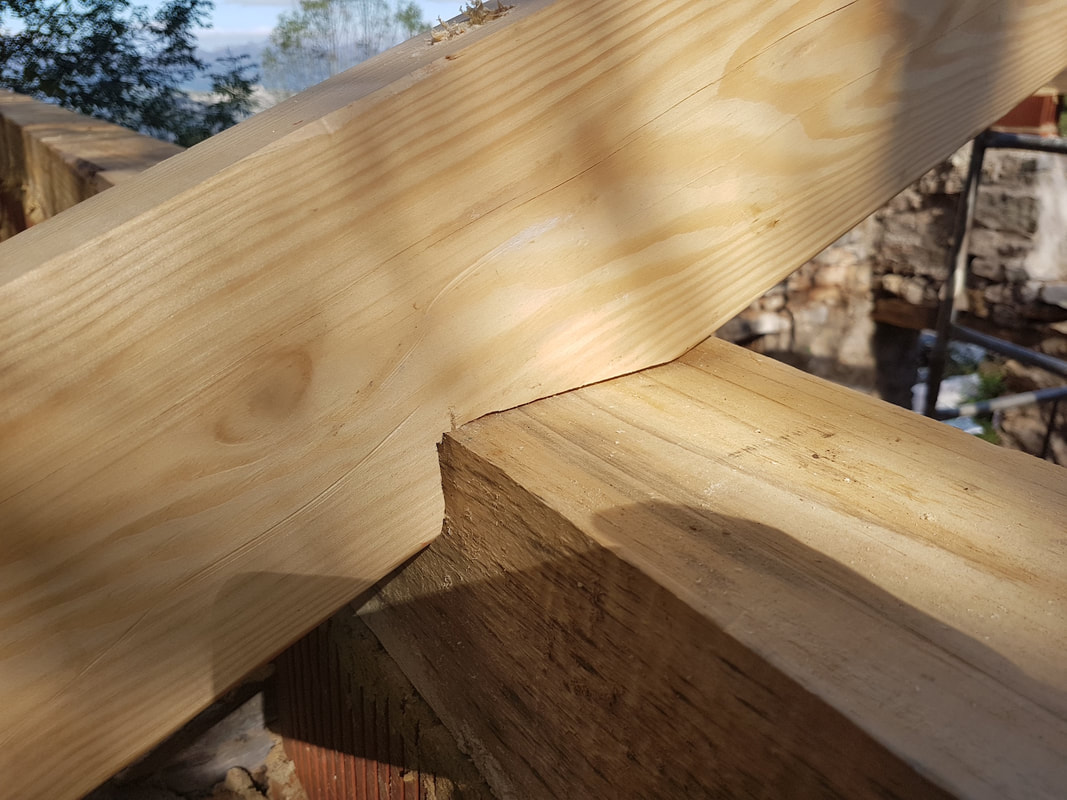 The rafters (7cm x 15cm) bird-mouthed. 5. The spacing My rafters are fairly heavy-duty (7cm x 15cm), so for my tiled roof, a 50cm span between each rafter was ample. 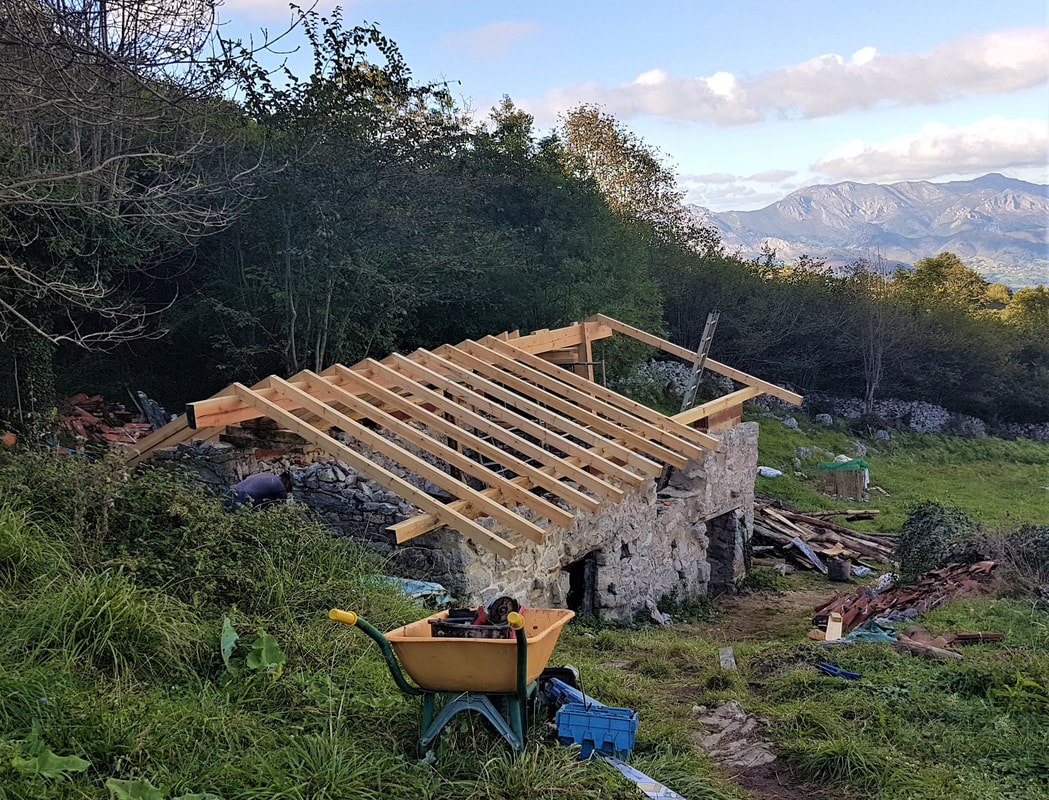 Spacing rafters (50cm span in this case). 6. Roofing Boards Now, if you have plenty of money and time, you would lay some lovely wooden roofing boards at this point, then add your insulation on top of that, then roofing felt, and finally tiles. Me? I was out of money and very very pushed for time. So we screwed a kind of chipboard (sawdust heated with resin and turned into planks) straight down onto the rafters. I will add insulation and some pretty cladding on the inside later when I’ve saved a bit of money. 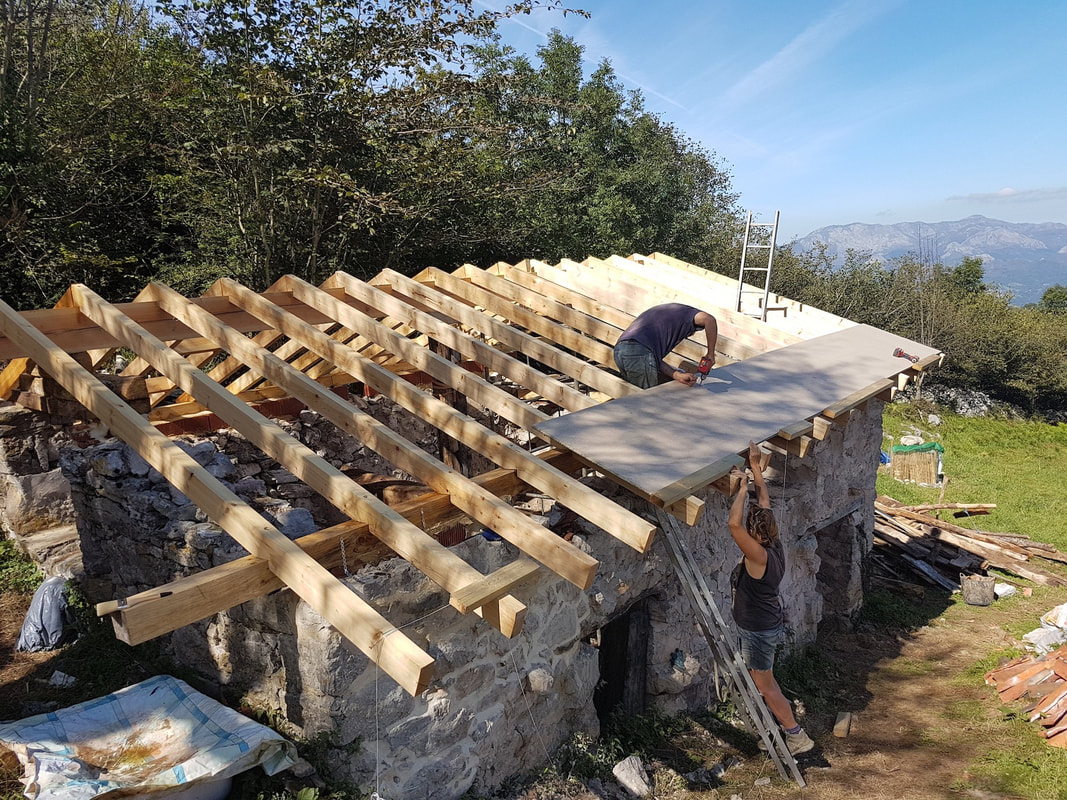 Roofing boards. 7. Waterproofing This for me was the most annoying part of this roof. If you are building a modern house with normal roof tiles, then all you need to do is use a lovely permeable roofing membrane, and you’re away. I’m not building a modern house. Basically I live in a museum, so I am bound by law to use tejas curvas, which sounds like something the inquisition threatened witches with, and in retrospect probably is. Tejas curvas (curvy tiles) are of course much more beautiful than their less exacting modern counterparts. In truth, I would probably have used them anyway out of respect for tradition. Personally I think tacky soulless ugliness is as visually polluting as bitumen membranes. But...lovely as these tiles look, I cannot deny they involve a colossal waste of resources. Tejas curvas cannot be nailed into place. In bygone years, when wood was aplenty, the locals would use chestnut beams separated at a fairly staggering 15cm, and rest the tiles in the gaps. Today of course, this is an unthinkable waste of trees. Also, in those days, every time a tile cracked you had to replace it fast as your roof would start leaking. So for these tiles some kind of waterproof membrane is necessary. Today, especially for tejas curvas, a type of bitumen membrane has been produced, complete with ripples that you rest the tiles in. You might argue that bitumen in and of itself isn’t so bad compared to plastic (I mean at least it breaks down – plants can grow through bitumen in a few years), but I daresay other crap is impregnated in the bitumen to mould it into a harder rippled shape. Is there another way? If you have time and money, you could I suppose lay a nice permeable roofing membrane down (though hey, I’m pretty sure these involve micro-plastics somewhere too), and then create the ridges for the tiles out of wood (which, unless you are recycling, has of course been cut from somewhere). Whether you deem this method more or less ecological is a matter of opinion. 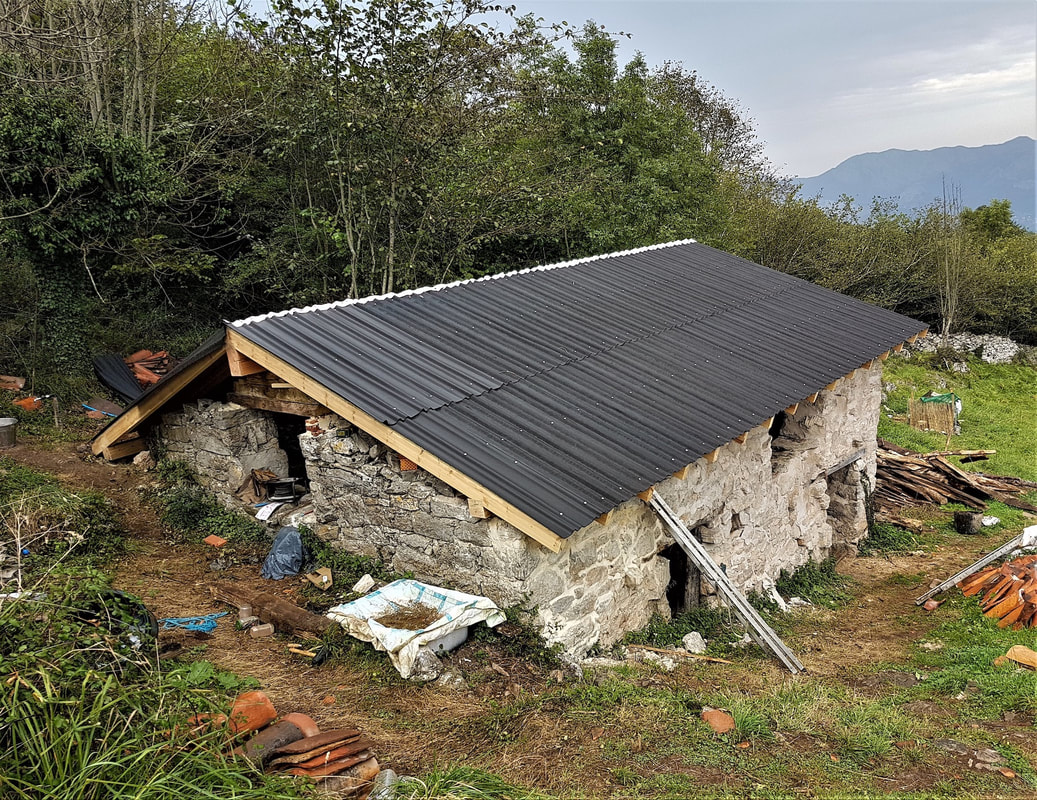 Bitumen ripples. 8. The tiles (tejas curvas) I’m sorry to say the tile drama doesn’t end with the bitumen boards though. Once those are down, you’ve now got the unenviable job of fixing those wretched tejas so that they don’t blow away in the fairly gusty Atlantic winds that charge around up here. Traditionally, folk covered their roofs in rocks. I must say, I quite like the rocks myself.  The roof in the beginning, tied to a tree, with tiles held down by rocks. On my other two small cabañas, I used limecrete to stick the tiles together. This mostly worked, except on one edge, where ultimately I had to add the rocks again because they were ripped off in a gale. The trouble was, limecreting the tiles together was utterly exhausting, material-heavy work, and I hated every minute of it. This was actually the original reason I decided to get someone else to do my barn roof. Limecreting those tiles really broke me (carrying heavy buckets of crete on the roof, plus a water bucket, and trying to fix the tiles without dislodging the ones you’ve just mortared all on a pitch far too high...nah. Not doing it again. So when Brian took up my roofing gauntlet, I simply did not feel I could ask him to do what I wasn’t prepared to do myself. He wanted to use tile glue, and frankly I just let him. It isn’t eco. It isn’t nice to use either, in my opinion. But on the plus side you don’t need much of it. In hindsight, what do I recommend for tiles? If you use all brand-new tejas curvas, then there is a better option. You can fix them with special clips, and use minimal limecrete or glue. I especially wanted to retain the old look of the barn though, so my second hand tiles were far too warped to use clips with. I think a lot about what I would have chosen to do had it been me wrestling with those tiles. Honestly I’m not sure. But maybe, just maybe, I’d simply have slung them down and ballasted them with rocks, like the old days. That would of course mean I’d be up there again in a couple of years repairing and replacing, but the tiles would at least be easier to lay in the first place. Hmph. Tejas curvas, it’s a tough one. If anyone has come up with anything easier and more sustainable, let me know.  We foraged second-hand tiles from all and sundry to put on my roof. Still to do: I’m very grateful to Brian for the incredible effort he put in to making me a solid and beautiful roof. I also learned a stack of things from him in the process. Brian and Julia’s shift is over now though, so the rest is up to me:) One crucial structural job that people all-too-often forget in the heat of the roofing adventure, is tying the thing down. I know more than one person who has seen their roof fly, or lift alarmingly. It might seem impossible with the weight of it, but if a heavy gust can get under an eave, it can start to lever it off the wall. In my earthbag house in Turkey, we tied the roof down with ropes cinched through the earthbags. Stone houses are different though. Roof and wall ties I have a number of techniques I’m using to tie my roof down, and will write a separate post on it next month once it's done and I have photos to illustrate it.  And it's done! Do you enjoy The Mud Home? If you find these articles inspiring or useful please consider joining us on Patreon. Your support pays for the running of this website, my virtual help, and my sustenance. A big thank you to all The Mud Sustainers, and everyone chipping in and keeping these posts and articles coming. Don't forget all The Mud Home how-to building articles are available in PDF format.  If you want The Mud Home to take away with you, I've compiled all the Mud Building how-to articles (well over 70 now) into three PDFs: Natural Building, Earthbag, and Off-Grid Living. These PDFs are updated every 6 months, and once you purchased them, you have lifetime access to the updates for free.
The top ten natural insulation materials, and how to use them. If you live in a cooler climate (or indeed a hot one and need to keep the burning summer sun out), no matter which kind of house you build, insulation will be on your mind. Without a shadow of a doubt the most important areas to insulate are the roof (60% of your heat disappears out here), and the floor (at least another 10% of your home’s warmth is sucked into the ground). But there are quite a few natural materials to choose from, and all are suited to different jobs. Some are naturally easier to use for roofing, while others work better under the floor. Here’s a quick guide showing the pros and cons, approximate R Value, and usage of each type: R Value? Oh no, what’s that? Insulation levels are measured in R values. Here’s a neat little infographic for US climate zones showing the kind of R values you would need for your roof, floor and walls for a conventional house in various climates. All building materials have an R value per inch. Bear in mind though, some insulating materials work in different ways (for example, if you compress certain materials like wool, then you reduce their capacity to insulate). Cotton bats (sometimes mixed with wool) (R 3.7 per inch) Pros: Easy to move about, easy to source, snug, clean and warm. Pleasant to touch. Not usually expensive. Cons: Mouse heaven. These perform better in the damp than wood insulation, but worse than say cork. Can be squashed (and lose some of its insulation power) How to use it: For roofing pin it somewhere between your roofing boards and your waterproofing. For flooring create a wooden framework under your floorboards and insert it in the gaps between the floor joists. Consider a vapour barrier beneath the bats and the substrate (if going straight on the ground). 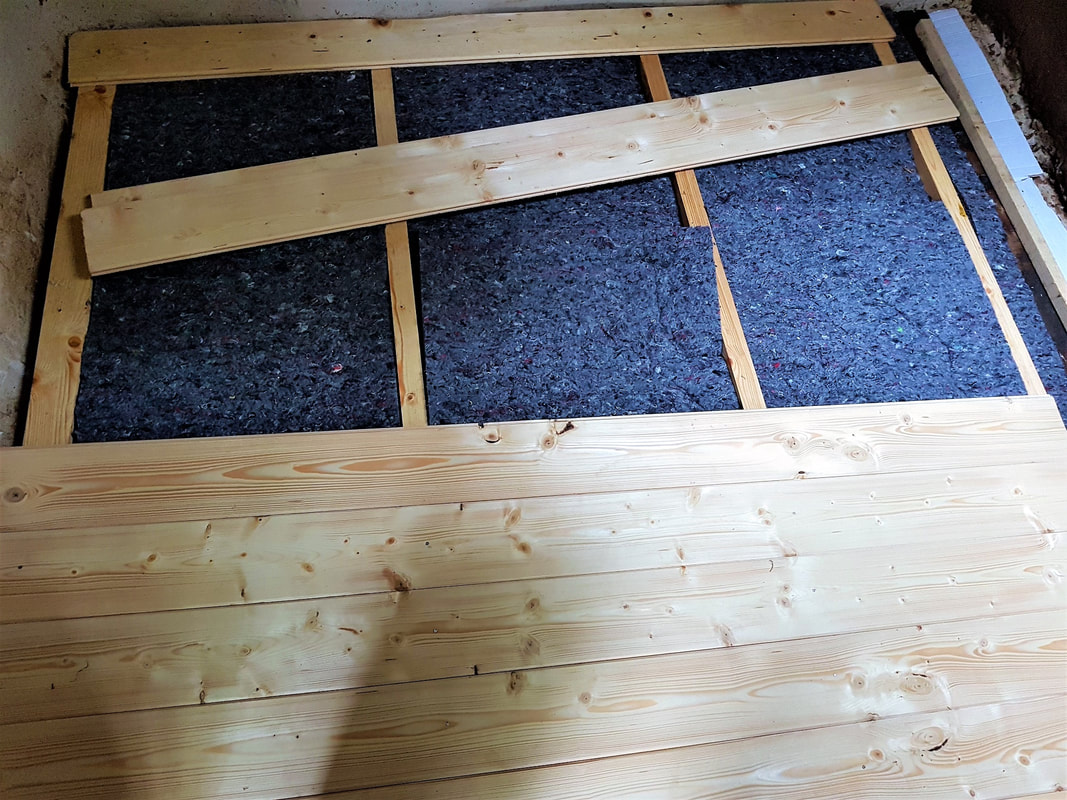 Cotton and wool mixed insulation panels under my floor. Just for reference, I didn’t use a vapour barrier but laid cardboard beneath the panels, straight on the flagstones. This all worked well (and I’m in a very damp climate). 2. Wood insulation (R2.5) Pros: Can be bought in easy-to-use panels or boards. Cons: Can be difficult to source if you are in the sticks. Not the cheapest material either. And of course mice love it, because it's fibrous and soft (not solid wood). You can buy denser panels, but I'm guessing mice would still get into them. Wood insulation is also quite sensitive to damp. And of course a bit hopeless in a fire. How to use it: If you want to keep the mice out of it, I recommend laying a metal mesh underneath it and over it. Lay the mesh first, slap the wood boards down, then wrap the mesh over the top and around. For roofing, wood insulation works best somewhere between your roof boards and your waterproofing. For flooring I’d only use it if I was sure there wasn’t damp anywhere in the equation. 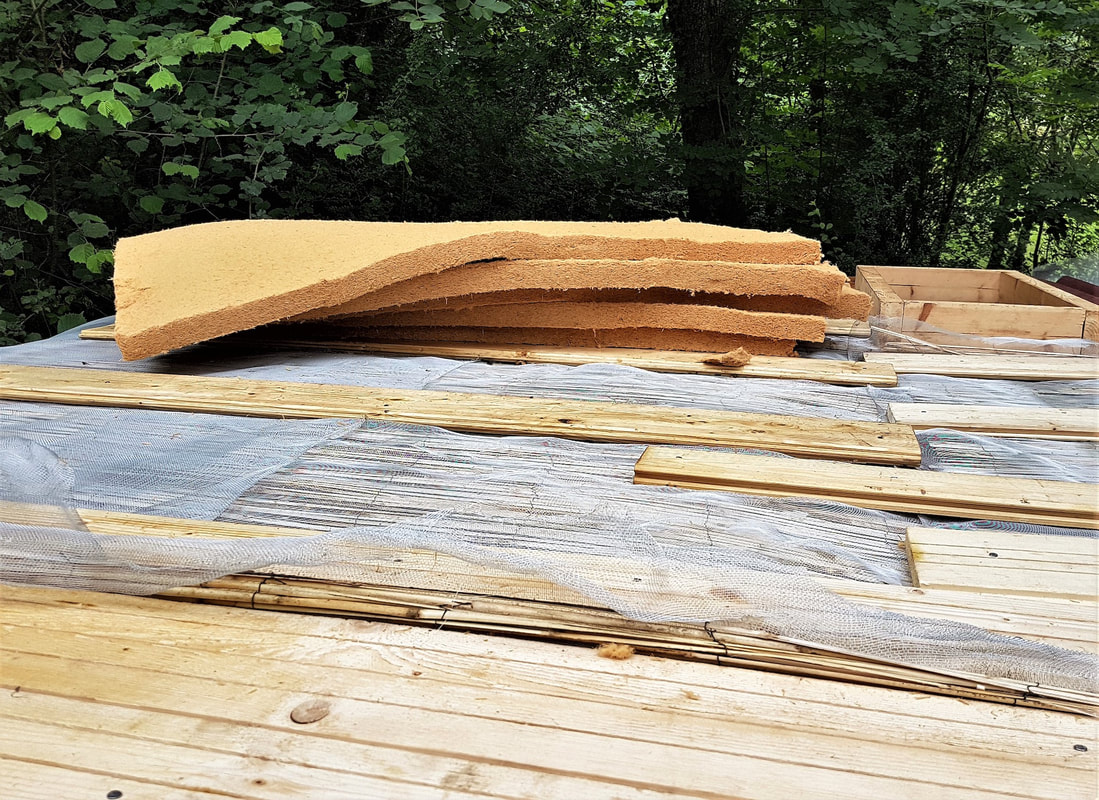 Wood insulation going on my roof. 3. Cork boards (R 3.5) Pros: Fireproof. Mice aren’t especially into it. Easy to install. If you get the sanded version it looks so good you may not wish to cover it. Cons: Ants are into it, sorry to say. More expensive than some other options, and not available everywhere. How to use it: Cork is super easy to use as it comes in sturdy-ish boards. For roofing it’s perfect. Tack it somewhere between your roofing boards and your waterproofing. For flooring you need a flat surface to lay it on. You could create a wooden framework under your floorboards and insert it in the gaps between the floor joists. 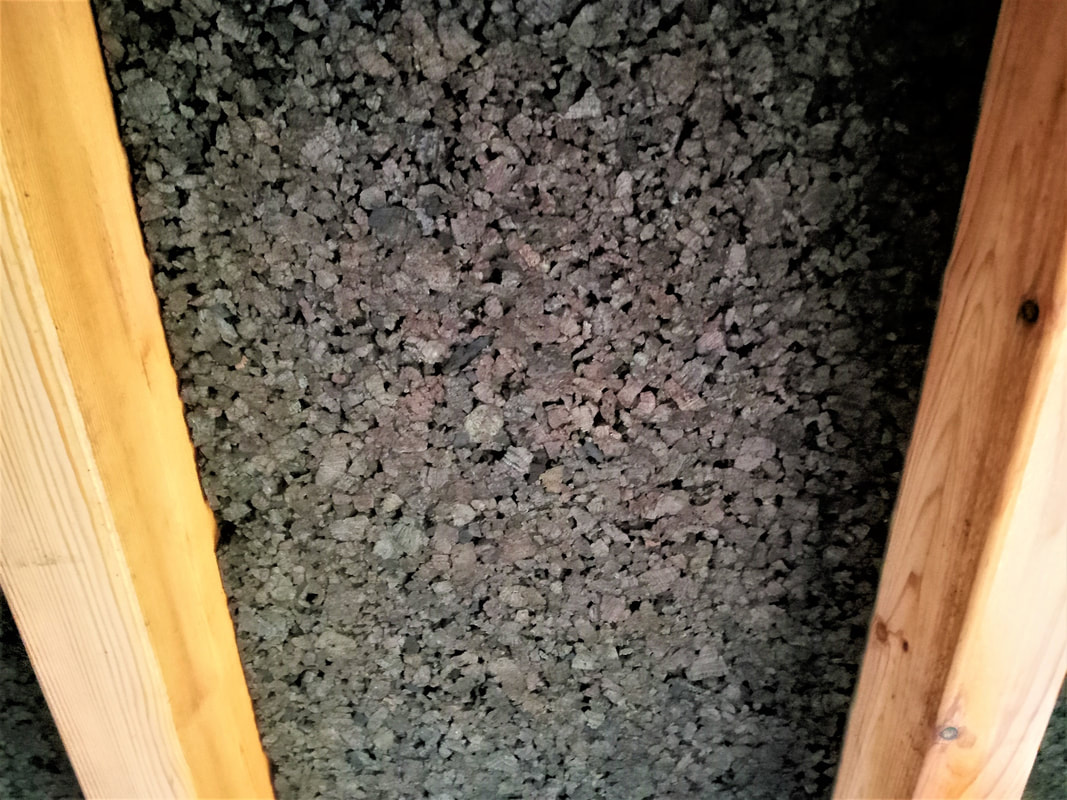 Cork is a superb, natural, fire-resistant insulating material. 4. Perlite (R 2.7) Pros: This is a volcanic glass super for flooring. It copes well with damp, is sturdy, not prone to rotting, fireproof, and mouse-proof. Cons: Can be hard to source. How to use it: I don’t see how you can use this for roofing (perhaps by pinning up sacks of it, but it’s not particularly well-suited). Perlite really shines for flooring, though. You can lay a fat layer of these small rocks on top of some geotextile membrane, and stick your floor of choice onto it. If using under an earthen or limecrete floor, you’ll want another layer of geotextile membrane on the top of it to prevent your liquid flooring from sinking into the rocks before it dries. 5. Foamglas (R 3.4) Pros: Foamglas is a bit like perlite, though inorganic, which is to say not natural. However it is probably more sustainable than its natural volcanic sister. It boasts the same advantages too. It copes well with damp, is sturdy, not prone to rotting, fireproof, and mouse-proof. It’s more readily available than perlite too, and although it’s inorganic it is breathable, which is important. Cons: Not natural, but probably more sustainable in the long term than perlite. A bit pricey, but getting cheaper as it becomes more popular. How to use it: You can buy foamglas in panels or as small coal-sized rocks. The panels are best for roofs, the rocks for floors. You can lay a fat layer of these small grey rocks on top of some geotextile membrane, and stick your floor of choice onto it. If using under an earthen or limecrete floor, you want another layer of geotextile membrane on the top of it to prevent your liquid flooring from sinking into the rocks before it dries. 6. Pumice (R value not found) Pros: Pumice has the same advantages as perlite and foamed glass. It copes well with damp, is sturdy, not prone to rotting, fireproof, and mouse-proof. It’s also very light, which makes transportation and wheelbarrowing a lot easier, which counts for a lot when you’re out in the sticks. Cons: Can be hard to source. How to use it: Best for floors. As with foamglas, you can lay a fat layer of these small rocks on top of some geotextile membrane, and stick your floor of choice onto it. If using under an earthen or limecrete floor, you’ll want another layer of geotextile membrane on the top of it to prevent your liquid flooring from sinking into the rocks before it dries. 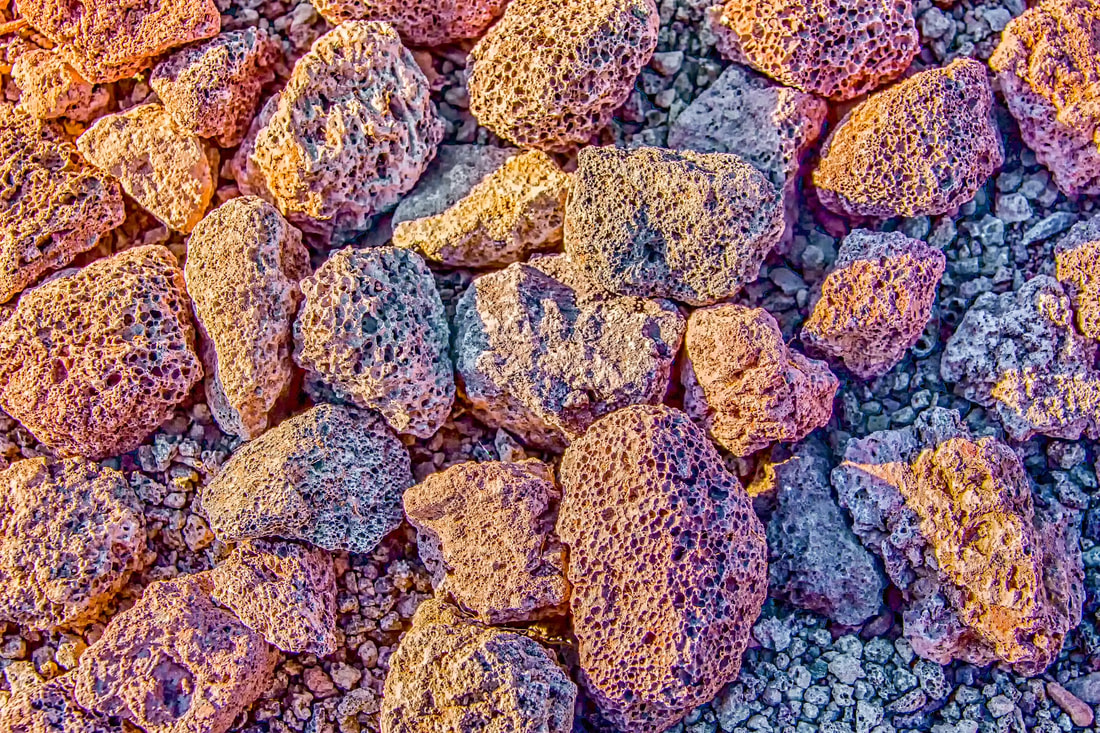 Pumice. 7. Sheep’s Wool (R 3.5-3.8) Pros: Snug, doesn’t need much processing, and if you have sheep in your area then it’s an obvious, sustainable, and natural choice. Cons: Wool has a bad reputation for attracting moths. Some say if you leave the tannin in the wool, this deters them, others disagree. And the tannin smells, so… I must admit I suspect the moth thing depends on other factors, because I have sacks and sacks of wool in my old barn (it’s been there at least twenty years) and no moths. The wool hasn’t been washed though, so the tannin theory may be correct. How to use it: For roofing I’ve heard of folk filling bags or hessian sacks with it, and pinning it to the roof, or creating a wooden frame and stuffing it full of the wool. For flooring it’s easier. You can simply stuff it under floorboards, but make sure you seal it in well. Leave no holes for mice or moths. 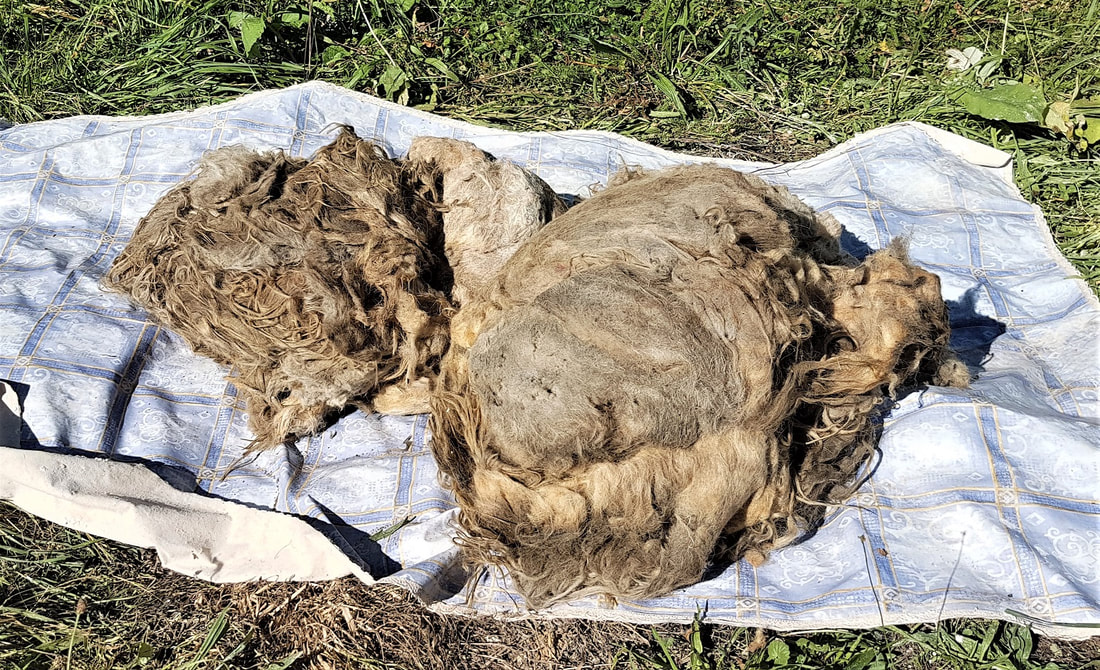 Unwashed sheep’s wool. The tannin appears to deter moths. 8. Straw (R1.45) Pros: Cheap as chips, easy to source (in many places). Cons: Mouse heaven. Not as insulating as many of the other options, which means you might need half a metre of it to keep warm. How to use it: I’m not sure about using straw in the roof. I suppose you could create a framework between your roof boards and your waterproofing, and ram it in there. But it would be difficult to seal it from mice, and you’d need a heck of a lot to really insulate well. For flooring you could potentially lay a vapour barrier, then stuff it under your floor joists, then add your floorboards. Laying a wire mesh all around would help deter mice. But yes, mice love straw. In my opinion, straw works best for walls. Slip-straw (a method of mixing a lot of straw into a clay slip, and then wedging it into a framework) is a good way of using straw for wall insulation. 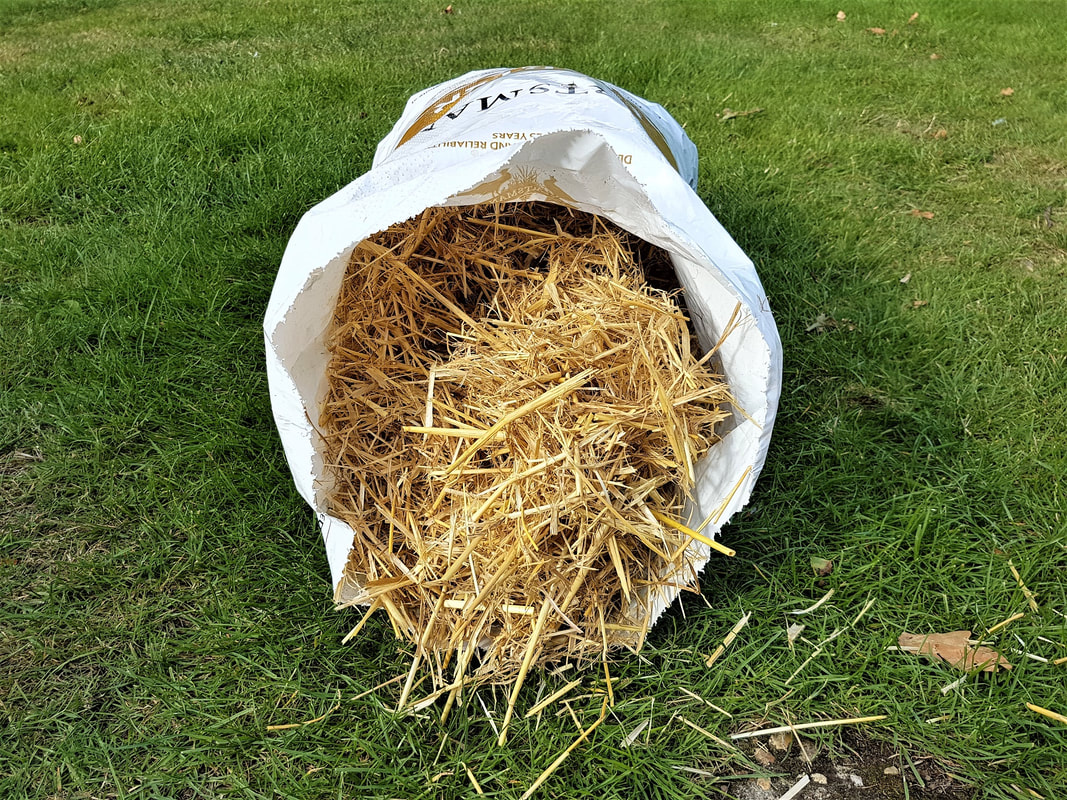 Straw is easy to source, and cheap. 9. Papercrete with lime (R 2.6-3.2) Papercrete is the method of mixing paper with lime to create a nicely insulating crete with a surprisingly high R value. Pros: Very inexpensive, easy to make, pest-proof. Cons: Messy to apply. Not for roofing. How to use it: For flooring you could create a massive slab of it, and then add the floor of your choice over it. Works best as an insulating render though. 10. Hemp (R 3.5) This is the trendy new kid on the natural building block. You can buy hemp loose, in flexible rolls like wool, or in boards. The boards are great for ceilings. Hempcrete (or hemplime) (R 2.4) Like papercrete, this is lime and hemp mixed. In some places you buy it already formed into blocks, which makes it easier to use. Pros: Inexpensive, fireproof, mouse-proof and generally pest-proof. Cons: Hemp can be difficult to source depending on where you live. Messy to use and apply. There have been issues in cool, damp climates of hempcretes not curing adequately. This is usually due to using a very soft lime putty. If you are in a cooler, wetter climate, consider a more hydraulic lime for this. How to use it: Hemplime is better suited to floors and walls. For flooring, you can lay a fat slab of it on some geotextile membrane, and then add tiles, wood, or earth over the top.  Hemplime used in a Tudor house (see The Natural House at https://www.thenaturalhouse.net/hemp-lime-construct). Extra: Cardboard (R 3-4) The humble cardboard is a very useful material with a high R value. If you’re strapped for cash and need something to keep the cold out fast, you could do worse than use corrugated cardboard. I actually stuck this under my floor beneath some cotton bats. Pros: Cheap, nay free if you head to the recycling bin. Easy to source, and easy to use. Cons: No good in the damp, and rots very fast. You need a lot of layers to get a decent insulation value for a very cold climate. Not very durable. How to use it: As it comes in boards, it’s really easy to use and can be tacked into place on a roof, for example. I’d see it as a short-term option, and I’d stick a vapour barrier under it if it’s going near a floor. Earth, concrete, and insulation People babble on about earth houses being bad in cold climates, but heck, earth is way way way warmer than Portland cement. I’ve experienced it firsthand, and the numbers agree. Concrete has an appalling R value (R 0.08). compared to earth (somewhere between R 0.15 and 0.2). This makes earth at least twice as warm as concrete. If you’ve got straw in that earth mix (which you probably will have) it’s automatically more insulating too. So, if you’re wavering about earthen houses, but have lived in concrete the rest of your life, you’re going to be pleasantly surprised. That said, for those in the seriously cold zones (below freezing for months at a time), earth houses will need insulating. More on earth and cold climates here. Insulation Summary 1. The roof is your priority. 2. The floor is your second priority. 3. Find any little draught hole and close it. 4. If you have a house with thermal mass (earth or stone) it is generally recommended to add insulation to the outside of the house walls. 5. But if you can’t do that for any reason, it’s still worth insulating the inside. Best for roofs Cork panels Cotton/wool bats Wood insulation boards Foamglas panels Hemp boards Best for floors Foamglas Perlite Pumice Hemplime Best for walls Papercrete (lime-based) Hemplime Insulating earthen plaster (read more about that here)  Everyone loves to be snug in insulation, including mice. How to keep mice out
Mice are insulation-loving, upholstery-chewing, corner-pooping little scoundrels. The only real way to deter them from your insulation is to seal it. Thoroughly. They will chew through almost anything other than solid wood beams, stone, and wire mesh. Find every hole, crevice and gap and fill it with lime mortar or earth plaster (though they may even chew through the latter too, eventually). Do you enjoy The Mud Home? If you find these articles inspiring or useful please consider joining us on Patreon. Your support pays for the running of this website, my virtual help, and my sustenance. A big thank you to all The Mud Sustainers, and everyone chipping in and keeping these posts and articles coming. You may remember the inspiring story of Dianne and Bismil, who drove from Turkey to Spain with their seven rescue dogs and took on that ‘monster’ farmhouse renovation project. Well here’s the next episode in that rather lovely story, and we move from the kitchen to the bathroom. One of the things Dianne, who is designing and managing this project, really gets right is completing one job before moving onto the next (I wish I could say the same for myself, ahem). Both of us toiled in a bathroomless state for most of the winter, and while I still shower in cold water, Dianne’s is looking pretty flipping stunning. 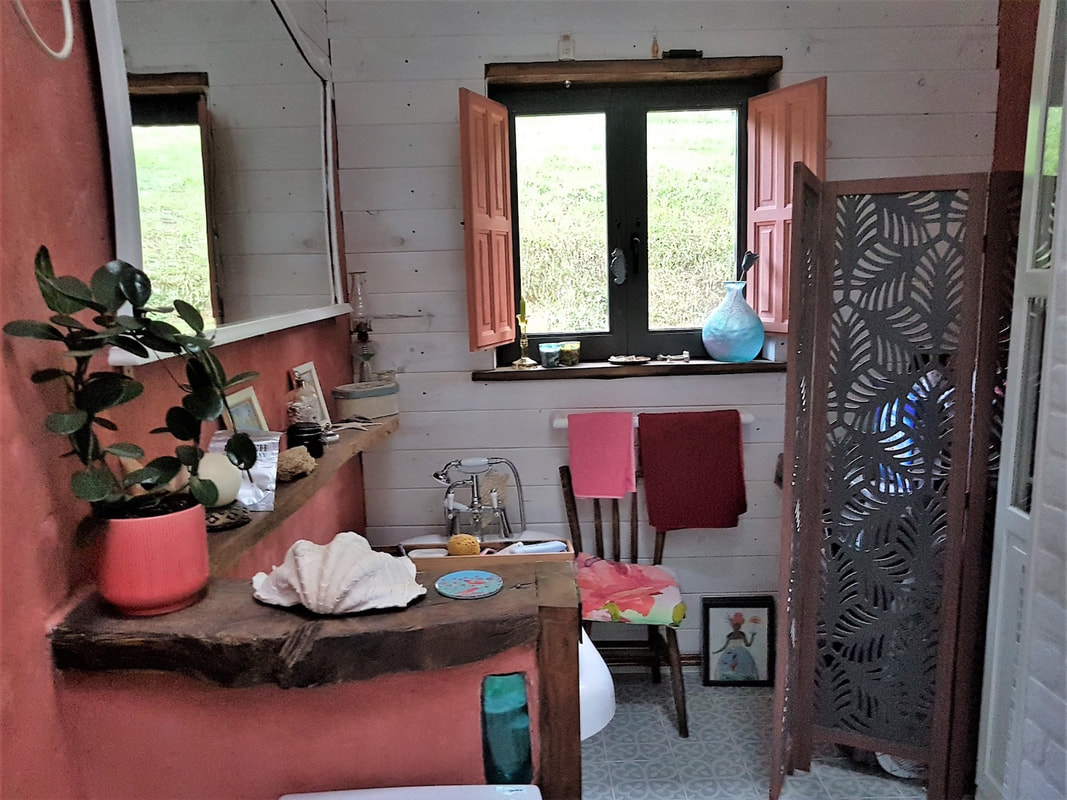 A gorgeous natural bathroom. Don’t ask me why, but I have a thing for bathrooms. Nothing makes me happier than a sumptuous washroom. But if you have a glimpse at how this one started out, you’ll see just how much Dianne and Bis worked to get it looking perfecto. 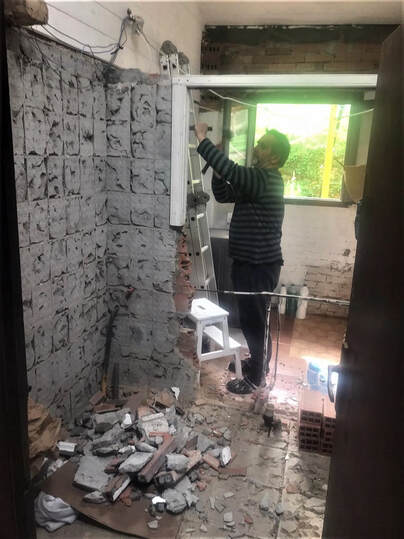 As with so many great creations, it started as a mess. In fact the bathroom is two rooms knocked into one. The old utility room at the back of the house was hiding a lovely window onto the garden, which was a real waste of a nice view. Dianne envisaged sitting in the bath and looking out onto that space instead. Great idea if you ask me! 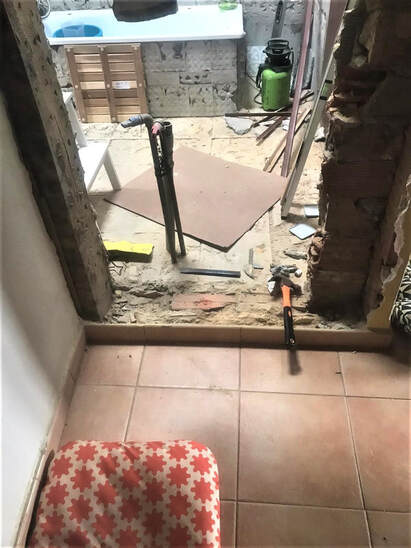 Before there was a utility room, and a tiny bathroom. Next Bismil and Dianne ripped off the old concrete renders and levelled the floor between the two rooms. It was a massive, dirty, difficult job. Lime Renders Throughout Dianne is very committed to using natural materials and recycling. She used an NHL (hydraulic lime) to create the base render and then used a lime putty to make a beautiful finish render. Finally the walls were painted in this gorgeous brick red milk paint, which has given the whole space an uplifting vibrancy. So beautiful really. 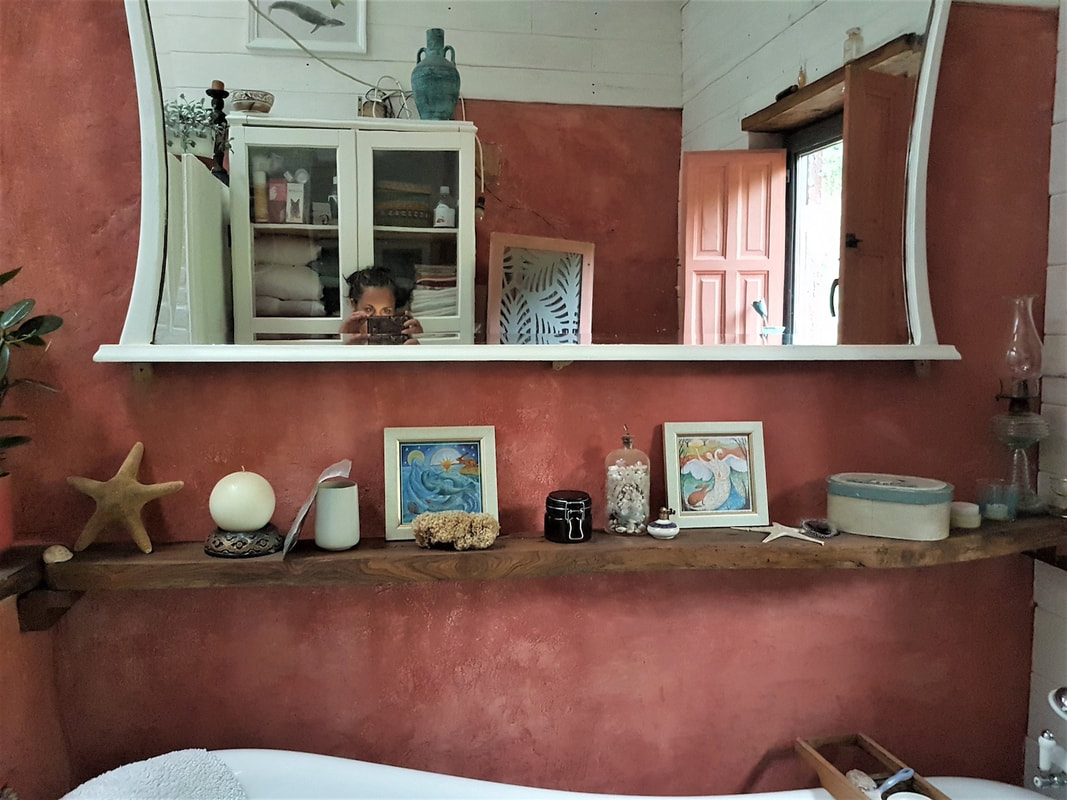 This is lime render with milk paint. Why Lime and not Portland Cement? If you’ve been hanging around The Mud Home a while, you’ll know this. But there are so many misconceptions about lime, I feel compelled to point it out one more time. Lime creates a more porous finish, which means it absorbs the damp and then releases it (the water is allowed to evaporate). This creates a breathable skin for your wall, which is more durable than mud, and copes far far better with the damp than mud or Portland. If you don’t want a mouldy bathroom that clings on to the damp, use lime! It’s a very viable option for bathroom walls. Hydraulic Lime or Lime Putty? There are so many different limes out there, and it confuses people immensely. I’ve written a more detailed post here on the different kinds of lime. I go into more depth still in my Amazing World of Lime Course. But basically, the softest, most environmentally-friendly lime is the putty. It cures slowly, and remains quite malleable for a long while. Hydraulic lime is, in my opinion, a kind of halfway house between lime and Portland cement. Hydraulic lime cures much faster and harder than the putty. Both however, use far far less carbon to produce than Portland (about 25% of the carbon on average).  Those wooden shelves were all upcycled. Recycling and Upcycling This is one of the most admirable things about this project, and I find it so inspiring. Pretty much every single thing you see in this bathroom except for the bath, sink, and toilet, have been upcycled from rubbish dumps, second-hand stores, or from the house itself. Those gorgeous shelves and sills? They’re all old pieces of wood Dianne and Bismil found lying around the house, or taken from the roof, then lovingly planed, sanded, and oiled with linseed oil. 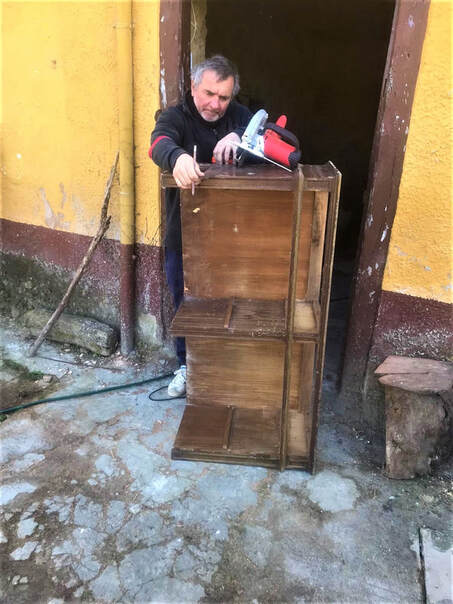 Bismil attacking an old cupboard... 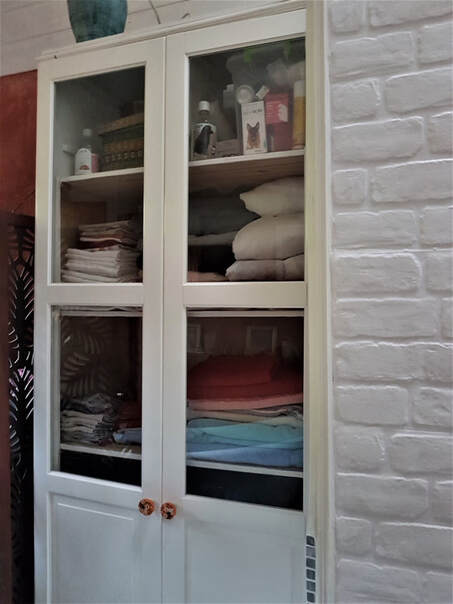 ...and turning it into this. This bathroom cabinet was created entirely from bits and pieces. Bismil took some old shelving lying around and joined them onto another old cabinet, then added the doors from a second-hand store. After that, the whole lot was painted with chalk paint. Who would ever know? Amazing. The mirror and most of the knick-knacks were from a second-hand store too. The window shutters were painted with milk paint. Just by giving stuff a lick of paint or oil, you can create a stunning effect. The Turkish resourcefulness factor, and Western poverty I’ll be honest, this kind of resourceful reusing of old stuff is fairly typical in rural Turkey. Rubbish was always a bit scarce there, because every bit of wood, string, tin, or plastic was reused for something. I always remember my neighbour Dudu washing plastic bags and hanging them on the line. So when I first saw the rate people were throwing stuff away in the UK, and how they think they have to buy everything, I was pretty shocked to be honest. When you can no longer create anything original, or even see the abundance all around you because you’ve been fed a bunch of manufactured crap for your entire life, it isn’t a privilege, it’s poverty. 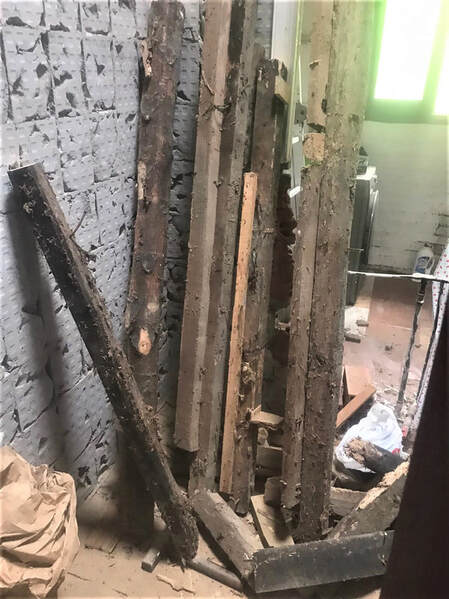 This is not rubbish. This is hugely expensive, right? People assume, quite wrongly, that these kind of house transformations necessarily require massive budgets. They can do if you hire tradespeople to do everything, and aren’t smart about who you hire or which materials you use. But in truth it’s entirely dependent on how much effort you’re willing to put in, how much you can do yourself, how creative you are, how many natural materials you use, and how much you recycle. Dianne and Bismil are on a very tight budget here, but they’re being super resourceful with their funds. 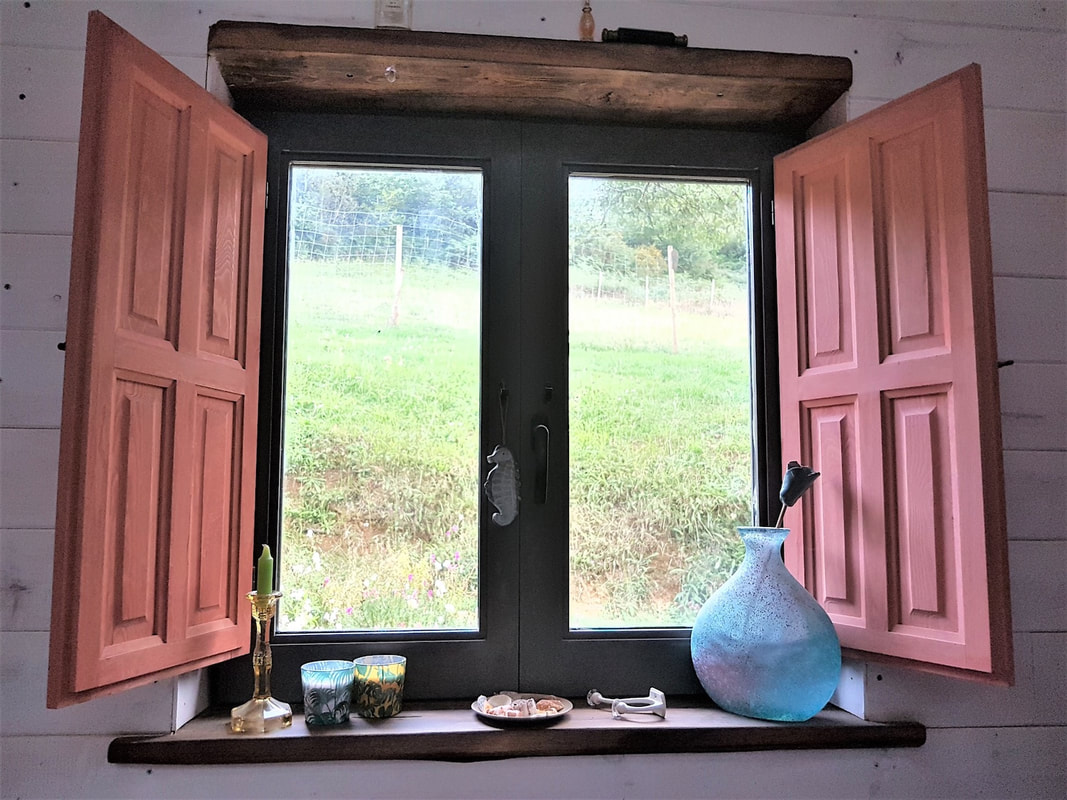 Looking out. What would Dianne do differently next time? We are so lucky when people share their stories, because we get to learn from them. Dianne is a bit of pro when it comes to house projects, and has such a clear vision about where she’s going with it all. But I know the bathroom was a bit of headache. So…what would she do differently next time? “I would have put the skylight lower down in the pitch of the roof. I know enough about the angle of the light now. Having said that, I am in love with the skylight even so,” Dianne says. “And the sink was a bit of disaster. I’m not happy with it. I planned to reuse a beautiful old corner sink, but my measurements went a bit awry and I couldn’t find a suitable replacement. But...I have a plan.” He he… and I can’t wait to see how that plan unfolds. 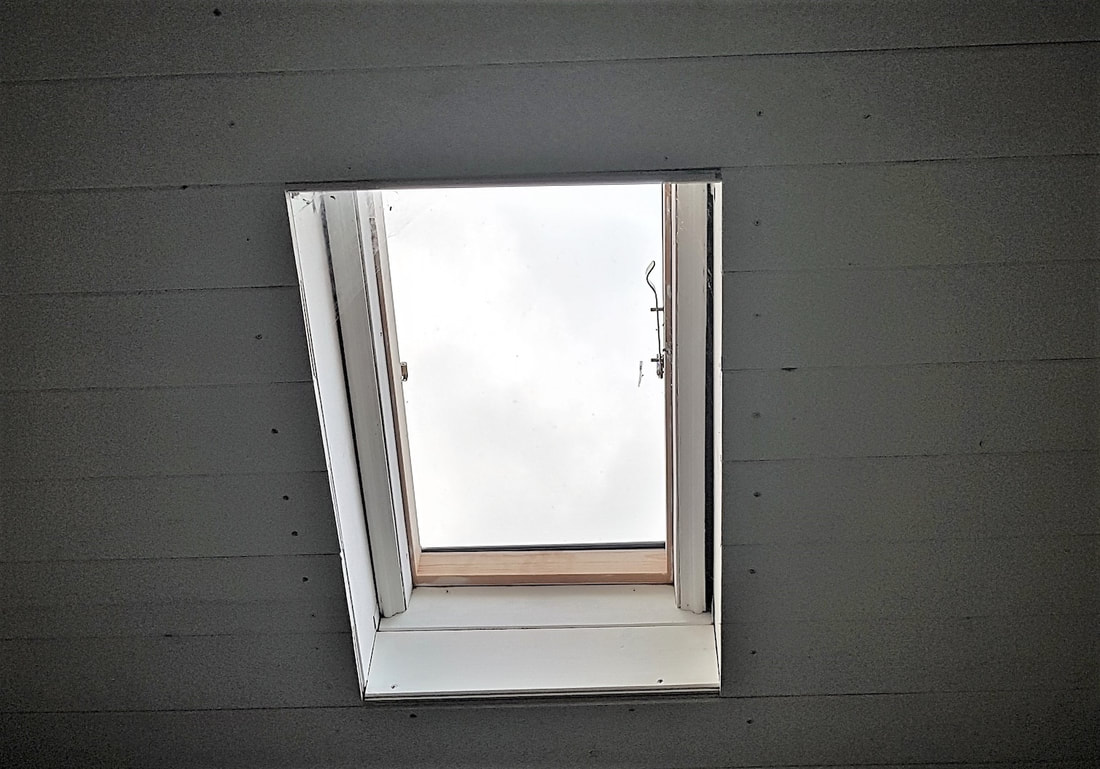 The skylight. What else have they renovated? In addition to the bathroom, the previously dilapidated roof has now been overhauled with skylights, insulation, fasciae, and guttering. It was quite a project in and of itself, but is now looking just great! I can't wait to see the next room transformation (not to mention cuddling the dogs of course:) Do you enjoy The Mud Home? If you find these articles inspiring or useful please consider joining us on Patreon. Your support pays for the running of this website, my virtual help, and my sustenance. A big thank you to all The Mud Sustainers, and everyone chipping in and keeping these posts and articles coming.  Many folk are (quite rightly) trying their hand at gardening at the moment, and many are also finding out it’s not quite as straightforward as they thought. I’ve also had to learn that growing food is an art. We often focus far too much on water, and far too little on soil. Here’s the latest how-to from the regenerative gardening expert Kristen Krash, who co-runs the Sueño de Vida nature reserve in Ecuador. As you will see, oodles of water is not always a good thing, because as usual it’s about the entire web of life, not just one aspect of it. Water and the Web of Life (by Kristen Krash) Last week, a friend of mine in the US sent me pictures of some plants growing in his first garden. “Look at these cayenne peppers!” he texted, obviously proud as a new parent. Lordy, I thought, look at those peppers. Are you trying to grow pool noodles? But I tactfully asked, “Have you been getting a lot of rain?” “Here and there,” he replied, “the usual summer storms.” A pause. Then, the confession: “I’ve been keeping on the watering, probably erring on the side of too much if I’m being honest.” Throwing tact out of the window, I typed, “Those peppers look bloated. They can’t develop any flavour if you over-water them.” “Well, that explains a lot,” admitted my novice gardener friend. He proceeded to tell me about the other plants he was literally watering to death. I was about to dish up a lesson on plants and roots and soil and water and--wait a minute! I thought. All the new post-Covid gardeners out there need to know this too. I’ll write a post  Newbie gardeners aren’t the only ones confused about how much water? While desertification looms large around the globe, too much water can also wreak havoc. In recent years, wheat and corn farmers in the American prairie have suffered devastating crop losses to flooding and the pummelling of heavy rain. When we began planting saplings here in Ecuador’s cloud forest, where it rains an average of 4,500mm per year (nearly 200 inches), I watched with dismay as rust spots blighted their leaves and black fungus corroded their trunks. All this water is killing my trees, I thought. I was confounded with the philosophical acceptance the locals expressed at the pounding relentless rains. “El agua es la vida,” they would say with genuine gratitude. Water is life. I really started to think when we visited some mature agro-forestry farms in our area. They were getting the same amount of rain as we were, but their plants and trees were healthy, lush, and productive. Was too much water really the problem, or was it something else? Walking through a mixed plantation of cacao and hundreds of other plant species, I could sense something different through the soles of my feet. In the deforested land Juan and I were attempting to regenerate, the ground was clay hardpan in the dry season, and a boggy mudslide in the wet. In the cacao forest the ground felt yielding and absorbent. It’s like a sponge, I realised, the soil is holding the water like a sponge. The plants can sip from it as needed. To confirm, a banana leaf unfurled above me, showering me in fine spray of water.  Nearly all land-based ecosystems, whether wet or dry, have two things in common: earth and water. The earth can be sand, clay, loam, or rock. The water can be plentiful or scant. The intrinsic balance of an ecosystem depends on the ability of the earth to catch, conserve, and filter the available water to maintain life. The overwatered backyard garden, the flooded prairie farm, and the degraded tropical forest all have the same problem. It’s not too much water causing the peppers to bloat, the cornfields to flood, the saplings to drown, it’s the inability of the soil to absorb, hold, and filtrate the water that is present. Suburban lots are stripped of topsoil that is then trucked out, sterilised, and sold. Monoculture grain farms are subject to constant tillage, herbicide, insecticide, and chemical fertilisers, which kill soil life, and turn soil into dust. When tropical forests are cleared, heavy rains quickly leach the soil of nutrients. In all three scenarios, the result is the same: soil so damaged it can no longer maintain the precise level of moisture needed to sustain the life of the ecosystem literally grounded in it. Water isn’t life all by itself, but rather a crucial strand in the web. Water needs the living sponge of the soil and the plants growing in it just as much as they need the water. If any part of the cycle is broken, the cycle collapses. Each element, each strand of the web, exists in a delicate balance, held up by the other strands of the web. Where do we as humans fit in the web? What lessons can we learn from nature to catch, conserve, and use water optimally in our gardens and farms?  The best place to conserve water is in the soil. Soil may appear to be heavy, dense stuff. But like most matter, soil consists of more space than solids. Healthy soil is not uniform in its texture, but has clods called aggregates. These aggregates enable the soil to swell and hold vast amounts of water—and nutrients—in the spaces between the solids. Plant roots sense the nutrient-laced water and direct root growth towards it. Whether you are working with an arid or rainy climate, the way to build healthy soil is the same: add organic matter. Really, I cannot emphasise it enough. Soil rich in organic matter holds moisture, boosts fertility, stores nutrients, cultivates soil life, and sequesters carbon. Practical and effective ways to add organic matter include compost, biochar, manure, and deep mulches. How can you tell if your soil needs more organic matter? Use your senses. 1. Look at it. Is it reddish brown or grey? 2. Touch it, rub it between your fingers. Does it feel dry and powdery or wet and slimy? 3. Smell it? Does it smell rank like ammonia? Or does it have no smell at all? Healthy soil is dark brown to black in colour, slightly moist to touch, and emits a rich earthy smell. If you answered yes to any of the questions above, you need to add organic matter. Water so the soil can dry out. I read this maxim years ago in a book called Gardening at the Dragon’s Gate. I still recall it often today. What does it mean? Well, plants, even moist climate ones, don’t thrive in perfectly consistent conditions. Nature is variable, even erratic at times, so plants have adapted accordingly. The roots of plants are not like straws stuck in the ground. They are also living, dying, decomposing things that surge and wither with fluctuations of water in the soil. When it rains—or you water your garden—tiny hairs on the ends of roots drown and die. The plant opens its leaves to expire moisture above ground. As the soil dries out, the roots surge with growth below, and new root hairs plunge into the soil to suction the receding water. Intricate exchanges of sugars and enzymes funnel the nutrients from the soil up to the stem, foliage and fruit of the plant. Once you understand how this miraculous mechanism works, you can better sense when to water your plants and when to let them be. Until your senses develop, you can always do the “finger test.” Stick your index finger in the soil to just past the first knuckle. Even if the soil is dry on top, if the tip of your finger feels moisture, DO NOT WATER. There is plenty of water in the soil for the plants to take as they need. Learn the water needs of your plants. Annual plants have tidy little root balls that sit comfortably in your garden’s topsoil. Perennials have spreading clumps or strong tap roots that can bust through even tough clay to create pockets of space in the soil. Water accordingly. Water annuals more often but with less water. Water perennials deeply but less frequently. Water the soil, not the plant. When you water your garden, don’t hose your plants down like you’d wash a car. Habitually drenching plants encourages stem rot, mould formation, and dreaded powdery mildew. Water plants in a six-inch to one-foot radius around their base, depending on their size.  Cultivate diversity with an emphasis on native plants. Always plant a diversity of annuals and perennials in the garden. If all the plants’ roots are sitting at the same level in the soil, you’ve created a competition. Encourage cooperation by planting diverse species with different water needs and root types. Choose plants native to your area OR to a similar climate to optimise their ability to thrive with minimal intervention. For example, we grow many species from the equatorial Pacific Islands here in Ecuador’s cloud forest. Mediterranean plants are a good choice for a Southern California garden. Cultivating plants that thrive in a similar climate expands your choices without compromising excess resources. Use groundcover plants and mulches. In rainy climates, creeping groundcover plants and mulches protect topsoil by keeping it in place and preventing run-off. In dry climates, groundcovers and mulches conserve moisture in the soil by shading it from the sun and preventing evaporation. Gravel and stone mulches are particularly helpful in arid areas that receive little rainfall. When temperatures drop in the evening, moisture condenses on stones and then flows slowly into the ground. If you have chosen your plants wisely, this should be all the moisture they need. Plant trees and support land regeneration projects. Finally, healthy soil can do a great deal to solve our plant problems, yield robust crops, and shelter the vast subterranean kingdom of essential life forms. But even healthy soil needs another strand in the web to keep it in balance: trees and forests. The interwoven branches of the canopy above and the interwoven roots of trees below are the ultimate guardians of the soil. The canopy is like a porous roof that softens the impact of raindrops, allowing water to infiltrate slowly and deeply. The roots form giant storage, filtration and communication systems, the support structures of all terrestrial life. Forests and trees are the great granddaddies of our farms and crops, gardens and plants. We need to increase their number more than ever to sustain the web of life, including our own.  Kristen has an extremely thorough and useful catalogue of regenerative gardening articles on her website. You can find them all here: https://www.suenodevida.org/sdv-garden-guide-index You can learn more about the Sueño de Vida nature reserve in Ecuador here: https://www.suenodevida.org/ All the Mud Home free courses, information articles, and videos come to you thanks to our growing clan of Mud Patrons and Sustainers. If you’d like to chip in so that this website and all its education can keep going, it will be much appreciated. Do you enjoy The Mud Home?
If you find these articles inspiring or useful please consider joining us on Patreon. Your support pays for the running of this website, my virtual help, and my sustenance. A big thank you to all The Mud Sustainers, and everyone chipping in and keeping these posts and articles coming. People spatter about the word “cob” a lot, often in the wrong place. Many times they’re on about plastering, not cobbing. So what’s the difference between cob and earthen plaster? In terms of ingredients, not a massive amount. But cob is structural. It's for building stuff out of. Earthen plasters are decorative, and used for creating renders for pre-existing structures. Here's the thing though: Of the two, contrary to what you might think, earthen plaster is harder. 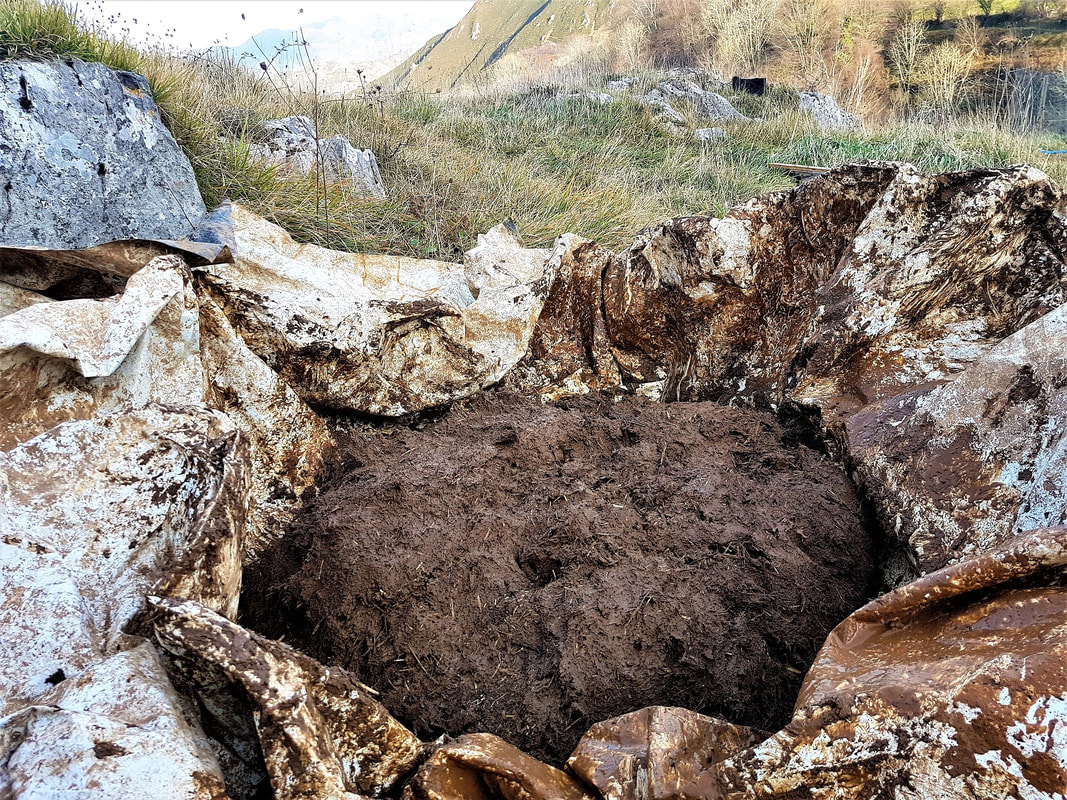 Cob versus clay plaster, what’s the difference? Why is earthen plaster harder? Clay has swelling and shrinking properties, so it's prone to cracking. This doesn't matter too much when you're building a wall out of it. But it matters much more when you're trying to create a smooth plaster that grips onto a wall, or create something aesthetic with it. People sometimes struggle with earthen plasters, because they pull away from the wall, or dry full of cracks. So I think that if you've mastered earth plaster, you've basically got cob down, too. But...  Plaster is harder. Are there any differences in mixtures? There are a couple of differences to note between cob and plaster mixes: 1. Cob can be rougher than earth plaster. As mentioned before, the aim of cob is structural (walls, houses, seats, etc). What does this mean in terms of mixture? You don't need to be quite as picky with the sieving of the dirt. 2. You want fresh (not broken down in the percolation process) straw in a cob mixture, to give the material a more knitted-together sturdiness. 3. You'll get on better with builders' sand, rather than fine-grade sand (again, gives more bulk and strength to the mixture). 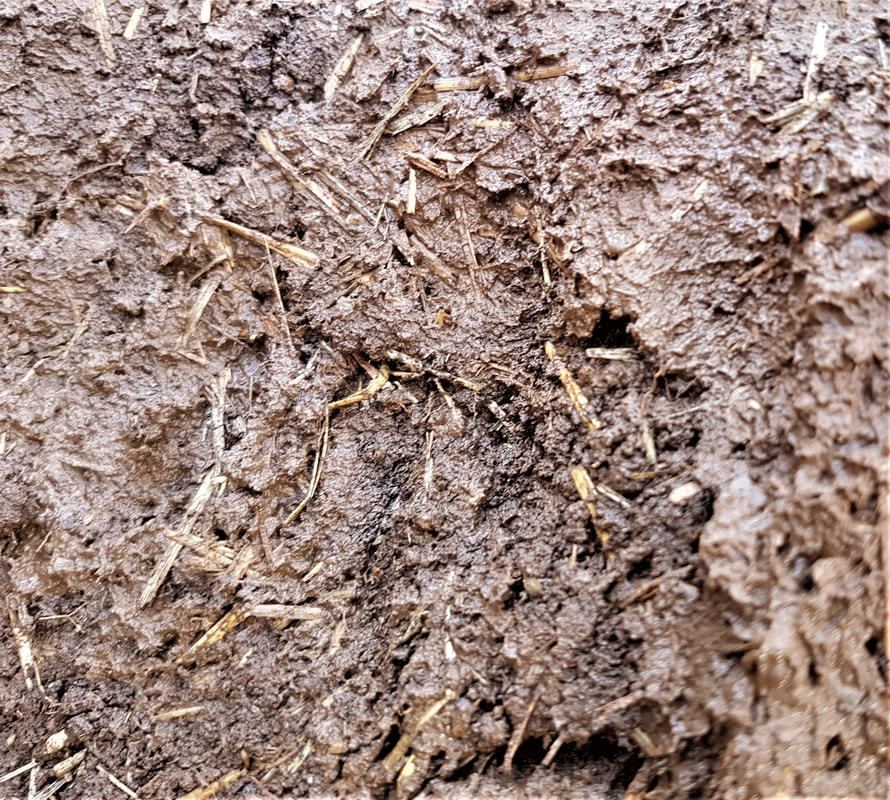 My plaster mix is finer than a cob mix would be. Free Earth Plaster Course If you want my introduction to making earthen plaster, sign up for my free mini course. Summer is here, it’s a good time to have a go. And once you’ve got the hang of that, you can move on to cobbing. Done the course? Now want a go at cobbing? If you’ve gone through that course, why not have a go at making something out of cob this summer? It’s cheap, fun, and a great way to enjoy some good weather. Five Ways to Practice Cob 1. Build a chicken coop This is my summer job! Chicken coops are nice and small, so it’s a great way to experiment with cob. You could even make a mini version of a house you are dreaming of, which would act as a scale model. 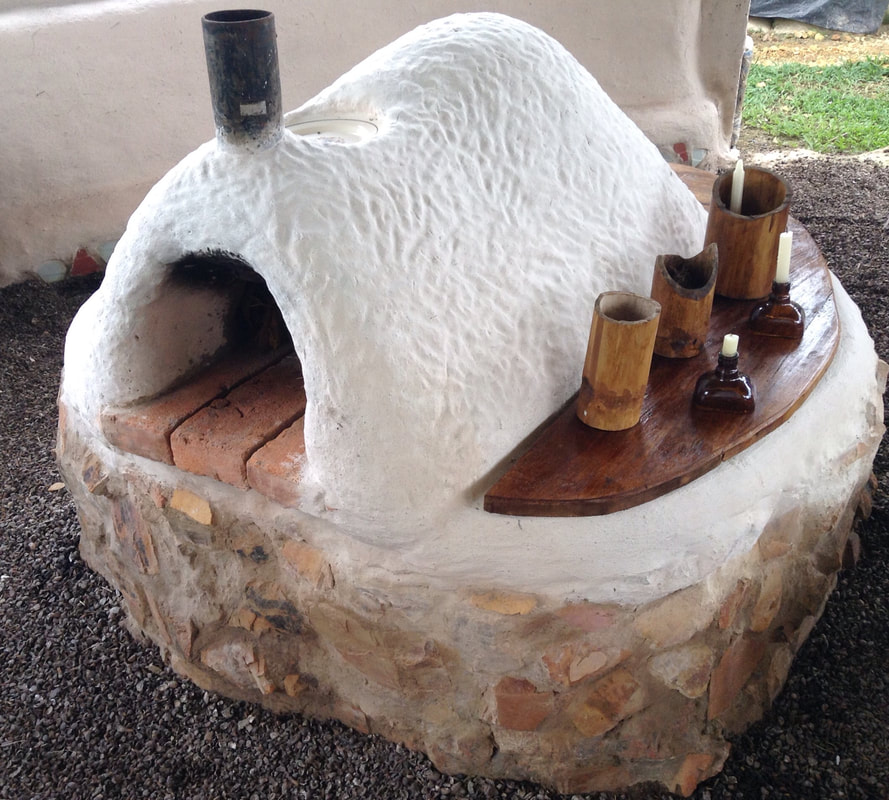 Kristen’s beautiful cob oven. 2. Make a cob oven Uncle Mud is the cob oven and rocket stove aficionado, so have a browse on his YouTube channel. Cob ovens are nice and small, and you don’t need planning permission for them, either. Very doable. 3. Build a dog kennel Another nice idea for cob is a lovely little shelter for your doggie friend. Animal houses are a brilliant way to see how cob performs structurally, and allow you to work out how to add doors and roofs and things at a manageable size. 4. Make a cob bench Cob seats can be beautiful. Not much to go wrong with them either. One of my favourite stories of a cob bench is one made at a school in the Hudson Valley. It’s lovely. You’ll probably want to cover it with some kind of roof to protect it from rain, though. 5. A bottle wall Bottle walls are a bit of a midway point between plaster and cob, but a great way to experiment with mud building, and observe how clay performs structurally. 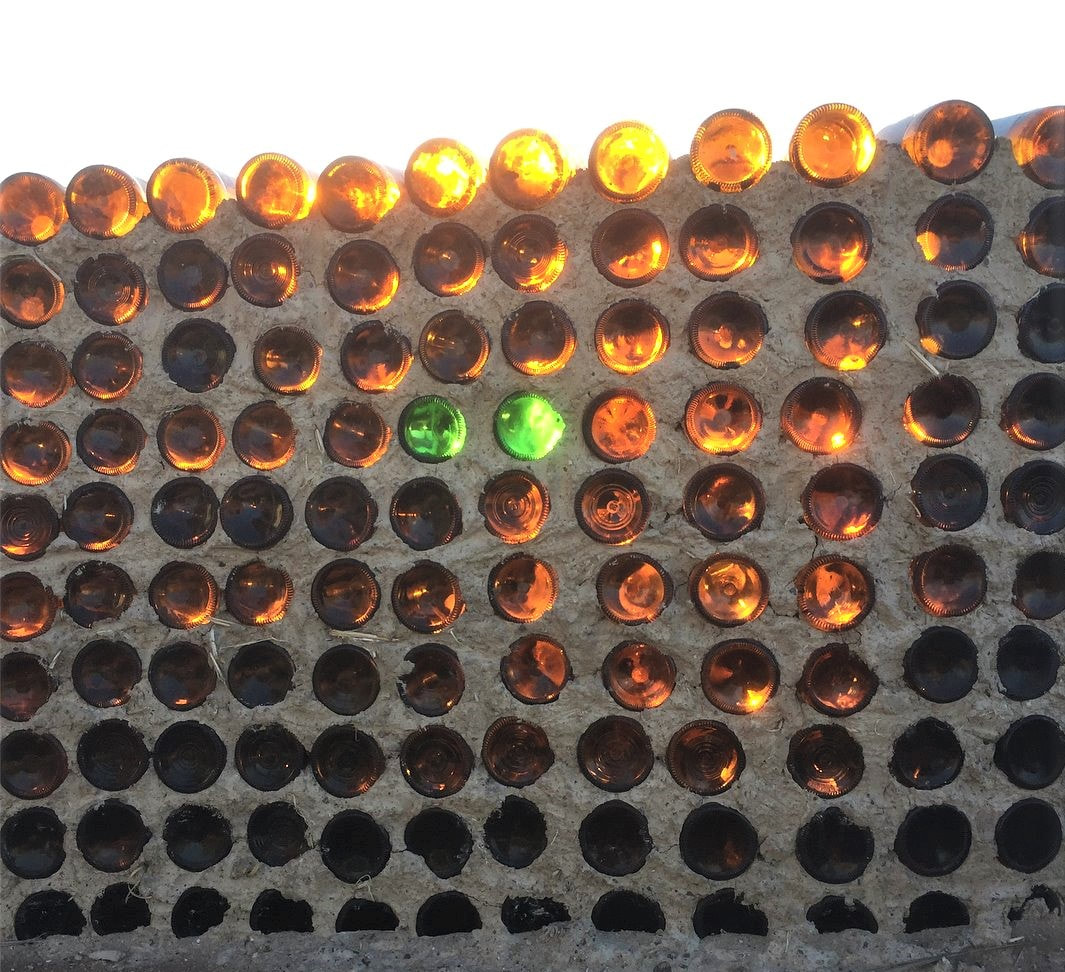 Jehane’s bottle wall. You can learn all the basics of earth plaster by joining my free earth plaster mini course. People comment frequently that they are very thankful for this free information, so do take the opportunity to have a go. “We will be building an Earthship community in Northern Arizona; Cannot thank you enough for the free information,” – Robin M. on the free earth plaster course Do you enjoy The Mud Home? If you find these articles inspiring or useful please consider joining us on Patreon. Your support pays for the running of this website, my virtual help, and my sustenance. A big thank you to all The Mud Sustainers, and everyone chipping in and keeping these posts and articles coming.  With some significant shifts occurring in our economic structures at the moment, I notice many of us who have been on the fringes are now stepping up our game. It really is time to stand in our power and use it well (rather than be ashamed of it). Having attempted to live money-free in Turkey and learning the error of my ways, my patience with people (usually middle-class) who think poverty is some kind of virtue, has worn rather thin. Powerlessness is not something to aspire to, but I’ve already barked on about that here. Over to Kristen Krash. Here’s how she and Juan are funding their reforestation project and their low-impact, inspiring lives, plus plenty of tips on how you can use whatever power and skills you possess to create some decent change. 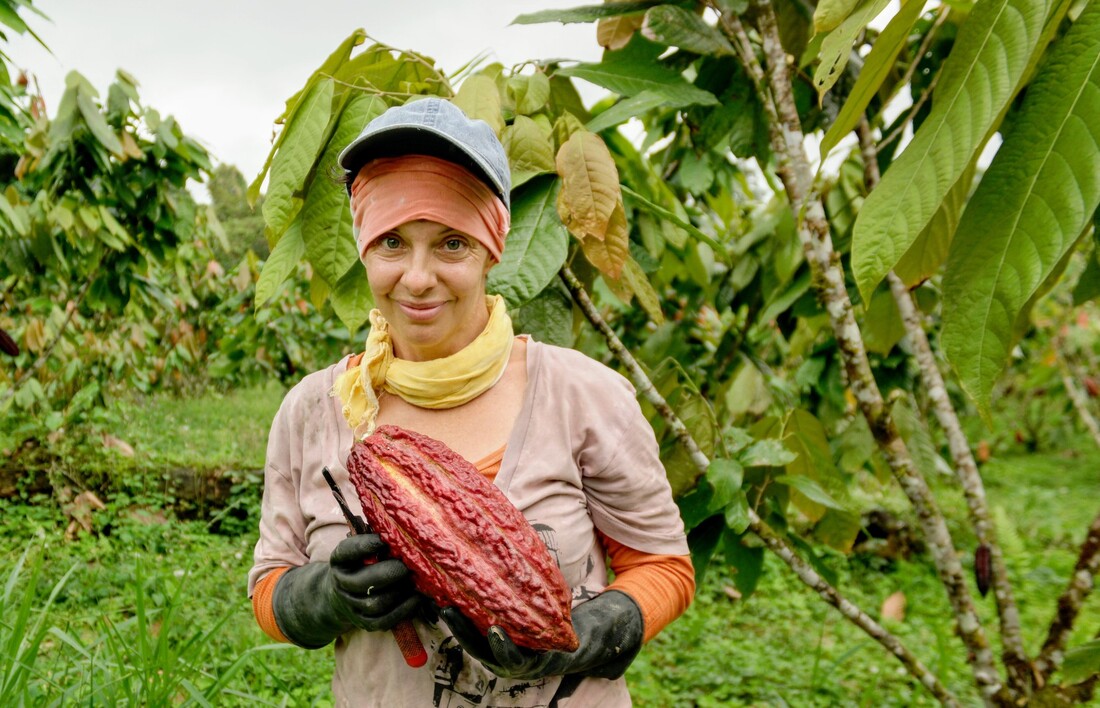 La Reina del Cacao herself, Kristen Krash, stepping up to create some change. La Reina del Cacao by Kristen Krash of Sueño de Vida in Ecuador Simply by going about its business of survival, the tiny coronavirus has done more to interrupt big business – and big consumption – than anything any of us can remember. Unprecedented lockdown, the news shrieks. Global economy on the verge of collapse. If you've carved out a spot for yourself away from the gloom and doom, perhaps you're thinking, meh. Let it collapse. No big loss there. That's why I'm out here. Or, this is a great opportunity for humanity! Only if we take it. Otherwise it's just another tragically missed chance and a lot of unemployment. Off-gridders and people who have acquired essential skills like farming or building have a particularly keen opportunity right now to sow the seeds of sedition. Change rarely if ever comes from inside the system; change manoeuvres from the periphery. Peasant revolts, campesino revolutions. The "haves" of society don't instigate real change. Why would they? Those of us tucked away in our mountaintops and forests might have a bit of land, some food security and essential skills, but we sorely lack systems that work for us—or anyone else who isn't a "have." The coronavirus is chomping at the rotted foundation of the global economy and leaving big gaps in its wake. Now is our chance to move in. How? Well, here's what my partner Juan and I are doing to instigate change from off-grid in Ecuador and some ways you can too, from wherever you are. 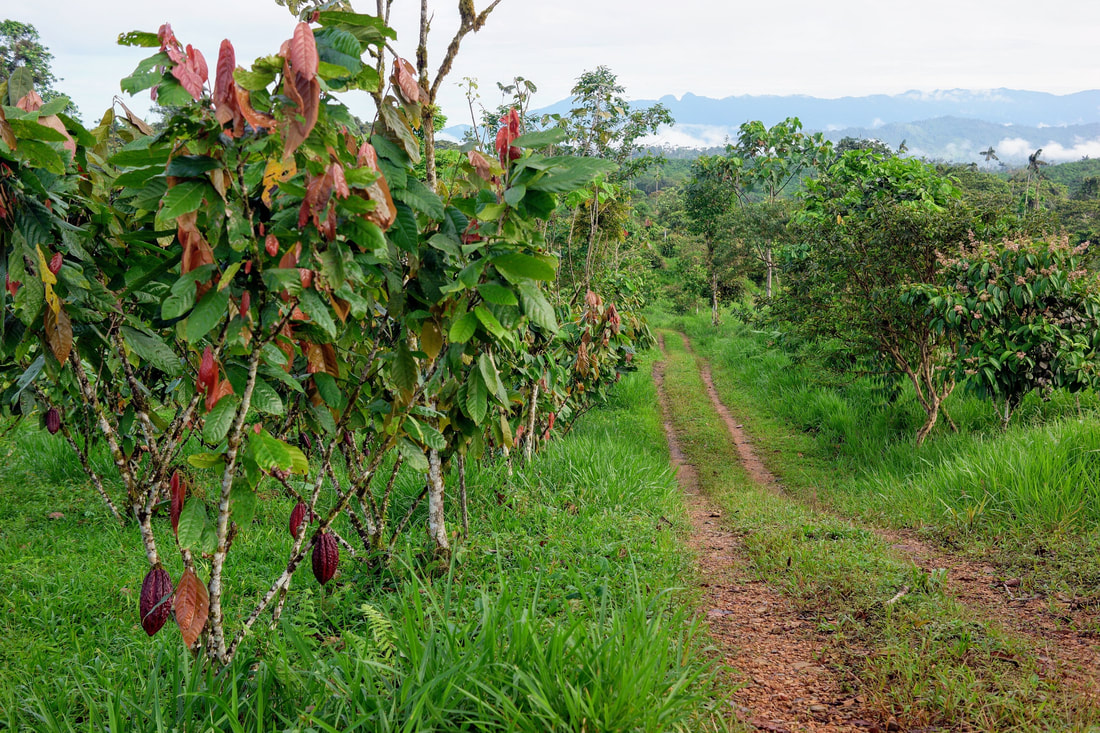 Logged land now replanted with cacao. We've been regenerating logged parcels of land with mixed forest systems in Ecuador for four years now. One of the many tree species we've planted is cacao. Recently, we started harvesting enough cacao to sell. Great, we thought, one more step on the road to sustainability. With our first harvests, we did like the farmers around us: toiled for days in the field, cut hundreds of heavy cacao pods from the trees, carried them in backbreaking loads (yes, just like those awful pictures of children in Africa) and opened each fruit with a machete to extract the cocoa beans. Then we hauled the sacks of raw cacao in our battered Russian jeep to the local distributor to get paid….Ready? Thirty-six cents per pound. $72 for two hundred pounds. Roughly $1.20 per hour of labour. Meanwhile, a 3-oz dark chocolate bar made with Ecuadorian cacao can sell for $5 or more. Now, let me ask you: Is that sustainable? I asked myself too, while I was dragging a sack of wet cacao out of the field that weighed nearly as much as I do. And again when we saw a small old woman sell a small bag of cacao, and then take her paltry amount of money directly to the market to buy food. This is subsistence farming: a poor person barely getting by while the CEO of Nestle rolls in billions. “This is so wrong,” Juan and I said. “We have to do something.” 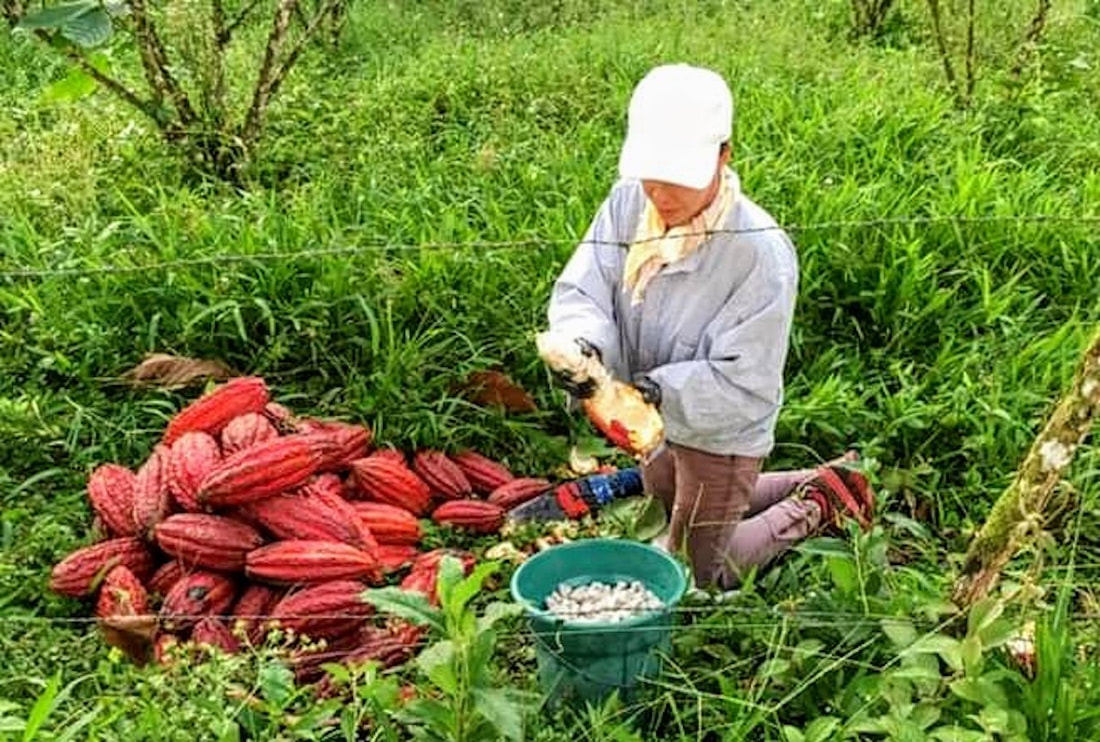 Cacao may grow on trees, but it’s still hard graft to harvest. Back in business? After four years of voluntary off-grid exile, I jumped back into the fray, because I know what vegans and yogis will pay for organic cocoa nibs. I hunkered under a tree, pulled out my phone and posted to Facebook. Fresh cocoa nibs. Who wants some? Within hours I had enough orders to tell me I was hunkering in a real opportunity. We worked madly to harvest, ferment, dry, roast, shell – all by hand – and fulfil the orders. Every available surface was covered with drying cacao beans. We needed packaging, labels, customs clearance, online checkout, and all of it is more difficult when you're off the grid and outside the first world. But we did it. We are processing and selling our own cacao. Have we lost the plot? Have we become fat capitalists posing as organic farmers? Or do we have a way to leverage opportunity into real change? 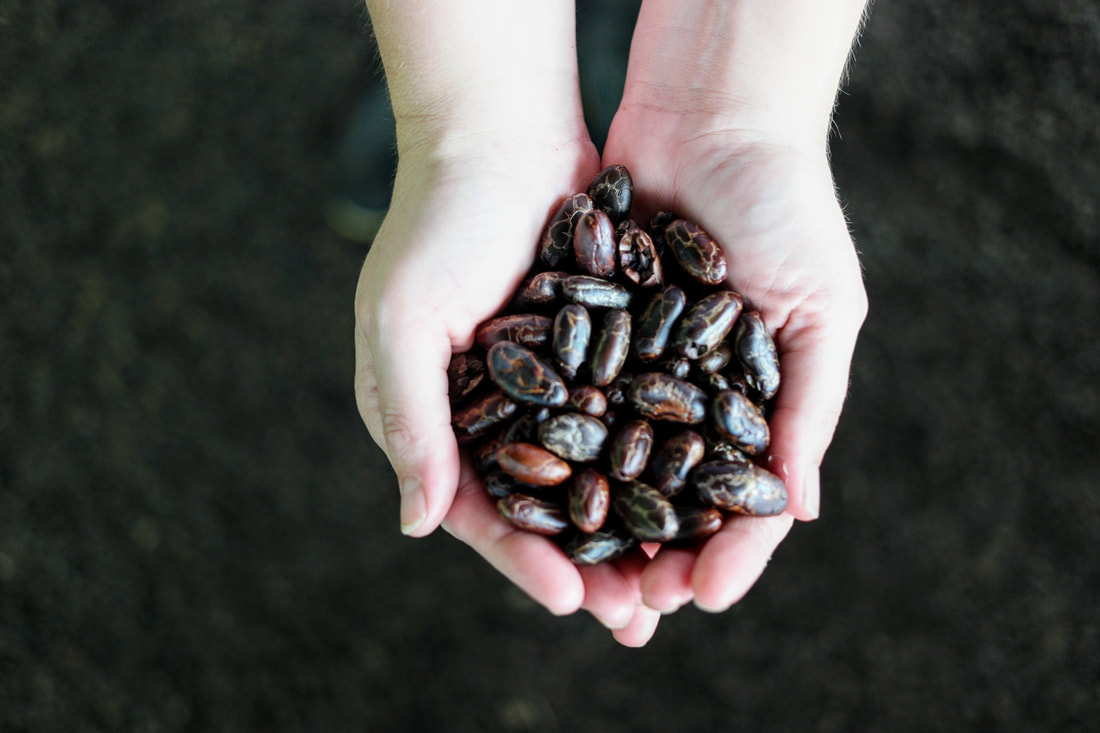 Fat capitalists, or sustainable farmers? A market is a place of exchange. Money is a medium. Using them doesn't make you the Monopoly Man. How matters much more. Juan and I use every single dollar we earn from our cacao to pay for our reforestation work and pay a just wage to our local helpers. As our small enterprise grows we can incentivise local growers to farm organically by offering a better price. You don't like people spraying chemicals on their crops? Neither do we. But remember these folks are barely eking out a marginal living. Change is terrifying. We know there's a better market for organic products and we can help open that market to our neighbours. With ten local growers on board, we can form a cooperative and start making bigger changes. It starts with us. No doubt the current system deserves the whipping it’s getting from Covid. I say “system” because it's all pretty much the same thing. Whether you call it "regulated capitalism" or "market socialism," nothing has really changed since the days of the East India Tea Company. It's still north over south, tech-industrial over agricultural, white skin over brown. The story of cacao in Ecuador is typical of a colonial system as alive and insidious as ever. Valuable raw materials like coffee, cacao, and spices are extracted, exported from their countries of origin, and sold in the first world to well-heeled urbanites who can't live without shade-grown coffee or acai smoothies. It seems to me that many resource-rich "developing" countries have been developing for an awfully long time. Or there's an unjust imperialist system keeping it that way. That system is crumbling. What can we build instead? 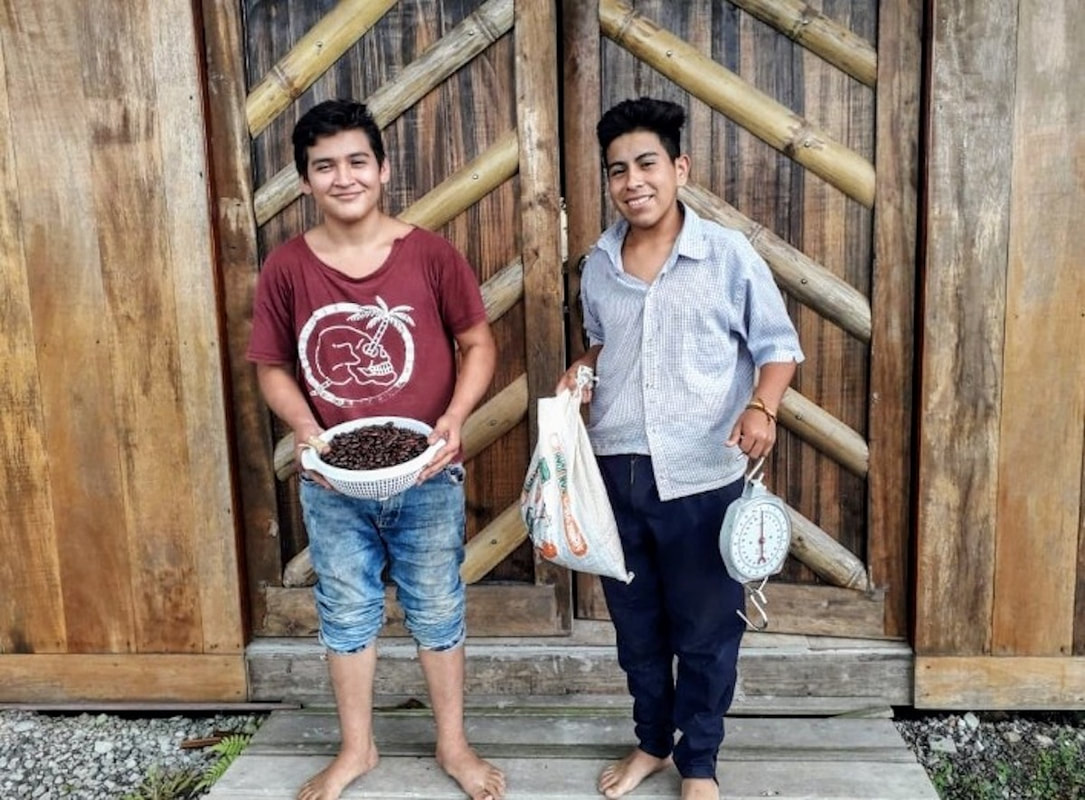 Kristen and Juan incentivize local growers to farm organically by offering a better price. Here are six ways you can instigate change in the post-Covid world: Buy better stuff. I don't just mean organic. Research how companies source their products and how they treat their workers. Fair trade certifications are good, but are a bureaucratic hassle and expensive to get. There are lots of folks operating ethically without a label. Check websites. If a start-up is concerned with economic justice, they'll proudly say so. Give up on the myth of rugged individualism. Sure, it feels good to do stuff yourself. Build a house. Grow some food. But no matter how self-sufficient you might feel with some dirt under your nails, you're still part of the human web. Right now, the only planet that supports our web is burning, and bucking the system by your lonesome can only go so far. To make the big necessary changes that just might save us, we need collective action. Start with your local community. A first-worlder building a hobbit house permaculture paradise in a "developing" or "third-world" country is in a powerful position and has an incredible advantage. Most of the people around them growing valuable agricultural goods have very little idea how valuable they are. Or they build with concrete and farm monocultures because that's what they've been told is better (by the first world). Whether you are making a product, building sustainably or planting a polyculture, share what you're doing with your neighbours. Hire them to help you. Pay them fairly. They know the terrain and how to get essential things done. And they bring their own lunch! They can help you a lot more in the long run than passing-through backpackers. Volunteers and WOOFERS can be helpful, but as a first-worlder enjoying the lower cost of living in a developing country, it's a good move, diplomatically and ethically, to make a ladder for everyone to climb. (If you don't speak your neighbours' language at least well enough to conduct basic interactions, start learning or go home.) Show respect and inclusion. The people around you might not have 5G or instant digital money transfers at their fingertips, but that doesn't mean they aren't savvy or entrepreneurial. Right before Covid, I was reading about a Peruvian rainforest tribe doing quite well running their own eco-tourism business, instead of being exploited by tourist agencies showing off the "primitives" and pocketing the fees. Oh no! protested a commenter. These tribes are corrupting themselves! They should be living off the fruits of the forest! They shouldn't need money! In other words, How dare they destroy my neo-colonial illusions of the noble savage! Don't be this guy. No matter how isolated or self-sufficient, everybody needs an income. Indigenous people do not exist for our curiosity. If they want to take a seat at the table, move over. Crumbling corporations would do well to learn their more consensus-based ways of doing business. Be clear and contractual. If you are more interested in an eco-community than a solo go, be upfront about what's needed from everyone involved. Don't be afraid to put it in writing. Many a well-intentioned project has gone awry because people didn't think clarity and boundaries mattered once they went to live off the grid. Old ways die hard, and to usher in the new we need to keep promises and follow words with actions. Contribute to fair-trade and ethically-driven associations. Juan and I can't do this by ourselves. I spend countless hours working digitally in addition to catching fish for lunch and harvesting food, while Juan builds water systems and chicken coops. We aren't the only ones. Find a cause that speaks to you, and contribute or buy their product if they sell one. I can tell you from real-life experience, small hands-on projects are more likely to put your money right back to work. For those of us who still can, it all comes down to choosing. The Phoenix didn't get to be a legend by sitting on her nest. It's time to rise. *** You can learn more about the amazing Sueño de Vida reforestation project here. If you’d like to support Sueño de Vida, here’s their Patreon page. If you’d like to purchase their bona fide organic cacao, go here: https://www.suenodevida.org/new-our-cacao 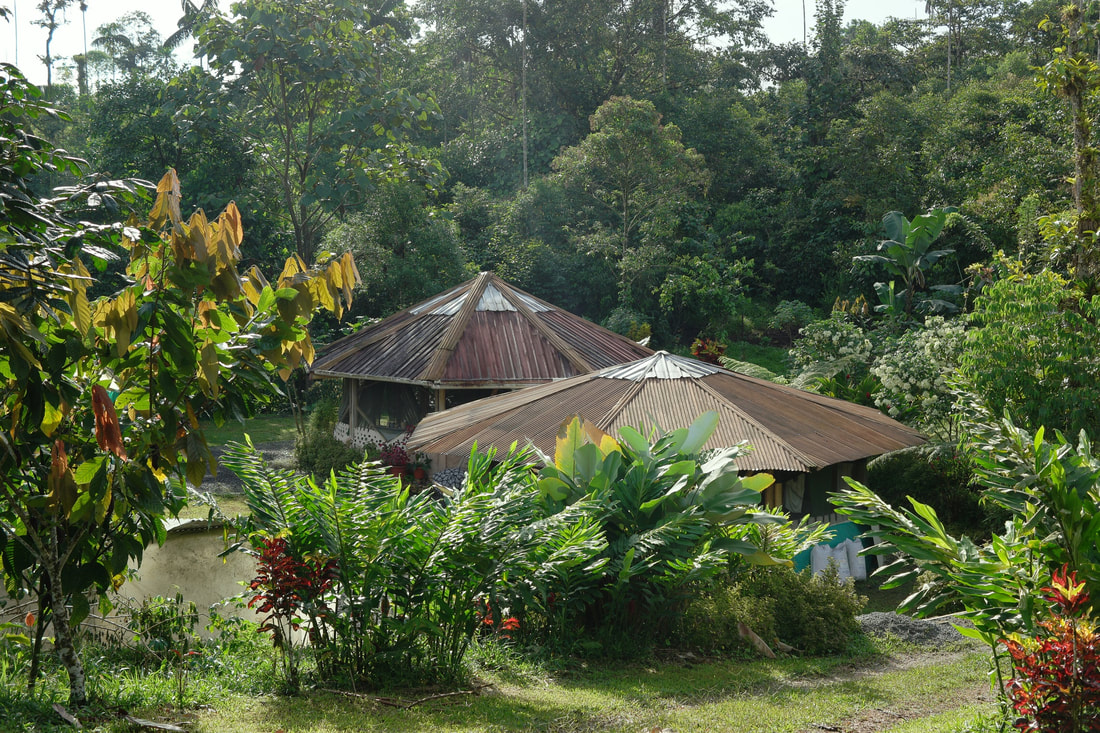 Sueño de Vida, a naturally-built, regenerative paradise. Do you enjoy The Mud Home?
If you find these articles inspiring or useful please consider joining us on Patreon. Your support pays for the running of this website, my virtual help, and my sustenance. A big thank you to all The Mud Sustainers, and everyone chipping in and keeping these posts and articles coming. One thing people always fret about, regarding both going off-grid and building mud homes, is the legal side of things: You know, permits, and red tape, and rules. I’ve written an article about building mud homes legally in the UK, but here’s the thing you’ve got to understand if you are looking to break out of the system somehow, and build a lovely free life for yourself: That system itself is not going to pat you on the back and give you a medal for it. The whole thing about leaving the safe and cosy urban life is that you are stepping outside standards and norms. Many times there aren’t actually any laws regarding what you’re doing, because the grand majority doesn’t do it, so the government hasn’t bothered to legislate for it. If you’re trying to get permission every time you move a rock, or stick a solar panel up, you’re going to be tying yourself in knots to no avail and getting yourself in all kinds of trouble. Most successful off-gridders and mud homers find nice fat grey areas in the rules, and set up camp within them. Even mainstream builders in the system do this to be honest, because codes, as we all know, were created for the most part by suits in offices with apparently little idea about the practical realities of building, nor the myriad exceptions that arise in the real world. 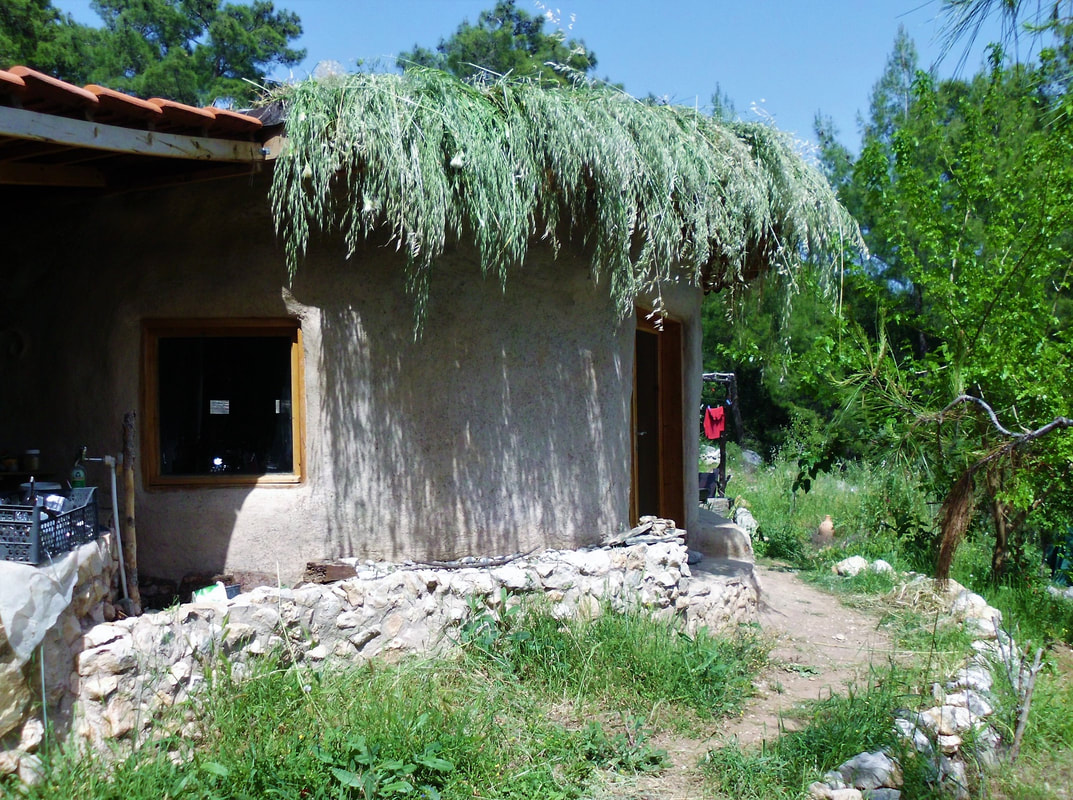 Stepping outside the standard way. To illustrate the point, here’s a story about someone I know in the UK (who shall remain anonymous). We’ll call him Mr. Builder for the purposes of this article. He’s constructed at least three large brick-and-mortar houses to code in the UK. One day Mr. Builder decided make a road to one of his houses, and for the purposes of this article let's say he named it Insight Road. Then he stuck a nice metal road sign up at the entrance so that people could find his house. Of course before long, as they do, one of these self-appointed unofficial law upholders we all love to hate, walked by and happened to notice the new road sign. The man pulled Mr. Builder up straight away. “I don’t think you’re allowed to just invent a name for a road, and put a sign up like that. You have to get permission,” he said. “Which law is it breaking then?” Asked Mr. Builder. “Ah well, it’s a bit of a grey area...” “Okay, when it becomes black or white, you come back to me and we’ll sort it out,” said Mr. Builder. Naturally that was the last he heard of it. This is the mindset you have to adopt if you’re going to go off-grid, build homes, or move out of the chicken run and become a free range human. Rules are there to be questioned, not blindly obeyed. A large wedge of bureaucracy is a kind of lysergic Sudoku puzzle anyway, and even with the best intentions it’s hard to make out what to do. Planning laws were all created by fallible humans, not God Almighty, and being a rule-abider does not make you a good person – many building codes are ecologically destructive, and simply pander to big business (the requirement for concrete foundations for example, when in many cases a rubble trench foundation is more suitable). But here’s the clincher: Being a rule-abider doesn’t even safe-guard you from hassle! In fact, half the time you get into more bother by trying to follow the rules than you do by squeezing between them, because as soon as you start applying for things, you’re on an official’s books and they actually have to check on you. Hmm am I ranting? :) Sorry but the system is moronic. It deserves to collapse.  Be subtle. Risk-averse versus reckless Here’s how it is: If you are highly risk-averse and want every loose end tidied neatly away, all the boxes ticked, and the government to approve your every step, unless you are pretty well-heeled going off-grid is probably not for you. This doesn’t mean I think it’s a great idea to be reckless, though. If you ignore the law completely, move onto a plot of land and start building willy-nilly (because hey it’s a human right!), don’t be surprised to find someone complaining about you, and fines or demolition orders galloping towards you like a herd of angry jurisdictional bison. You’re not an off-grid matador. You’re more of a mud lynx. You have to be smart. This means you have to know the rules well, and work out how you can work them (hire a lawyer if you have to, it might save you a fortune). You have to get on with your neighbours, and not annoy people (by making a lot of noise, or by building some big ugly mess). It also helps if what you build is small, cute, and muddy, and doesn’t look too flashy (people are very jealous in this world, but not usually of mud huts). People are more likely to moan to the authorities about you if:
People are less likely to complain about you if:
So the upshot is this: Learn the rules well (they vary from state to state and province to province, so don’t ask me to write an article on them – it would take ten years, by which time they’d have all changed). Learn where the grey areas are and wriggle into them. Find like-minded people. Be subtle. Build beautifully, naturally, and humbly. Don’t be a jerk and bug people. And finally, accept that nothing is certain in this life, and there are no guarantees, but that you’ll probably be okay:)  My tiny off-grid world in Spain. Do you enjoy The Mud Home?
If you find these articles inspiring or useful please consider joining us on Patreon. Your support pays for the running of this website, my virtual help, and my sustenance. A big thank you to all The Mud Sustainers, and everyone chipping in and keeping these posts and articles coming. (Plus how to make a Madras brick and lime roof) Let me take you to another place, far away from lockdowns and empty supermarkets. Let me take you to southern India, to a beautiful mud sanctuary pioneered by a brave soul called Karen Shetty. Four years ago, the Divyalok eco-spiritual centre was treeless and empty, and Karen was staring at it wondering how to make her vision a reality. Today it is a mud, lime, and regenerative dream. What can I say? This amazing project is a testimony to the power of belief and inner strength.  Karen in her first earthbag structure. On the surface Karen doesn’t look especially cut out for creating an eco-sanctuary from nothing. She was born in India and calls herself a cocktail of Scottish, German, English, and Rajput genes. For a long while she lived a more mainstream kind of life, with a Master’s in Business Administration, she ran a garment export firm for twenty-two years. But then ten years ago things changed, as they do. Karen met her guru, did a stack of meditation, and decided to live a little differently. Taking the plunge Four years ago Karen realised she yearned to live more sustainably in nature, so she took the plunge and bought seven acres of land close to a reserve forest, a sacred mountain and river, in a remote village in south India. From here on she began to build a retreat centre. Not that such a thing is a picnic, especially if you have no experience.  The primary shelter, Karen’s mud building research hut. On the face of it she had no clue: Karen was a complete novice to farming and construction when she bought her land, so she had to figure it all out by experimenting. Her first shelter (she calls it her mud building research centre) was made from coconut fronds, with a mud floor. The entire thing was built in a day! But it was a roof over her head, and that’s what you need. On the face of it, Karen had nothing much to prepare her for the new life she was entering. She had to face a heap of utterly foreign situations and tasks: living alone, planting trees, no electricity or running water, and using mud to build, to name but a few. For three weeks she managed with a kerosene oil lamp. The water was from the river bordering the west boundary. I point this out because I see so many people obsessing about building techniques and engineering skills when they enter this type of project. The thing is, these skill-sets (while useful) are not actually what’s going to get you through. I’ll tell you why Karen’s project is blossoming, and why she and her team managed to get five stunning earth cottages up, secure water and power, and plant an entire forest, all without much of a clue about what she was doing at the outset: Karen had both some spiritual/life strategies in place to keep her going when things got rough, and a pretty solid vision. 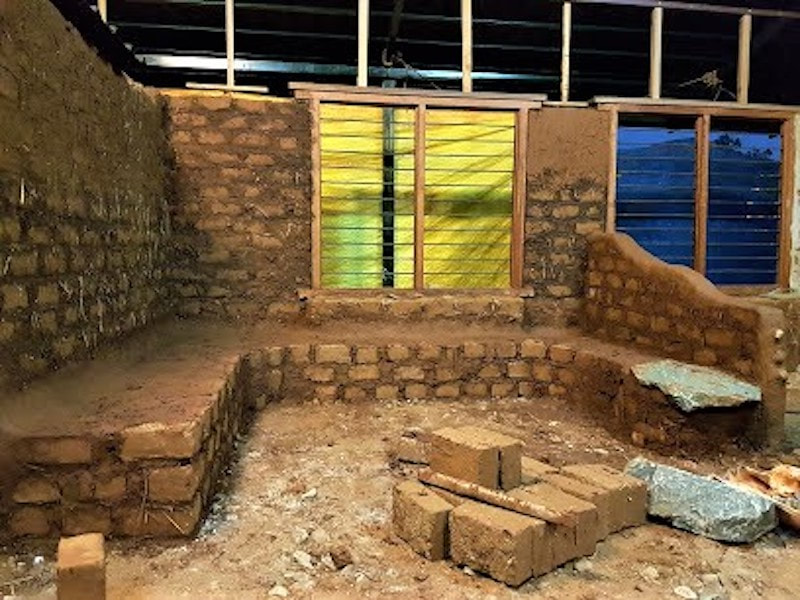 The first mud build was adobe brick. One Skill You Need to Cultivate I used to mention this as a timid little aside, but as time goes on and I watch the same kind of people make a decent go of this game while the same kind falter, I will cut to the chase, and tell it how it is: One skill you need to cultivate when you move into this type of life, especially if you’re doing it alone, is meditation (or similar). Laugh if you like, but I see it over and over again. Someone with zero building or farming skills makes an amazing mud world appear, while a qualified engineer, architect or carpenter for some reason doesn’t. I’m not saying none of these folk make it happen, nor that practical skills aren’t important – my neighbour is doing just great and he’s an engineer – but the technical knowledge alone isn’t enough. 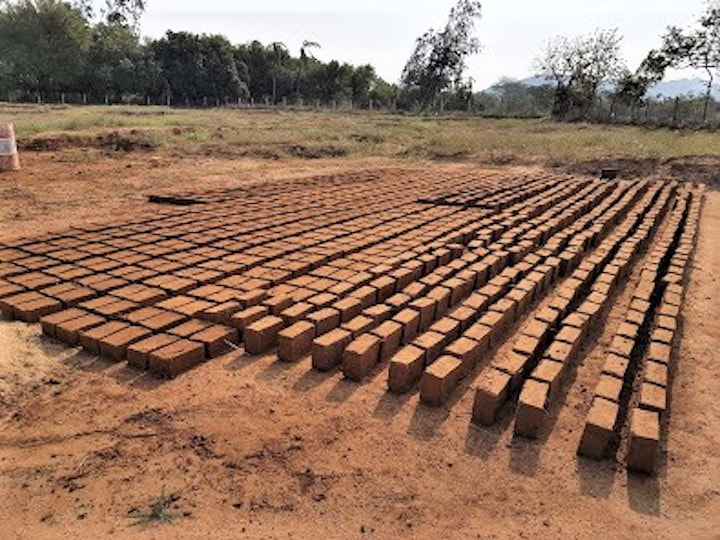 Adobe bricks in the sun. The Mud Buildings Back to the building. Karen and her team have created an incredible array of stunning mud buildings. Sometimes they used adobe, and sometimes they used earthbag. All were built without architects or professionals other than a plumber/electrician, and with the help of local villagers. The first building Karen and her team created was made of adobe bricks. Karen researched how to make them, and then gathered a team to help stomp the mud. These bricks were made from clayey mud and straw mixed, then poured into moulds, and left to dry rock hard in the sun. 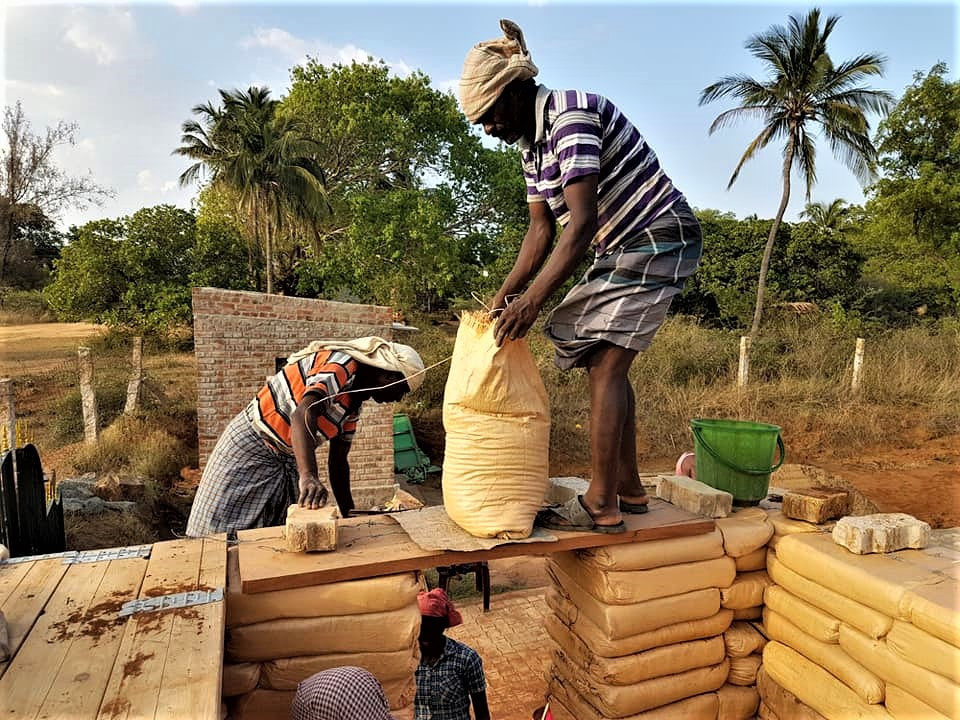 Mud cottage number two used earthbag building. A Special Madras Roof Made by Eighty-Year-Old Thatha The next structure was an earthbag hut, and boasts a very special brick roof. It was constructed using an ancient Indian technique of lime, herbs, and jaggary. “The tiny cute bricks were specially ordered from an old brick maker who had put aside these moulds as they weren’t popular anymore,” Karen explains. “The technique was taught to us by an eighty-year-old mason who we affectionately call 'thatha’ (Grandpa in Tamil). It took us a year to find the right person. Other masons who came by said this technique failed miserably and the bricks would keep falling through the beams. Hahaha! We felt "thatha" was God-sent, as he was not practising his trade anymore and looking after his farm instead. He was so patient with my learning skills and I remain grateful to him. Always on time and very clean and neat in his work.” 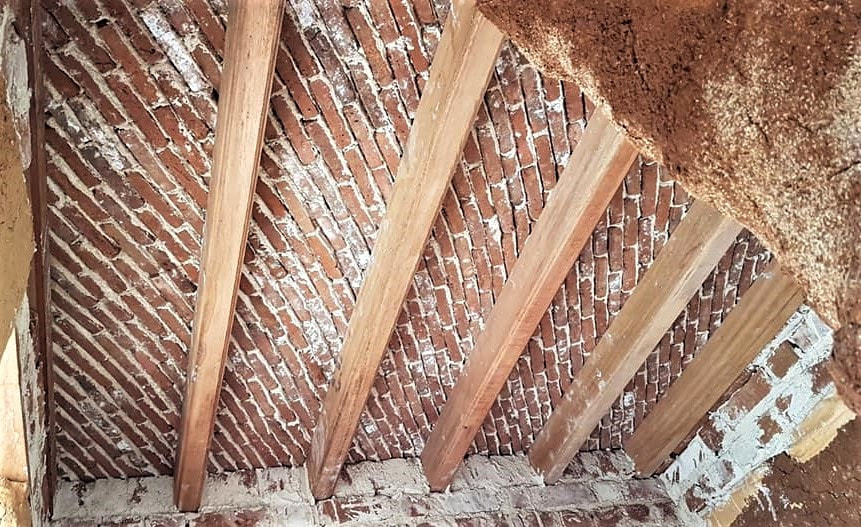 The Madras roof. How Thatha Made This Roof “Lime was bought from a kiln close by and we slaked it at our place, mixed it with sand, and had to keep moist until we used it. We then took a herb called kadukai in Tamil (haritaki) which is also used for natural dyeing purposes. This was soaked in water for minimum 15 to 20 days and the water was used in the lime mortar along with a jaggery solution. This lime slurry was used to fuse the bricks on the roof which worked like magic. Without a support or any formwork the bricks stand together in the open spaces between the roof beams. We used wooden reapers from the timber mart, but traditionally they use the trunk of the palm trees which are tall and sturdy,” says Karen. 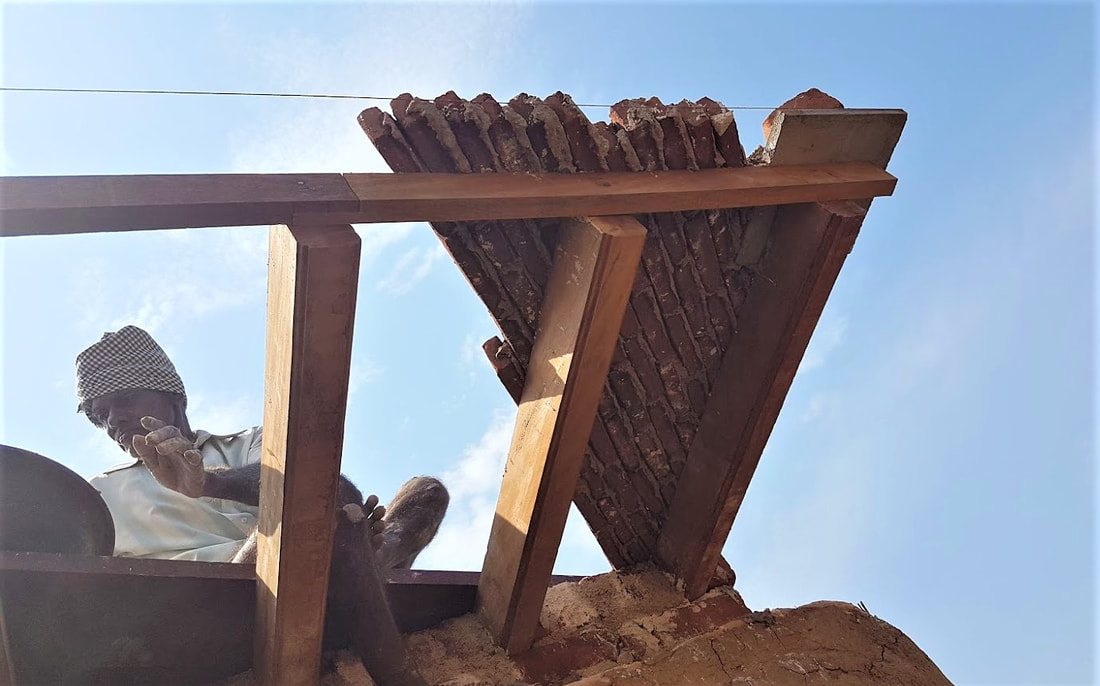 Thatha working his magic. Three Layers The Madras roof is created in three layers: For the first layer the bricks are placed vertically. For the second layer the bricks are laid flat and horizontally. The third layer is terracotta tiles. This kind of roof is called Katta Kuthu or Madras roofing. “It really makes a difference, with the inside temperatures being much cooler than the outside heat,” Karen told me.  Building number three, back to adobe brick. All the subsequent buildings have the Madras roof. Cottage number three is a beautiful adobe brick structure with a gorgeous natural interior.  The beautiful interior of the adobe cottage. Oxide flooring, with lime and earth plasters. What Next? When Karen and friends bought this property it had just one tree on it. Today the trees and medicinal plants total an incredible five thousand and counting! In the beginning there was no power or access, but after countless negotiations with government officials (having experienced Indian bureaucracy, and I can only imagine how much breathwork you need to do to get through this), today Karen has light, and two bore wells for water. The next phase of Divyalok is to introduce weaving and handicrafts for local women who are often abused by drunk husbands and partners. Divyalok really is an incredible story of regeneration from nothing. Never say you can’t create your world and make an impact, because the most unlikely people are doing it in the craziest conditions all over the planet. These days though, I will stick my neck out and say this: If you want to succeed, invest in and master the right tools, which are usually the inner ones. You can learn more about Divyalok and connect with Karen here. http://divyaloklife.com/  From nothing to something spectacular. Things to Take Away from This Project: 1. You definitely don’t need to be an architect/engineer to create an awe-inspiring mud world for yourself and others. 2. As usual, perseverance is everything. Karen just keeps chipping away at her vision, and low and behold it manifests. 3. Traditional techniques are often the best. If you can find anyone who remembers the old ways, listen to them, hire them… heck, kidnap them if you have to:) 4. Belief in yourself and your mission can take you a long, long way.  Do you enjoy The Mud Home?
If you find these articles inspiring or useful please consider joining us on Patreon. Your support pays for the running of this website, my virtual help, and my sustenance. A big thank you to all The Mud Sustainers, and everyone chipping in and keeping these posts and articles coming. |
Many thanks to the Mud Sustainers supporting this site!

Do you find The Mud Home valuable? Please consider supporting the blog on Patreon. For as little as $2 a month (not even a coffee where I'm from), you can join the club.
BENEFITS FOR PATRONS INCLUDE:
Email priority, private Facebook group, review copies of my books, sneak previews of courses and books, Q and As, priority for courses and more. AuthorAtulya K Bingham 
"Beautifully written and inspiring." The Owner Builder Magazine
FREE!
If you want the step by step guide of how I built my house, sign up for the PDF.
WHY NOT? IT'S FREE! Categories
All
All the Mud Home How-to posts have been compiled into a PDF package with 75 articles and over 200 photos. You can still buy it now, and enjoy lifetime access to all the updates.
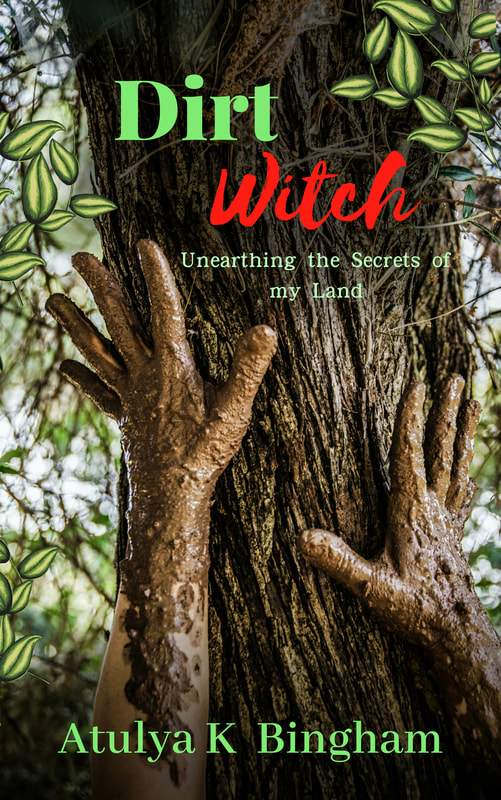
“Entranced! Be inspired by one who’s lived and breathed dirt.”
Kim Fraser, Get Rugged |
|
|
The Mud Home takes many hours a week to run, and costs a lot to sustain. If you find this site useful or inspiring, please consider supporting it so that it can continue.

Many thanks to all those who've already become Mud Sustainers.
|
 RSS Feed