Want to learn earthen plaster?
|
When you learn how to create gorgeous clay plasters from the earth around you, you begin an amazing journey into natural building.
|
I’ve used the word “quit” provocatively of course. Way better to have tried your dream out for size and decided “no thanks,” than to spend your whole life just imagining. But it is true to say that some people give up and never complete their projects, while others live in a perpetual state of building chaos for years and years sometimes with partnerships breaking up under the strain. On the other hand, other people get through the sticky moments and complete their home. You see the end of that process a few years later in a gorgeous social media post. But that result didn’t just appear out of the ether. There’s a bit of a knack. 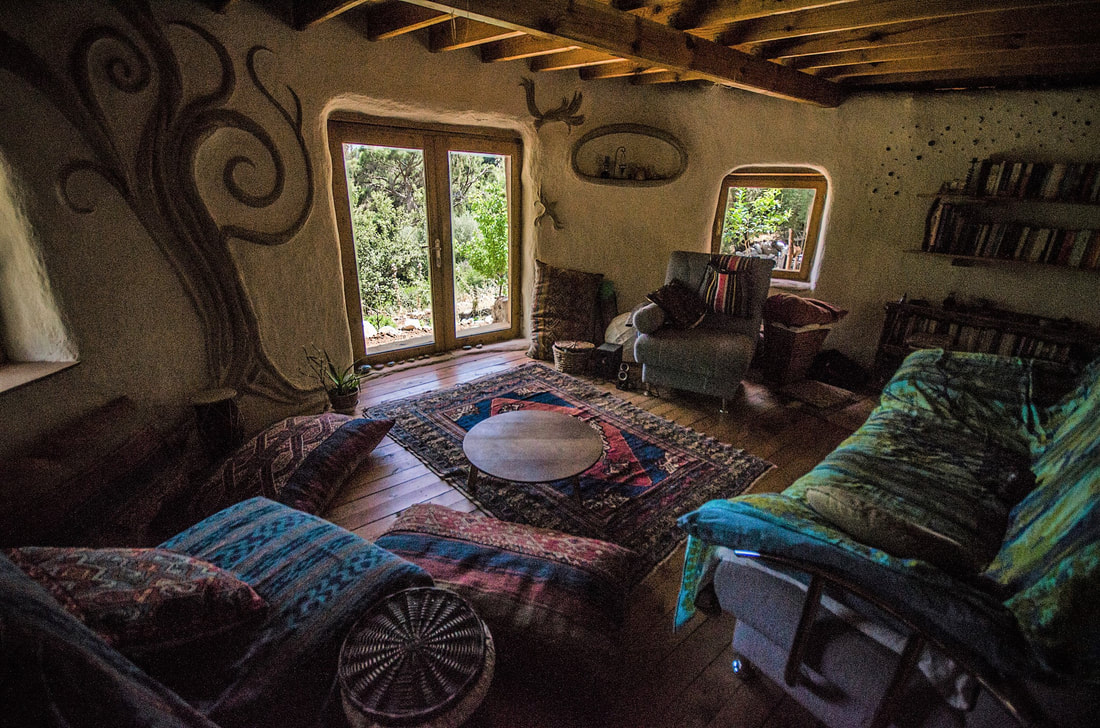 It didn’t just appear out of the ether. (photo by Melissa Maples) What people think is hard about building (but mostly isn’t) It’s often the people we least expect that succeed in this game. That’s because there are some massive misconceptions about what it really takes to start, and more importantly, finish your own home. The technical/engineering aspect of building for the most part is not freakin’ rocket science. And for the most part it’s also not why people fail. For the most part you don’t need to have some sort of qualification to build a house. Of course some smart aleck will no doubt point to an example of someone somewhere whose house collapsed. True, it happens. But it’s not the reason the majority of owner-builders end up quitting. Most lay people who start building focus an awful lot on technical and structural elements of the build (as they should), but sometimes it’s to the detriment of other aspects. Knowing how to do something isn’t the same as actually getting it done.  Jehane Rucquoi, who’s now 86 and still not quitting her amazing earthbag world in Nevada:) Reasons It All Goes Pear-shaped: 1. Disorganisation Honestly, this is probably the single most common reason I see that people come unstuck. You need to work in an appropriate order and stay vaguely on track. It sounds straight forward. It’s not. There is a lot to think about when you start building and it’s easy to get completely lost. I’m an Earth whispering hippy that talks to trees every day and likes to sculpt flowers out of mud, but even I have a game plan and a to-do list. Some sort of structured approach is essential. Prioritising correctly is a life-saver. In the same vein, you need to avoid getting distracted as far as is humanly possible. The more you can stay on task and keep some forward momentum doing the right tasks at the right time, the easier it all is. For an example see Dianne and Bismil’s monster renovation in Spain. I’ve learned a lot from Dianne because she’s super organised, and moves cleanly and clearly through the build. 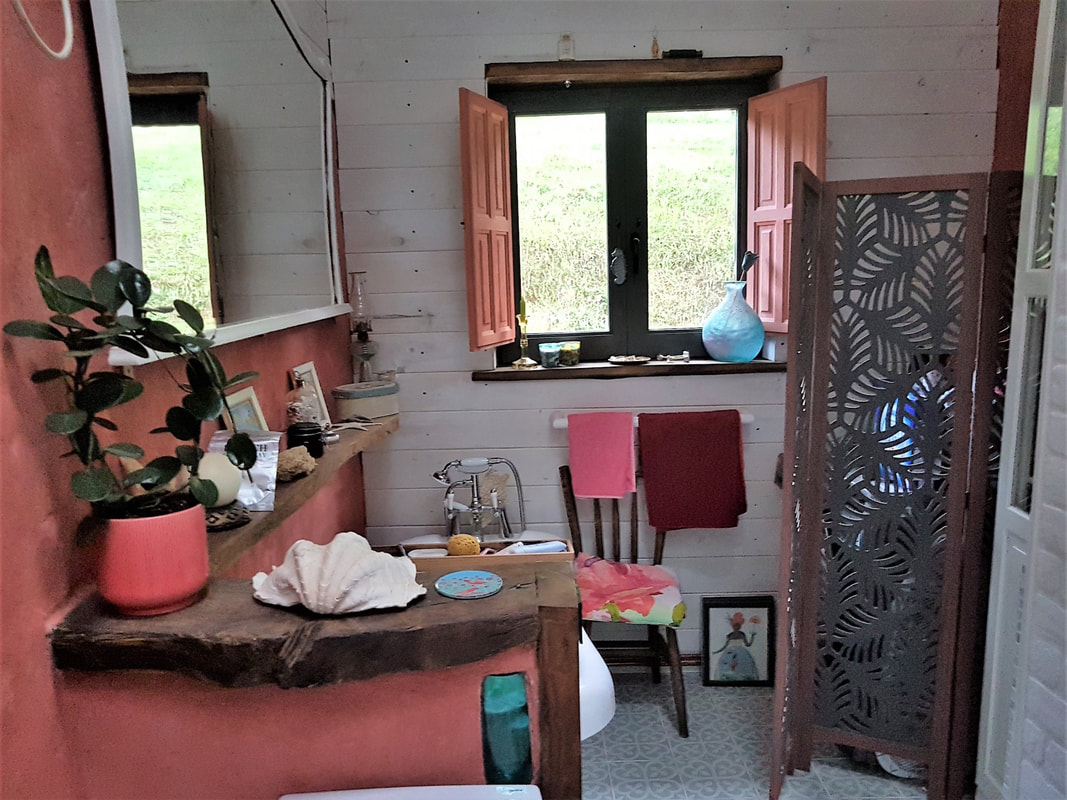 Dianne’s bathroom. She moves cleanly through each step of the build. 2. Refusing to get in professional help when necessary I doubt many Lone Rangers will to listen to my take on it, but hey, since when has that stopped me:)) Let’s face it though, it does look a bit like some of us think help is akin to failure. So we carry on doing a sub-par job, wasting masses of time and energy on parts of the build which are neither our speciality nor enthusiasm. Basic plumbing is left unattended. Taps don’t work. Solar power systems function poorly and everyone is using a torch to read their books. Floors are not laid. Kitchens and bathrooms don’t work properly. Everything is a bit of a mess. Finally, family members lose patience and skedaddle out of there. At the end of this sorry state of affairs, said builder blames said everyone else for the failure. Yeeees, seen it too many times to mention. I won’t lie, I hobble under the Lone Ranger fallacy as much as the next independence-lover. I also know it’s not easy, and the criticisms of onlookers can be hard to stand at times. But I can face the truth when I see I’m not doing a good job, and will get in a pro if I have to. Come on folks, get real! Even professional builders work in teams, and hire plumbers, electricians, and carpenters. For an example of what I mean, take a look at Nad Kad’s amazing strawbale house. Yes he built a lot of it alone, and is a genius at clay plaster, but he never fails to mention that Jim Schalles was the pro behind the gorgeous (and well-functioning) rocket stove. 3. Unrealistic goals and biting off more than you can chew. Most of us make this mistake somewhere along the line, but some folk catastrophically misjudge the effort involved in building. Ianto Evans said something along the lines of, "Remember everything takes twice as long as you think and costs three times as much." I must admit, personally I come in not too far over budget, but things definitely always move far slower than I want or expect. So before you buy that ancient castle in Scotland, or decide to construct the world's first multi-storey earthbag mansion, take a long step back. Try a small build first and get a feel for what's involved. Unless your house is a very teeny tiny cottage (think 15m2) your total build is probably going to take at least two years. Even if you have ten people helping, (and take it from me, half of those ten probably won’t be much help) it will still take that time. Don’t believe me? Just take a look at this article by the very professional building team at Koluba, who know exactly what they’re doing and have stacks of volunteers. That house isn’t huge at all. It still took the best part of two years. Yeees. If you think you’ll finish your home in a summer, you’re probably new to the game. But what about my earthbag house in Turkey? It is true that by sheer will and good fortune we erected the structure of (a small) earthbag house up in six weeks. But it took me another eighteen months to complete the interior. That house is just 6m diameter.  The interior took a while. (photo by Melissa Maples) 4. Poor management skills People think management is bossing people around or being in charge. In truth, ninety percent of management is people skills. And the biggest management crime I see is lack of acknowledgement for everyone in the team. It is lovely to do things yourself and create your own home, but only a fool thinks anything is built single-handedly. And only a very ungrateful and arrogant fool dismisses the vital assistance and contribution of everyone on their team, including and especially those in the background cooking, cleaning or washing. At. Your. Peril. Even a lone hag like me who loves to work in solitude, who has no one cooking for me or washing my clothes, acknowledges the help of my team. Without my good neighbours, my dad, my friends, my Patreon crowd, and the sporadic but oh so needed help of Jose Manuel, I would have been snookered many times. For an example see Kay La Bella’s project. She has such a wonderful way with people that makes everyone want to help, and the energy of the project simply shines. Ways to win in management: Say thank you often. Point out the fab things people have contributed. Listen to other people’s ideas, and incorporate some of them. Include everyone, exclude no one. But the most important words to overuse are “thank you”. 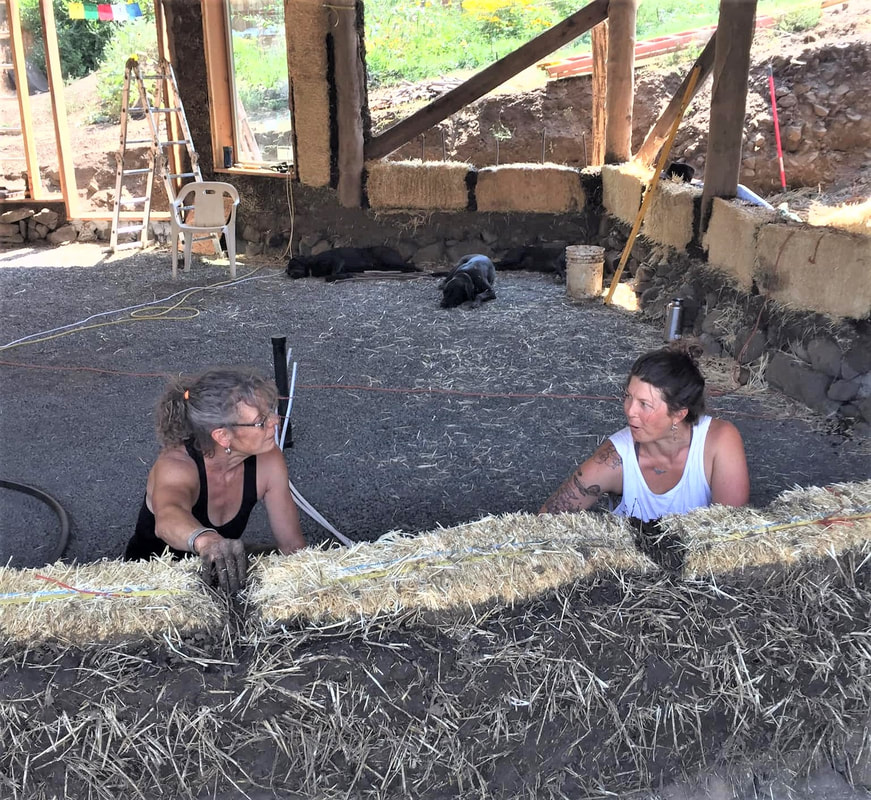 Kay and friend on the build. 5. Running out of money I have to admit, I’d never quit because of this. Never. I mean you can always scrape a bit together somehow, can’t you? I think if you use mud, lime, and listen to your land, you can pretty much always keep building. Creativity and willpower trump money any day. Use second-hand stuff, use your wits, use the abundant resources of your land, and don’t buy into all this expensive Grand Designs lark. Stop competing with the Joneses, they’re idiots anyway. The irony is, when much of your house is homemade, it becomes more attractive. My current build is quite elaborate for me, but my budget is tiny. I just move slower and make (sometimes hard) choices. Nevertheless, I see that money is an ostensible reason people give up. Some ways to mitigate financial ruin:
 My mud bathroom cost next to nothing. Do you enjoy The Mud Home?
If you find these articles inspiring or useful please consider joining us on Patreon. Your support pays for the running of this website, my virtual help, and my sustenance. A big thank you to all The Mud Sustainers, and everyone chipping in and keeping these posts and articles coming.
1 Comment
Beginners’ Tips for Going Rural When you first buy land or move into the country it can be daunting to know which tools you need. Here is my list of the first 10 things I’d buy. I also asked around in our Facebook group, and not everyone agreed with me, so I'll add the valuable recommendations of those off-gridders at the end. Forget the expensive high tech at the beginning, especially if you’re off-grid. Consider where you are going to store this stuff and how you’re going to power it. The more machines you have, the more headaches if you ask me. They are prone to get ruined by weather, or even stolen. I’ve grown to love the simple tools. How amazing they are— the axe, the pick, the scythe. They are cheap, need no power or fuel, they are quiet, and many times do a better job than their noisy mechanistic counterparts. No one nicks them, either. 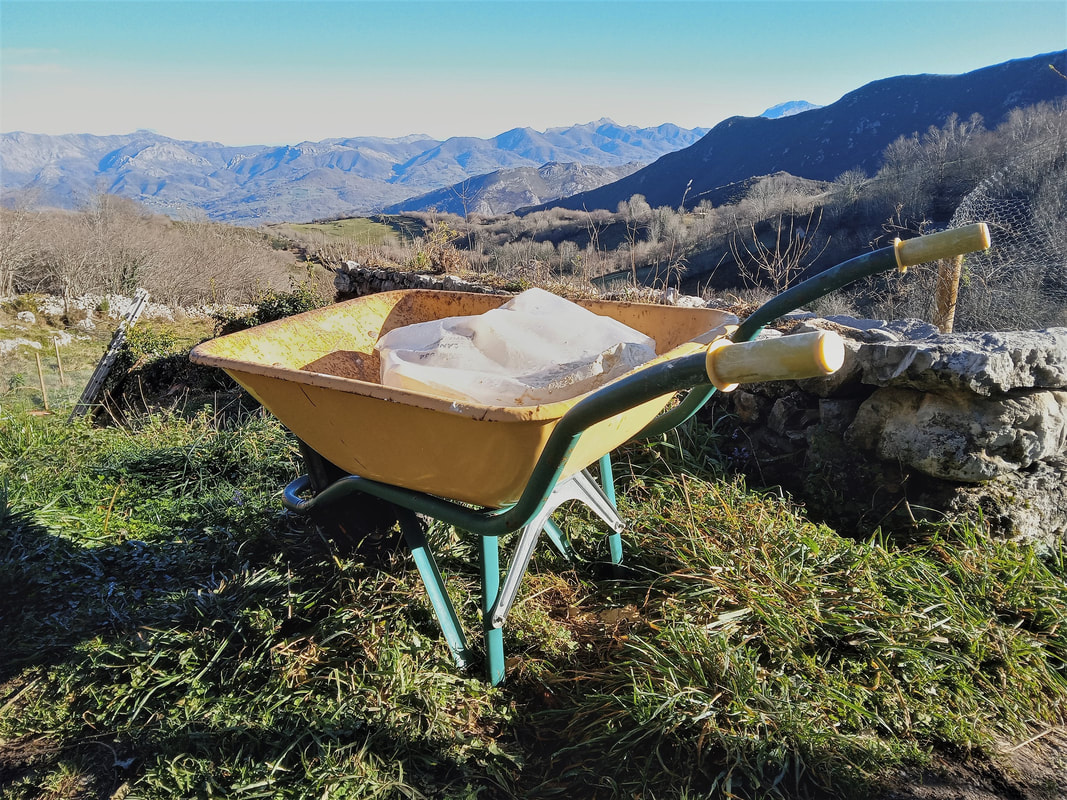 Ground Tools If you’re starting from scratch, you want some old-school gardening tools at the outset, because the first things you’ll be doing are clearing spaces and digging. Sadly a lot of folk can’t seem to do anything without involving some earth-wrecking hulk of a machine, but if you’ve been with The Mud Home a while, you’ll know that isn’t how I roll. Land is so precious, so alive, so communicative. Using the simple old tools keeps us in shape, and always returns a more aesthetic result without demolishing any number of treasures our land is holding that we haven’t noticed yet. 1. Pick Probably the most fundamental tool of the lot. Whether it’s for digging a hole, digging rocky ground, or breaking ground, the pick is the one. 2. Scythe/sickle/machete You need some sort of undergrowth clearing tool, and it depends on your land as to what that will be. In Turkey where it was rocky scrubland, the sickle and machete were more useful. Here in Spain’s grassy north, it’s the scythe. Scything is such a beautiful way to spend an afternoon. I’m still baffled by why anyone would want to strim instead of scythe. Strimmers and petrol mowers are ghastly, noisy, wildlife massacring, and unpleasant to use. They’re not even faster than the scythe. Take a look at this video to see what I mean. 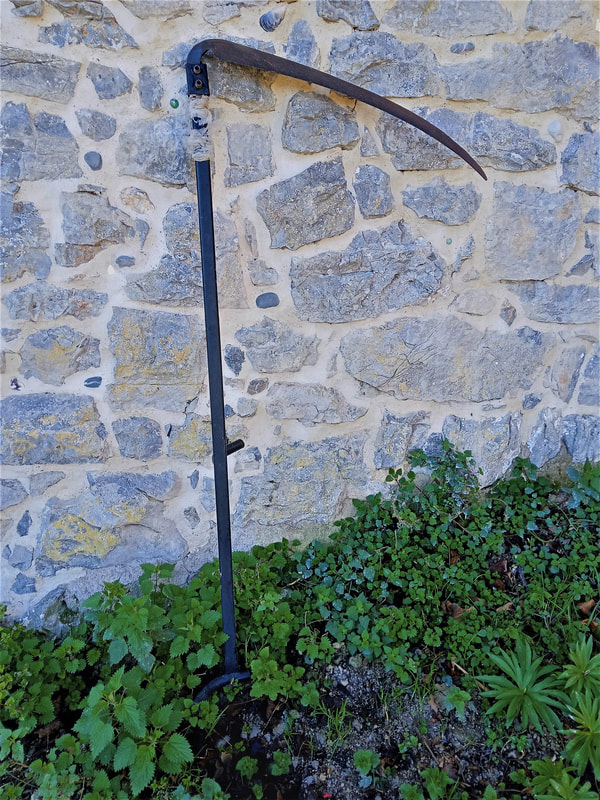 Scythe. 3. Spade There are many different kinds of spades, and again it depends on your soil, but if you can only buy one at the outset, get one that can both dig earth (has a pointy end) and that you can use as a shovel too (not too heavy). 4. Wheelbarrow So fundamental. I try to imagine life without the wheelbarrow sometimes, and it’s a back-breaking world of drudge. Hail to the wheelbarrow inventor! The tyres burst sometimes, which is the only bummer. I have a spare wheel for mine just in case. 5. Axe I have come to love the axe after I was taught how to use it properly. I have two: a big one for wood splitting, and a little one which is just such a wonderful tool for chipping points into posts, scraping off bark and dry rot, and for some basic chiselling too. 6. Rake Up there with the pick and the spade. If you’re terracing or gardening, a metal rake is a must for dragging that topsoil where you want it to go, or for ‘sweeping’ rocks and stones from said topsoil. Other Mud Homers' comments: "A shovel, wheelbarrow, and a Portuguese hoe-like tool called an ‘enchada’ will accomplish a lot and they’re what I started with for my first job clearing top soil for a parking area. Also, I’m a massive fan of rock bars... " Says Kirsty who's doing an amazing job of building her own off-grid world in Portugal. "To the above list, I would add an auger especially if you have any fences to erect or sheds to build etc. We use it instead of the clamshell fencepost diggers." Says Kit who's a very handy off-gridder in the States. "The pick I use a ton. I have 2 because i keep breaking the handle." Says Chris who's sitting in an idyllic bit of rainforest in Columbia. 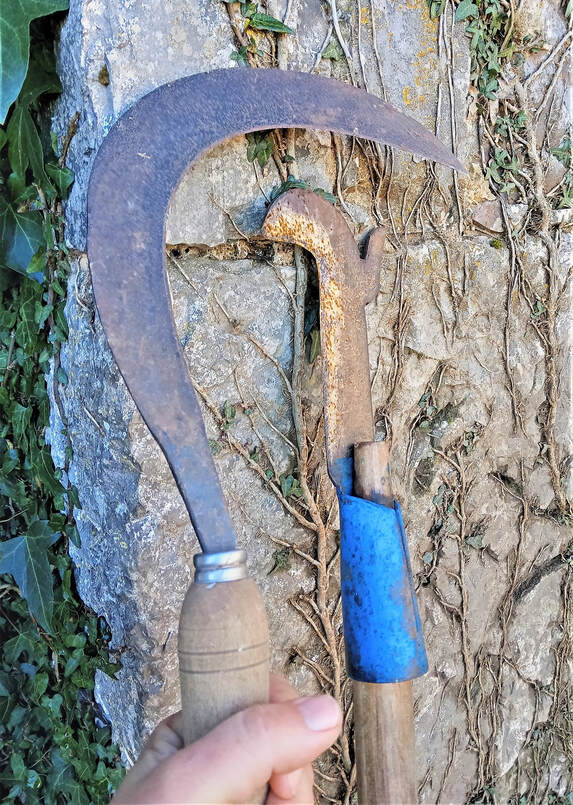 Sickle and small machete. Building Tools 7. Hammer and nails I suppose if you were desperate (I’ve done this) you could use a rock as a hammer, but yes the hammer is fundamental for wood work, stone bashing, and so much more. 8. A decent hand saw for wood cutting Easier said than found sometimes. Choose the teeth length carefully. Too long a tooth and the saw is always catching and harder to control. Too short a tooth and you’re busting a gut to saw anything. 9. A wrench and spanner collection This can be pretty handy too for fixtures, plumbing, and so on. 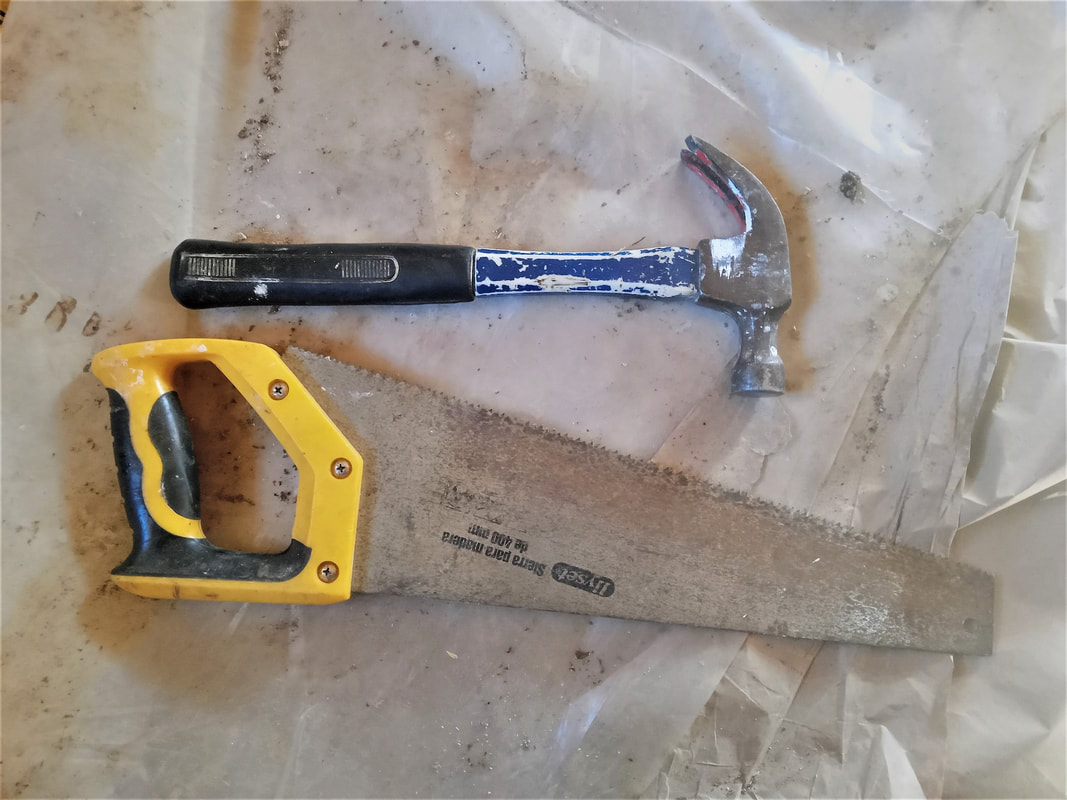 Hammer and saw. Power Tools 9. A decent battery-operated drill/power driver (and screws) Without a doubt the most empowering power tool of the lot. I mean there’s so much you can do with a drill because of its multiple attachments: bore holes in wood, metal, and masonry, screw in screws, you can get wire brush attachments for cleaning, attachments for digging out mortar, attachments for sanding...yeah. Sometimes the tech really does what it’s supposed to, and the drill is one such example. 10. Chainsaw Love it or hate it? I hate the noise and the forest-ripping brutality of this machine, but I’m not gonna lie, it’s useful. Not just for firewood, but for building. I can now cut joists by chainsaw almost as straight as with a circular saw. It’s also necessary for pruning large branches. But seriously, if we can make cars almost silent, why oh why has the chainsaw not been modified with silencers? A bad workman blames his/her tools. If you’ve got these 10 tools, you can do pretty much anything, and if people reckon they can’t, I find it a little strange, because this is about all I had to work with for most of my time building my earthbag house in Turkey. But… 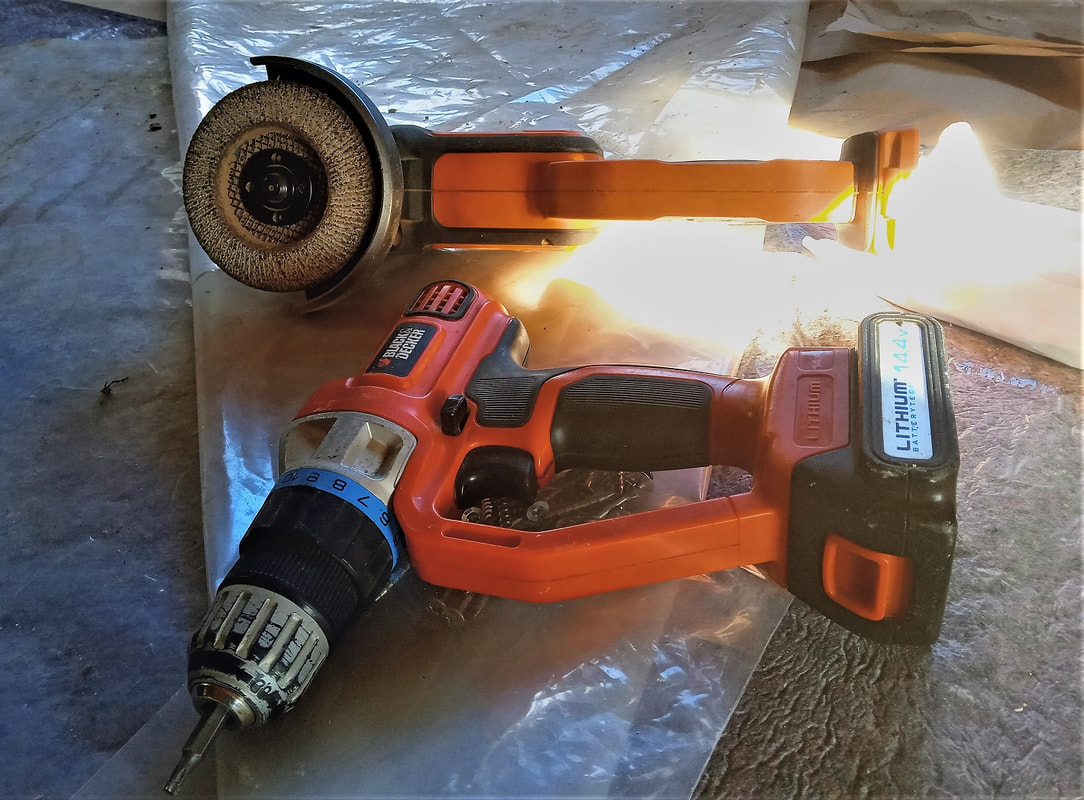 Power driver and grinder. Bonus luxuries that could make life pretty sweet Depending on your areas of interest, there will be some other power tools that allow you to create with more finesse, particularly for wood work and metal work. Do yourself a favour though and buy a cordless, battery-operated, nifty device. I can’t quite work out why anyone is still buying these massive mains-powered machines anymore, they’re so outdated (unless you’re a professional carpenter or something). I’m wondering if people don’t realise how the tech has improved and how powerful the new cordless devices are. Cordless, battery-operated tools have so many advantages: 1. If you’re off-grid, you can easily charge them on a solar power system (conversely you’ll be hard pushed to have enough power margin to use the mains’ versions). 2. Cordless tools are much easier to store. You can keep them in the boot of your car if you want. 3. They are way easier to use, and in my opinion way more useful. You can carry them to any part of your building or land, rather than trying to carry bits of timber to the machine or messing around with dangerous extension cables. The Most Fundamental Power Tools Grinder – Again with its many attachments the grinder can be very useful, though it’s by no means totally necessary. I never had one in Turkey and we built a whole house. Circular saw – For woodwork enthusiasts and joiners, this is definitely going to be useful. Get one of the new battery-operated beauties though. You can carry them wherever you want, up onto a roof if necessary. Sander – Well, you can get sanding attachments for grinders, so this would be last on my list. But a decent sander can do a better job on flat pieces of wood. Jigsaw – I do things with my jigsaw that are best not mentioned. If you like curves and circles, this is the tool for you:) Small extras: I’ve only mentioned the bigger tools. Of course there are zillions of small cheap extras, like tape measures, knives, screwdrivers, and paintbrushes, but that would kinda take forever. Other Mud Homers' Comments: "For carpentry definitely a tape measure, a good saw, a good square, chisels, and lots of pencils! For power tools I think my orbital sander is great because I can’t realistically sand giant beams by hand but many other power tool jobs can easily be done with hand tools." Says Kirsty. And I second the good square, and the pencils which are often devoured by the lesser known pencil weasel that hides in all building sites the world over. I used to go to the gym when I lived in the city. Now I get better exercise, outside in the sun and fresh air, and improve my land. No monthly fee for that. I do miss a bit of the social aspect of the gym, but this is better in every other way. Says Chris in general. So true! And yes, that's what you don't get when you sit in a mechanical digger all day:) 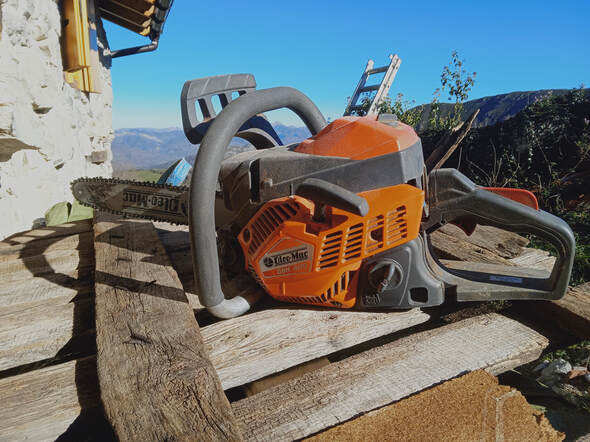 Do you enjoy The Mud Home?
If you find these articles inspiring or useful please consider joining us on Patreon. Your support pays for the running of this website, my virtual help, and my sustenance. A big thank you to all The Mud Sustainers, and everyone chipping in and keeping these posts and articles coming. Nestled somewhere in the Rockies where the days have sharp edges and nights are pierced by starlight, a rather lovely lady is building a rather lovely mud and straw house with a lot of rather lovely people. The backdrop is pretty impressive too, what with grass-swathed mountains plunging into roaring rivers. Idaho. Hmm. Balecob Kay La Bella’s gorgeous little cottage is interesting not least because it’s balecob. Don’t know what balecob is? I admit, I wasn’t too sure either. It’s a hybrid between straw bale and cob, where the advantages of both cob (structural strength) and straw bale (high insulation) are used to create load-bearing structures. See the links at the bottom for more details on that. 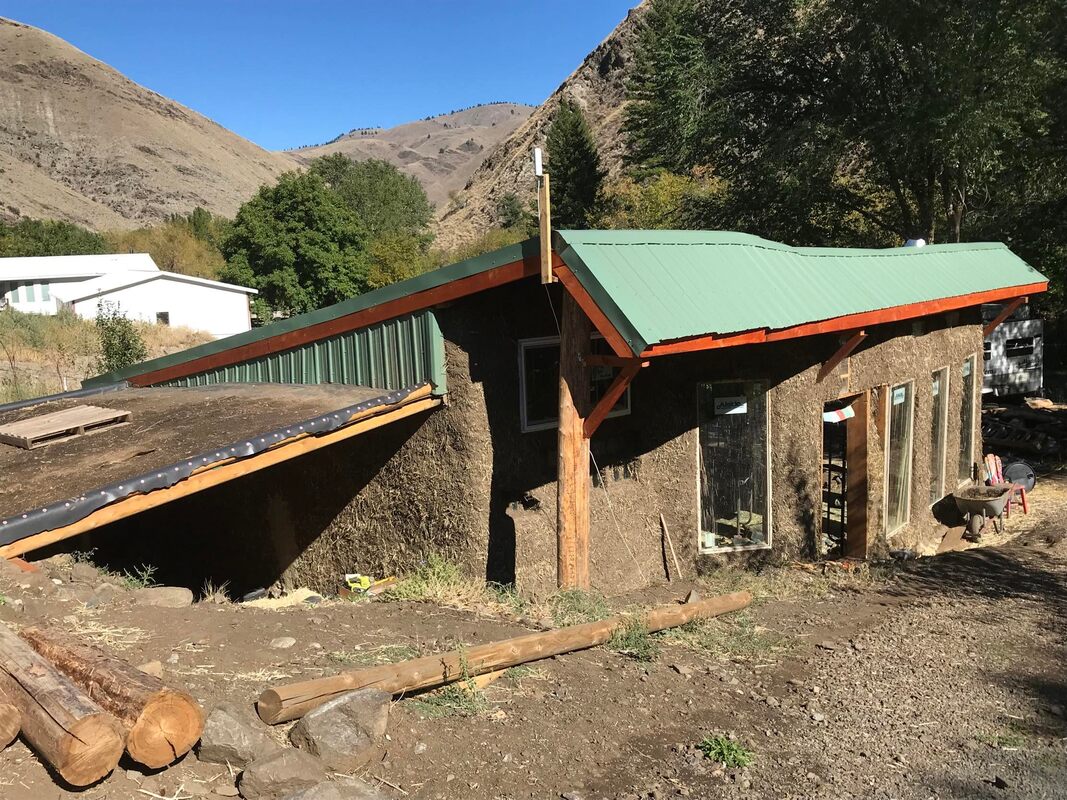 Balecob the Kay Way. But there was another thing about this project that caught my eye, and that was the obvious good feeling and community spirit. As soon as Kay joined our special Facebook clan and I began following her build, I was struck by the generosity of her character. She honestly never has a bad word to say about anyone. Needless to say when it came to building her fabulous little balecob cottage, she seemed to be continuously surrounded by smiling, hardworking assistants, a lot of whom seemed to sport plenty of well-defined muscle tissue:) But why Idaho? And why balecob? “There are no building codes in the county, that’s why I bought there, so I didn’t have to get permits or have stamped architectural drawings,” explains Kay, who really has found a stunning spot. And I tell you when I read her comment, and saw the rugged escarpments and rushing rivers, I had half a mind to go buy there too. So how big is the house? “I didn’t realize when I bought the property that there was a size restriction. The total footprint had to be no bigger than 900 square feet. The little subdivision I am a part of had that one “rule”. So the house is about 750 square feet including a small loft, and a to-be root cellar in the back is about 200 square feet,” Kay told me. For those of us in Europe and many parts of Asia, that sounds pretty flipping spacious. 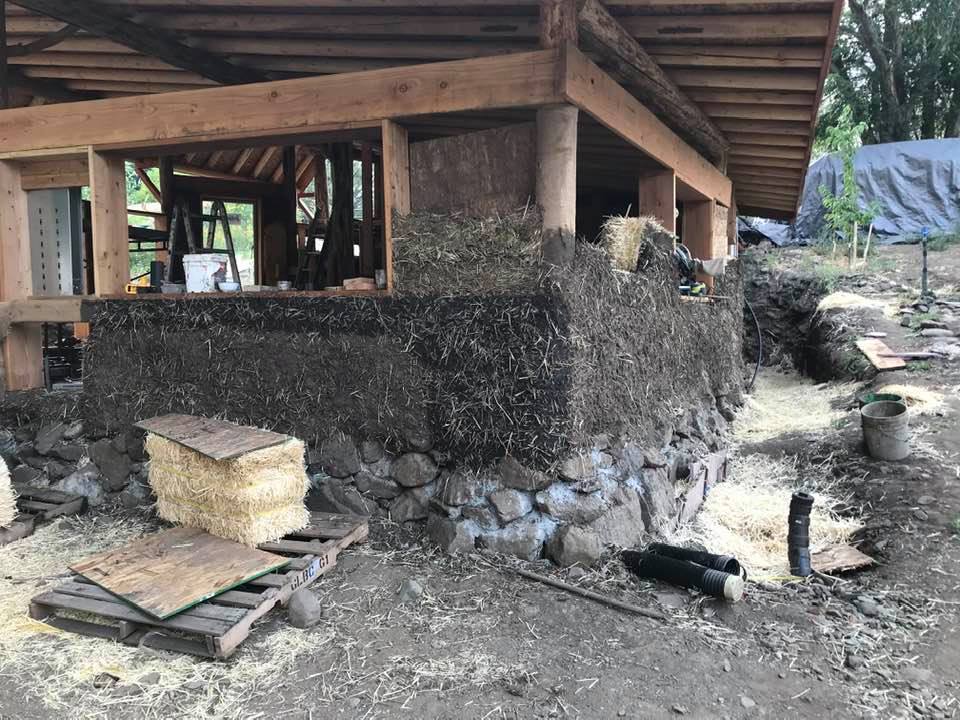 Cat Taylor and friends Kay did a lot of research and prep work before starting her house. She first tried out cob with an oven, and a shed. So by the time she came to the house, which is always a daunting endeavour, she had some mud skills at the ready. She also hired help strategically, which is something I do too, and can be a really good idea. You can really learn from specialists. “I am so blessed with good friends and family, and they all helped with the grunt work of building the last of the stem wall. We thought we had it done for Cat Taylor so we could start with the straw bales. Ha! She got here and we discovered we needed a whole other layer of stone for the wall,” laments Kay. Cat Taylor is a well-known natural builder who runs the beautiful Natural Building Organisation, which is far more than just a natural building school. Cat also works with horses for special needs and veterans suffering PTSD. “I had hired Cat to come out when another of her workshops in Colorado cancelled. She didn’t really do a workshop with me, I just paid her to come and share her knowledge. But, the friends that showed up did get to work with her. She got us to the point of placing the posts and setting some window and door frames, and then left us with instructions on completing the beams, roof, root cellar roof and balecob infill to follow. I was a bit nervous when she left, having not had her here to get us started with what she knows of bale/cob, but we were very successful. She and so many other resources were there coaching us on, as well as a bit of intuitive knowing.” And honestly Kay has done such a sterling job. She and the team managed to get the exterior complete by winter, which is a big deal. 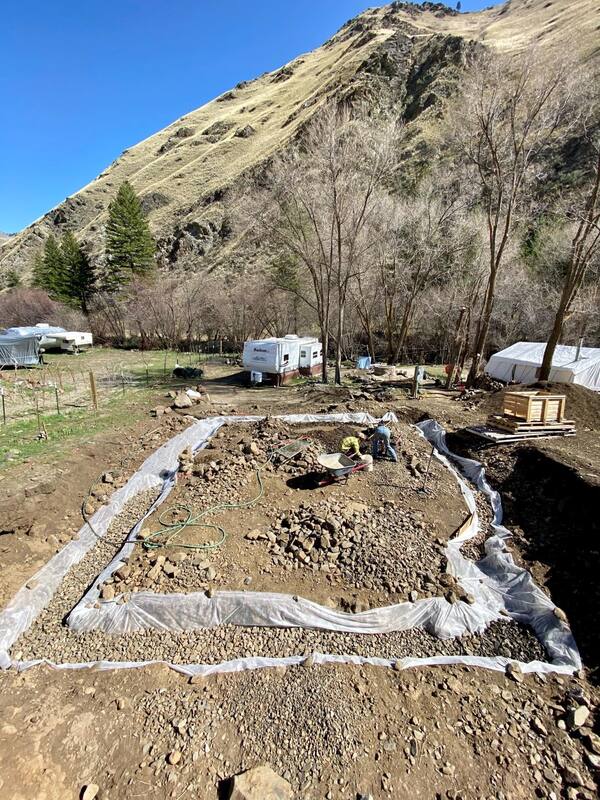 Foundations. How did Kay and friends make this house? Long-time Mud Home readers will be getting used to the order of events by now. As always we start with the rubble trench foundation, upon which was built a nice stone stem wall. The rubble trench is your drainage (see more on that here). The stem wall keeps your mud/straw house off the wet ground. The hardest part of the build There’s always one bit of the build that really tests you. It might be the roof. It might be the plaster or the finishing. For Kay and her family it was that rubble trench and stem wall. “The rock for the rubble trench needed to be clean, because its main purpose is to keep water drained from the house in case of a huge rain. So the trench needed to slope away from the house, have a layer of clean rock size 2-3 inches at the bottom with the drain pipe, then a layer of clean bigger rock 3-4 inches on top, all tamped down as we went,” explains Kay. “I had so much rock! But we needed to sort it into sizes, put it into 5 gallon buckets, dump it on a screen over the wheelbarrow and hose the dirt off to clean it, then dump it in the trench. It was painstaking and seemed to take forever! It was a huge challenge, and none of us had done anything like it before. But I did my homework. The rocks were mostly all laid by hand.” 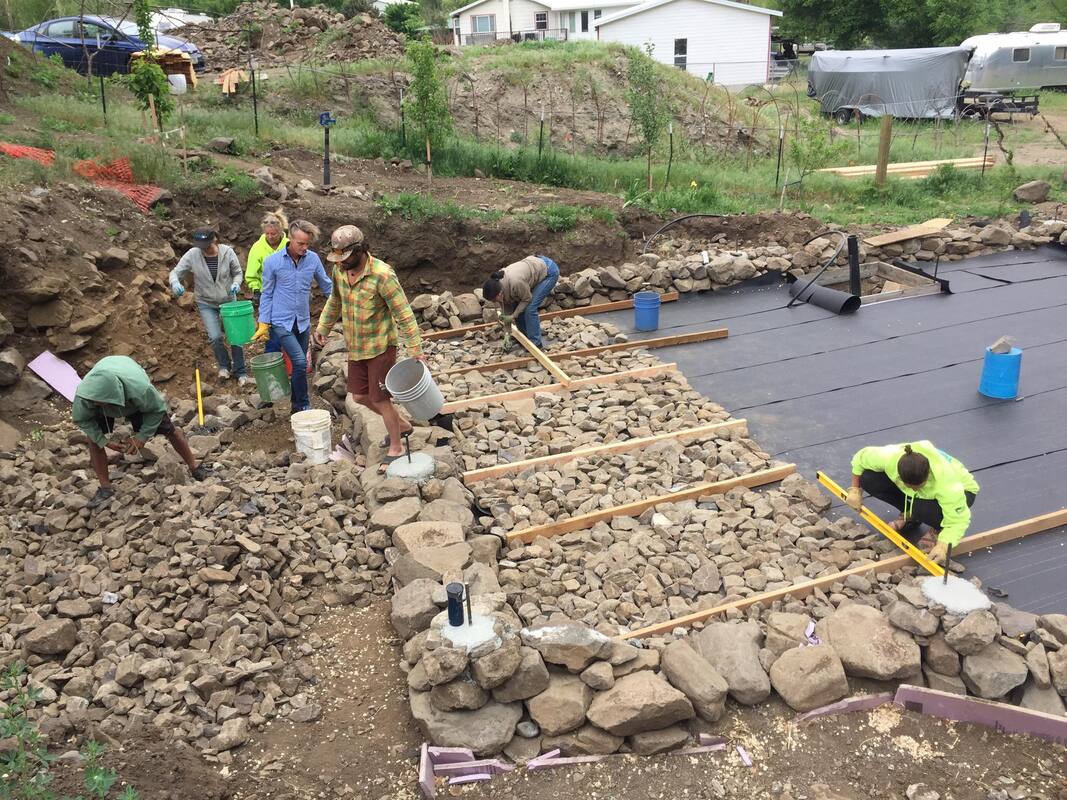 Stem wall. Post and beam frame Once the foundation was laid, a post and beam structure was erected. 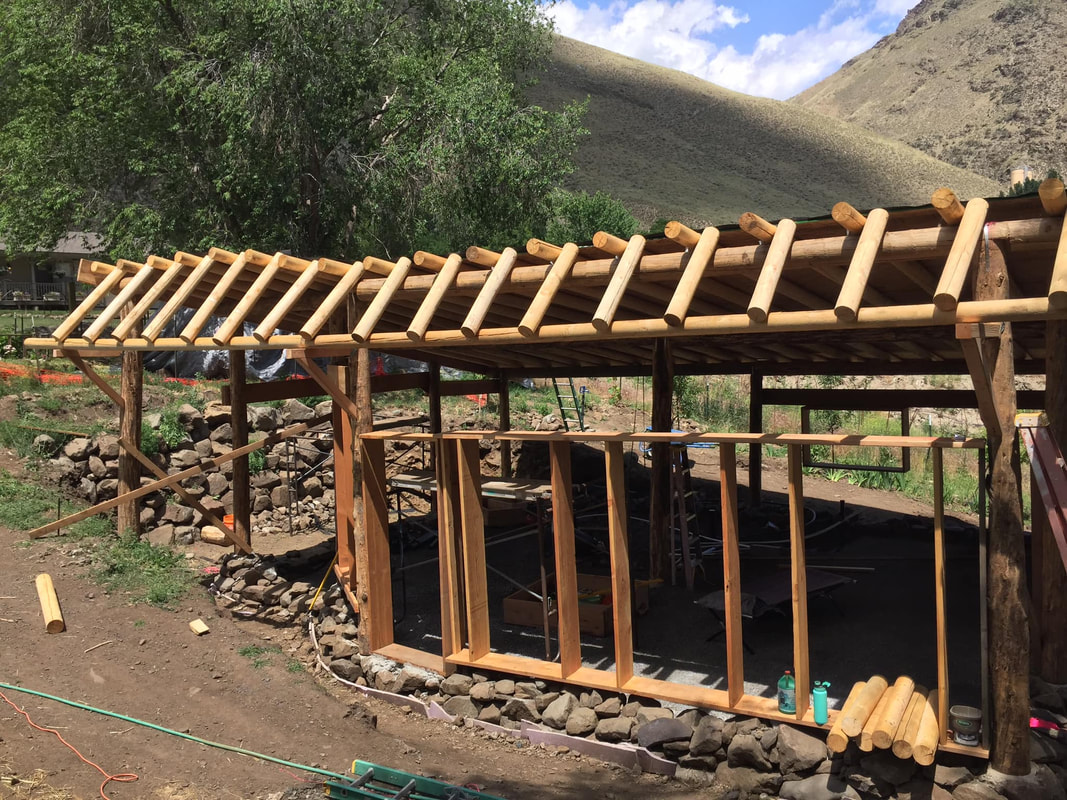 Post and beam framework. Balecob walls Next came the balecob infilling. As you can see the bales were laid on the stem wall, and everything was ‘cobbed’ into place. “Cat Taylor convinced me to do bale/cob, but she suggested to cut the bales in half lengthwise so we would have approximately 9” wide bales instead of 18,” says Kay. And that was a great idea to save space (and bales). 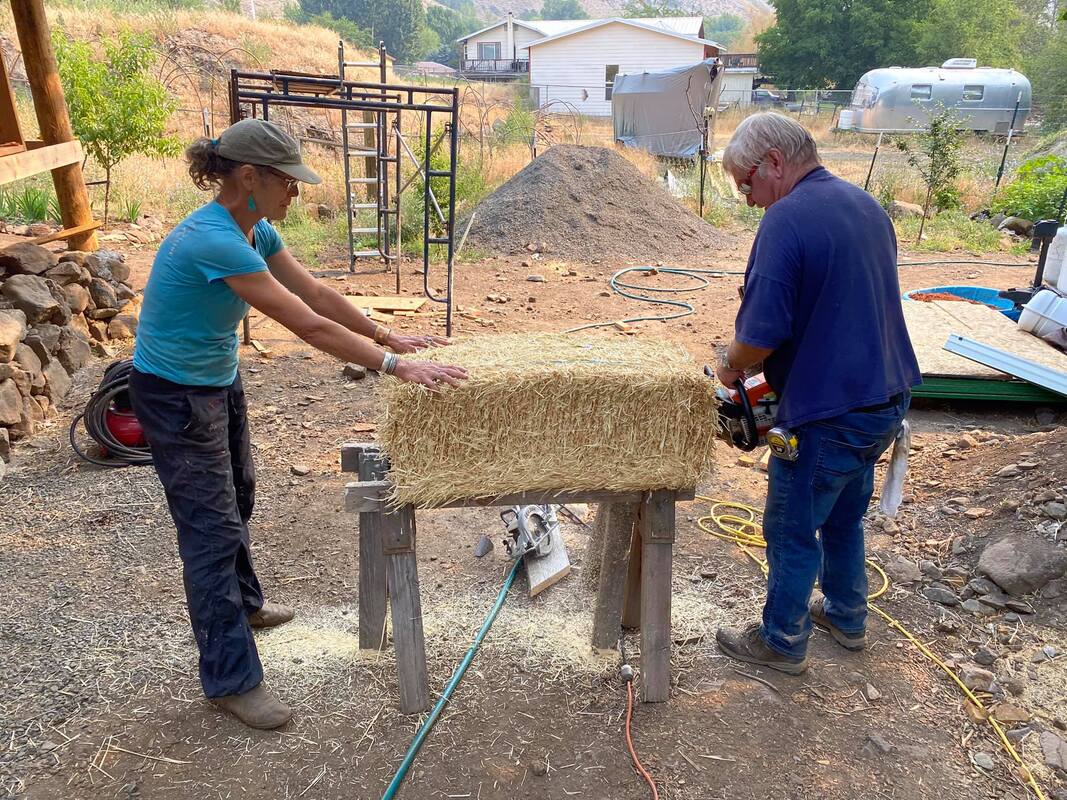 Cutting the bales.  The bales, and the cob. Roof “The supports for the roof are lodge pole pine rafters about 5-6 inches in diameter set with a 24 in space between them. They are then covered with 4 x 8 sheets of plywood or OSB. The main roof has a kind of tar paper vapor barrier on it (not sure how natural that is),” says Kay. I think it’s really hard to get away without some sort of non-natural water barrier in the roof. I mean yes, you can forego it, but you usually end up with leaks. After the vapor barrier came the metal sheeting, which they screwed into place. “The smaller side roof that will cover my ‘root cellar’ also has the plywood nailed to rafters, then sheets of cardboard to cover the nail heads so as not to puncture the rubber pond liner that was the final layer, before dirt (which I still need to add to, for a living roof).” 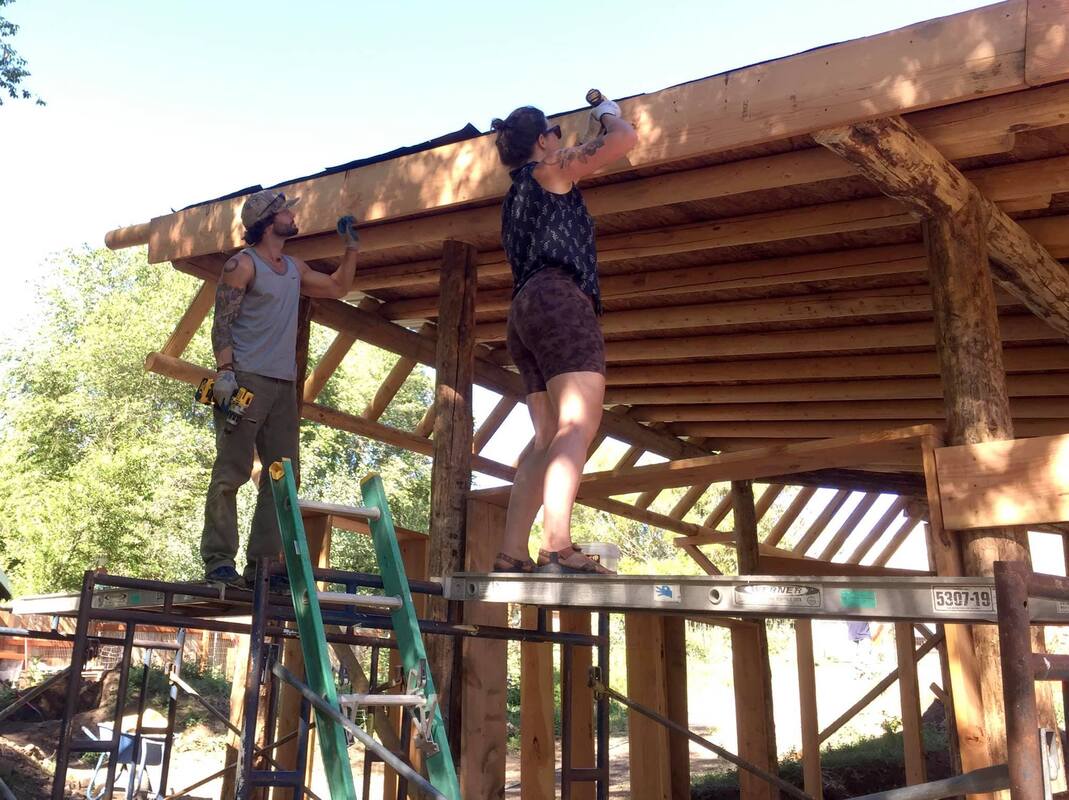 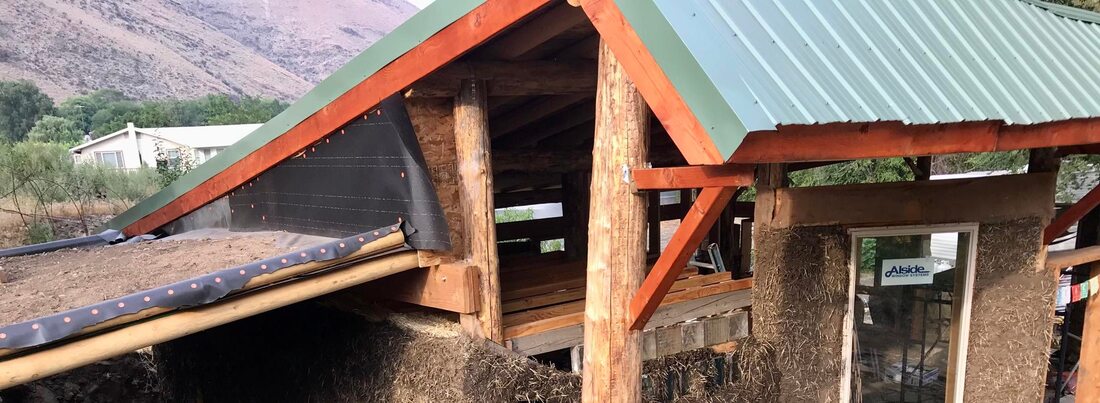 The roof! This will be Kay’s permanent home. She came to Idaho from Colorado to escape the crowds and help her daughter with her new coffee roasting business. There’s only one downside to Idaho. “I truly desired a longer growing season. I love to garden, and grow my own food,” says Kay. And sitting slap bang on Rapid River, she enjoys free irrigation water that is gravity fed from an irrigation canal about 100 yards above her property. Perfect for gardening and fruit trees. Yes, you might notice I’m rather taken with this property:)) 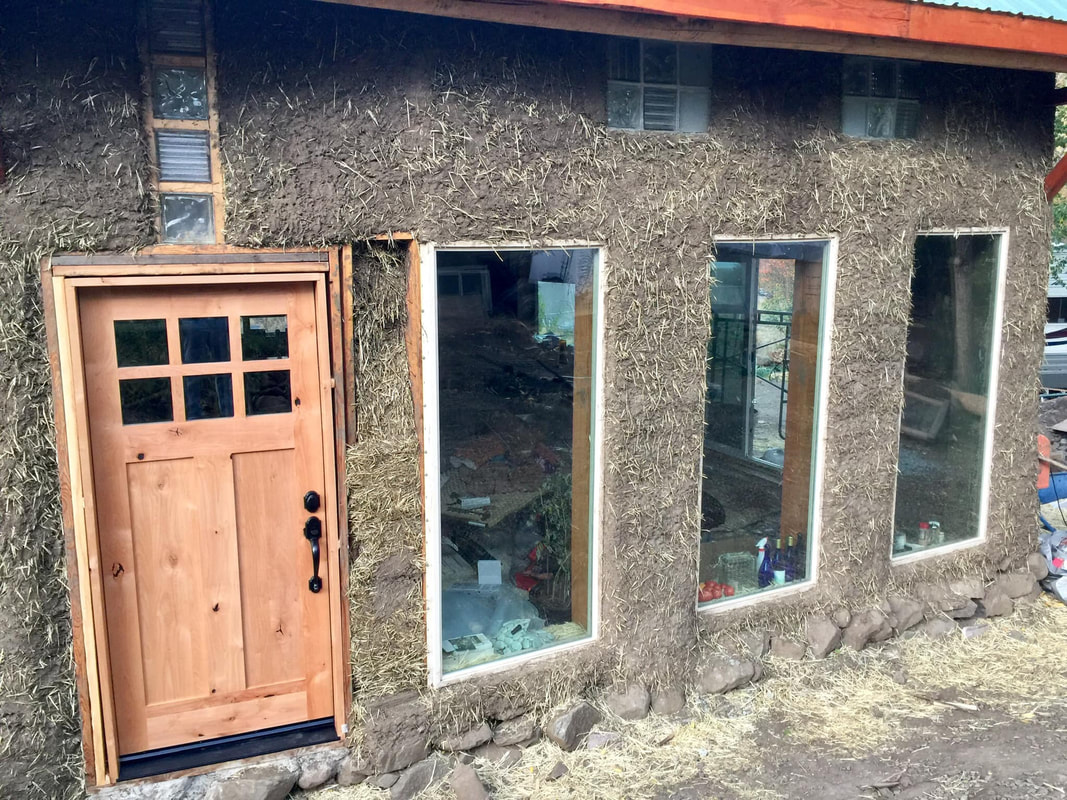 Windows and doors going in! Kay’s balecob house isn’t finished yet, so I’m going to cover it again next year. In the meantime a big round of applause to a brave and lovely woman creating her own gorgeous world away from the madding crowds. Things to take from this project: 1. Hiring help strategically can make all the difference between happy success, and exhausted failure. Some people do get rather into the Lone Ranger mindset in building and see any kind of instruction as a sign of failure. In truth, failure more often comes by not enlisting help at the correct times. 2. What goes around comes around. When you’re generous and see the best in people like Kay, people are more likely to want to work with you and help you. 3. Some counties in Idaho have no building codes. Oooh. Relevant links: For a super step-by-step article on how to build balecob, go to Mother Earth News: https://www.motherearthnews.com/green-homes/balecob-how-to-zbcz1802  Did the dogs help too? Nah, they just took the sofa.  Mum and daughter. Do you enjoy The Mud Home?
If you find these articles inspiring or useful please consider joining us on Patreon. Your support pays for the running of this website, my virtual help, and my sustenance. A big thank you to all The Mud Sustainers, and everyone chipping in and keeping these posts and articles coming. 5 limecrete recipes from the world’s oldest buildings. There are many builder myths swimming about in the cement mixer of concrete history. One of them is that the Romans invented concrete. They didn’t. They created a specific kind of limecrete, which differs considerably to the Portland cement of today. Also, it’s highly unlikely that they invented the stuff. There’s plenty of archaeological evidence to show other peoples were using limecretes and mortars way earlier. Lime mortars can be found in Syria dating as far back as 6500BC, and in Europe on the banks of the Danube limecrete floors in huts were found dating back to 5600BC. So the Romans were late to the limecrete party. But they did create some very interesting recipes. They weren’t the only ones though. 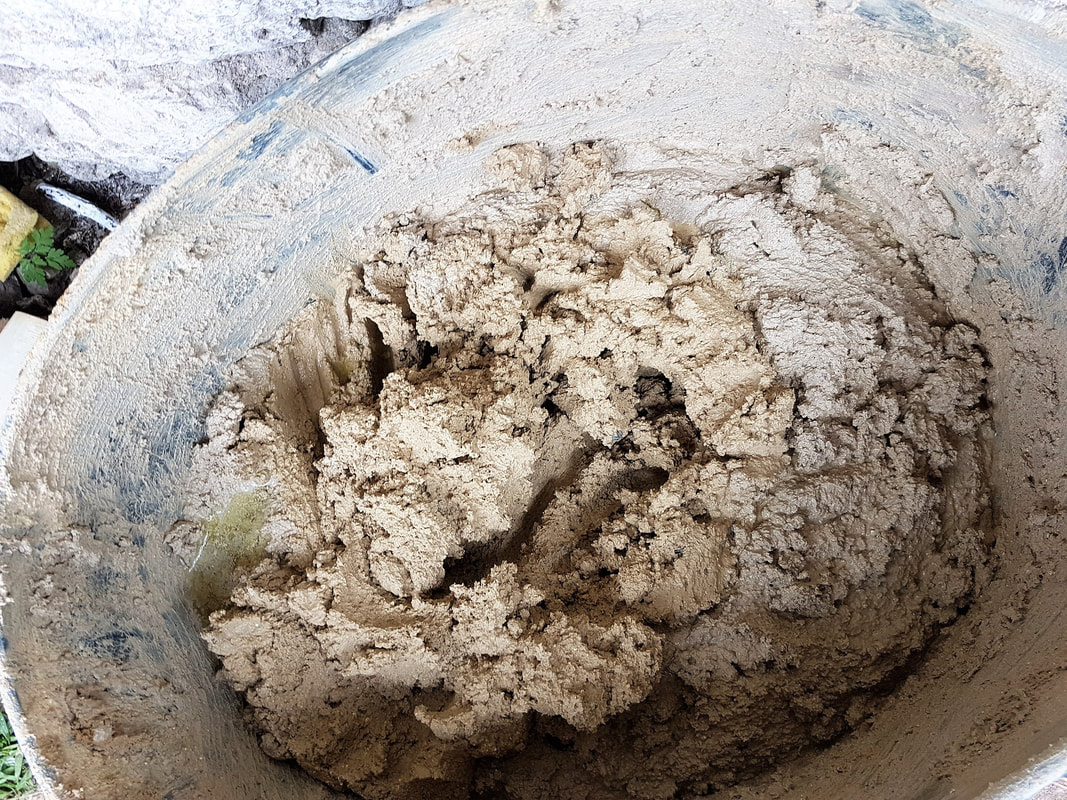 Can my limecrete hold up to the ancients’? I doubt it. How did the ancients make limecrete? This week in answer to a question about pozzolans, I found myself diving down some dusty old rabbit holes in search of the first limecrete recipes. What a wonderful time I had! And what I stumbled upon was so interesting, I decided to share it. The bottom line is there’s no single way to make limecrete. So many pozzolans. So many options:) Huh? What’s a pozzolan? Right, let’s get back to some cement foundations: Lime, lime mortar, limecrete There’s lime, lime mortar and limecrete. They’re all different. Lime is basically burnt limestone (you can read more about the different limes and how they are made in my article here). When you slake burnt limestone you get a putty. If you mix this with sand or earth, you can make a basic mortar for stone walls. Limecrete When you mix that same lime putty with something called a pozzolan, a chemical reaction occurs which turns the lime into a cementitious substance. This is a very simplified account, but it gives you a general idea. If you’re serious about using lime, check out my Amazing World of Lime course though. 5 Ancient Limecrete Recipes With that all under our belts, here are five ancient world limecrete/mortar recipes you might like to try (sometimes the ancients used limecrete as mortar, as we do today).  Photo by Simon Berger. 1. Ancient Egypt: Limecrete Pyramids? This is possibly the most mysterious of all the limecrete stories and recipes. It’s still highly debated how the Egyptians built the pyramids. What we moderns are a tad slow to realise is the ancients were in many ways more advanced than we are today. Remember those images of all those slaves dragging massive stone blocks across the desert? Well, there’s another theory out there fronted by Dr Joseph Davidovits that those great stone blocks weren’t in fact hauled from anywhere and chiselled, but rather made from poured geopolymer cement. Oooh… Despite the traditionalist backlash, it’s not as far out as it sounds. There’s plenty of evidence of poured limecrete in ancient Egypt, and scientific analysis of the Pyramid blocks has done nothing to dispel Davidovits’ theory. If you’re into this kind of thing, you can read all about it here: https://watershedmaterials.com/blog/2015/3/31/geopolymer-concrete-egyptian-pyramids-and-a-new-way-forward-for-sustainable-masonry Pyramids recipe (courtesy of the Nabataeans) Lime + crushed limestone (main aggregate) + high alumina clay/diatomaceous earth + natron salt. There’s some debate whether the Nabataeans were using clay or diatomaceous earth in their mix, so take your pick! But only certain high alumina clays have pozzolanic properties, so lobbing in any old loam you found up the road probably won’t work.  The Great Wall of China. 2. The Great Wall of China The Great Wall of China was built over a long time, and the builders used many techniques ranging from rammed earth to mortared stone and brick. It was during the Ming dynasty that lime entered the picture. In this era the Chinese created an exciting lime mortar using glutinous starch. Recipe (courtesy of the Ming dynasty) Lime + aggregate/pozzolan (it’s unclear from my research but probably clay or sand) + surprise ingredient, sticky rice! https://www.acs.org/content/acs/en/pressroom/newsreleases/2010/may/revealingthe- ancient-chinese-secret-of-sticky-rice-mortar.html The glutinous starch in the sticky rice helps bond this crete, making it tougher and more durable. 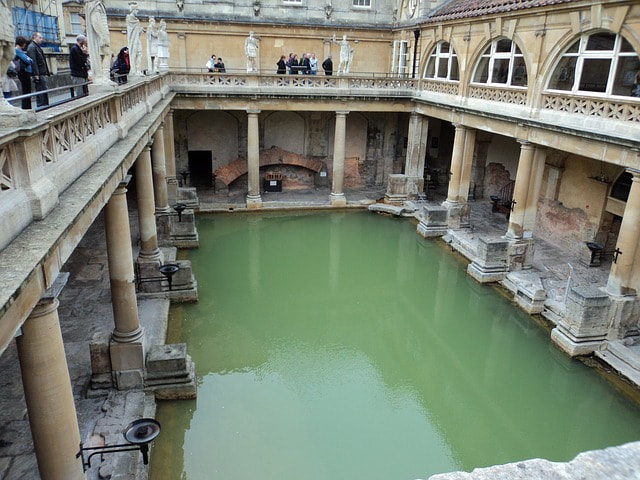 The Roman baths of Bath UK by lositlady. 3. Roman Limecrete The Romans did indeed create very slick, tough limecretes often using volcanic substances as their pozzolan of choice. Here’s a recipe from the Baths of Baia in Italy. Recipe from the Baths of Baia Lime + volcanic tuff (main aggregate) + ceramic fragments. The Romans pozzolaned the hell out of their limecretes. Both volcanic tuff and crushed ceramics are pozzolans, and this combo created an especially durable crete. 4. India’s lime mortar heritage For truly opulent lime mortar mixtures, look no further than India, which developed a stunningly rich lime tradition still well understood today. Due to the large amount of analysis and research conducted on so many of India’s ancient buildings (some folk value their heritage it seems), there are so many detailed lime mortar recipes I had trouble choosing which to add. Here are a couple: Thanjavur Palace Mortar Substantial testing was done on the mortar for this 17th-century building, as you can read in the link below. Recipe Lime + quartz (main aggregate) + feldspar + small quantities of ground limestone and lithic grains. For more detail see this article: https://link.springer.com/article/10.1140/epjp/s13360-021-01897-9 The feldspar is the pozzolanic ingredient here. The use of grains such as fenugreek and haritaki seeds are common in Indian lime recipes. Not sure if these were the grains in the Thanjavur palace mortar, but could be.  Limecrete in the mix. Jaipur Pink City Plaster This is a plaster rather than a crete, but it’s so luxurious I had to add it. The Anant Bhagwan Mandir temple in Jaipur is 250 years old and uses a special glossy lime plaster developed in the 17th century called Araish. Recipe: Quick lime, marble dust, curd, jaggery, and fenugreek. Jaggery is a high-starch cane sugar which would have a similar bonding effect as sticky rice. The casein in the curd helps bind the lime plaster, giving it a slicker look and preventing dustiness. What do haritaki and fenugreek seeds do? I had no idea, so I asked one of India’s natural building experts: Shagun Singh. Here’s her reply: “The haritaki/harad soaked water is added to enhance lime's workability, increase its compressive strength and reduce porosity. While the fenugreek soaked water serves the purpose of enhancing lime's workability and water resistive properties. Jaggery water is added to lime mortars for enhanced binding, but avoided in plasters.” Thanks to Priyanka Gunjikar for her input too! India’s plaster experts: India’s lime mortar and plaster tradition is vast and detailed, so if you’d like to geek out on that, Thannal Natural Homes is the place to look in the south. Here’s a great article to start: https://thannal.com/plasters-of-rajasthan/ In the north, get in contact with Geeli Mitti, who run stacks of workshops: https://geelimitti.in Get experimenting! Sooo on that basis, time to get your lime cauldrons out folks. As you can see, there’s no single answer to limecrete. But the trick is in the pozzolan. The Amazing World of Lime If you want to learn how to use lime as a paint, mortar, render, and crete, then take a look at my simple fully-downloadable online lime course. "This course is worth every penny. It totally cleared everything up for me and gave me the confidence to get started with lime." Kirsty Henderson, author of Portugal from Scratch. 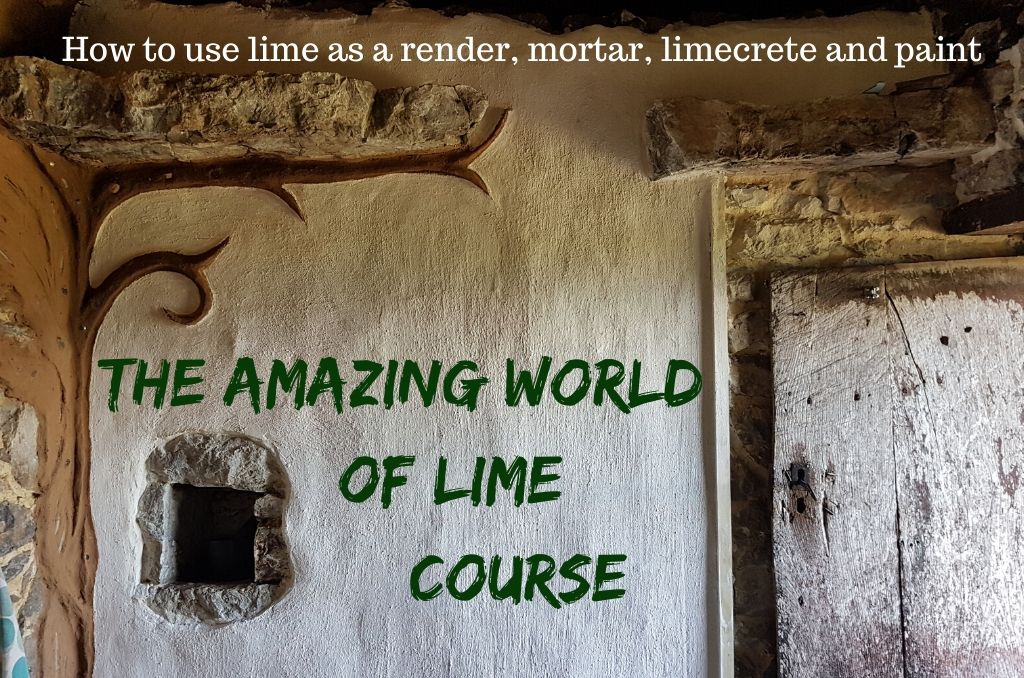 Do you enjoy The Mud Home?
If you find these articles inspiring or useful please consider joining us on Patreon. Your support pays for the running of this website, my virtual help, and my sustenance. A big thank you to all The Mud Sustainers, and everyone chipping in and keeping these posts and articles coming. How to use rubbish in cob building and more. There are so many facets to the “problem” of trash: building with it, reusing it, what about recycling? How to deal with garbage when you’re off-grid in nature? How to reduce it? Because heck, as a species we have a real problem with the stuff. As with all these environmental issues we also have piles of judgement that tower far higher than the actual garbage dumps themselves. It’s unhelpful because there’s no simple answer (other than stop buying stuff) and many many subtleties to consider. Here’s what I’m doing with my rubbish. Roll on the judgement:) It’s complex, so stay alert. 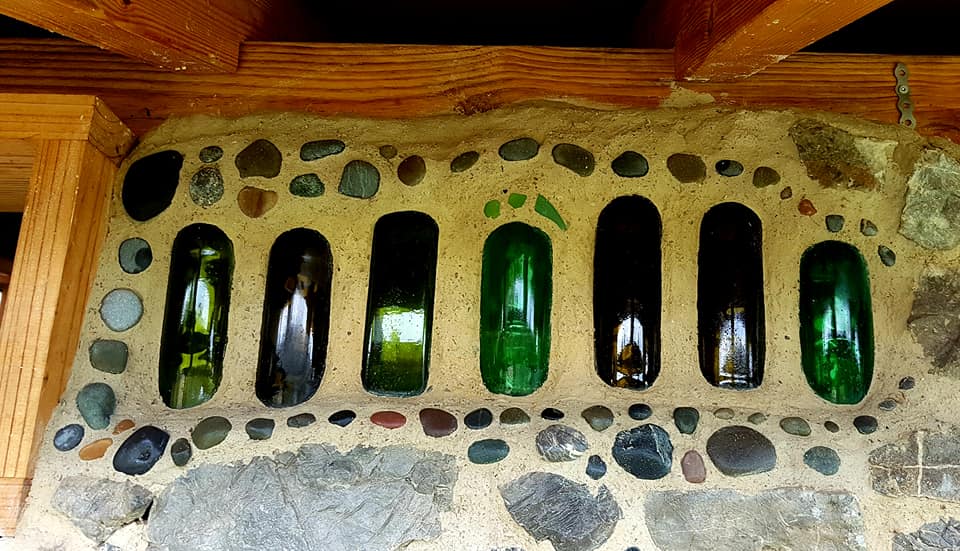 Building with rubbish, my new bottle wall in limecrete. 1. Reuse/Recycle - Welcome to the Trashure Bin We all know recycling isn’t the great eco-saviour it was supposed to be, as a lot of it ends up transported across the world to be dumped in another country. We also all know it would be better to reuse stuff. But how exactly can you manage that sensibly without your house turning into something you might see on Hoarders? Here’s how I do it. 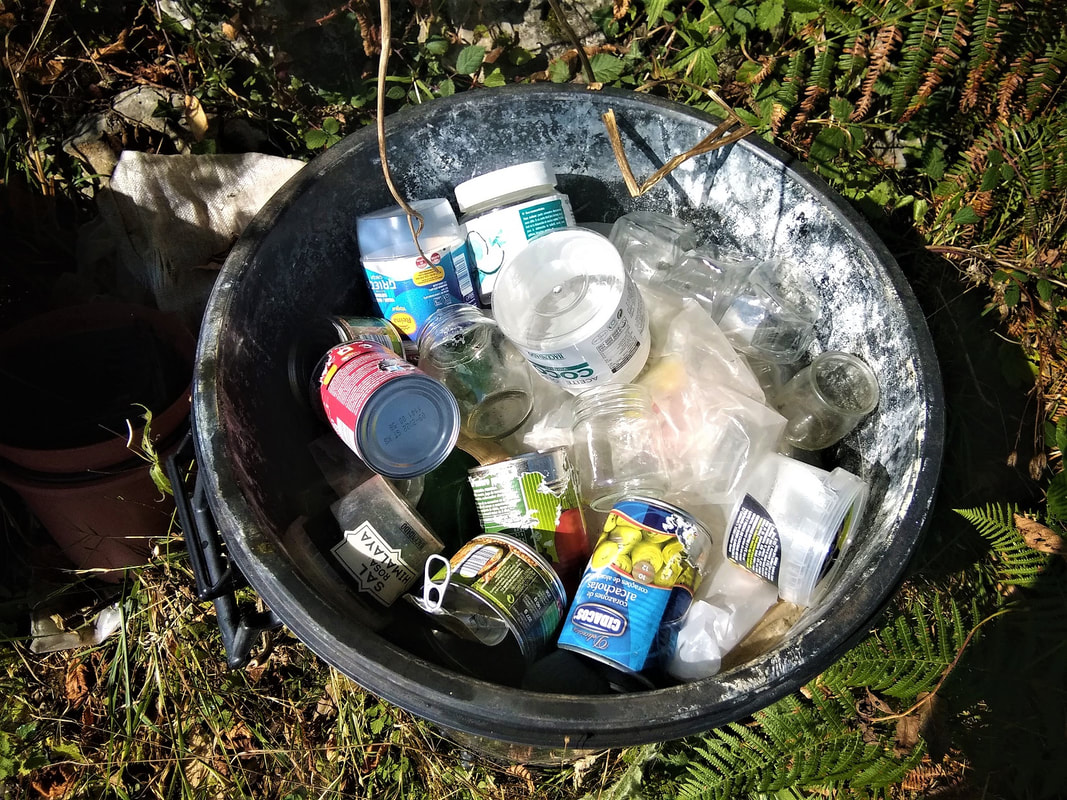 The Trashure bin. I have two bins where I shove everything that I could ever possibly reuse, this includes jars, bottles, plastic containers, tins, sacks, plant pots, netting, blah-de-blah. I can’t tell you how many times I dip into those bins, and how often they save me buying something. Need something to put those nails and screws in? Go to the trashure bin. Need a water pot for the hens? Look in the trashure bin. Need a food container? You guessed it, I go to the trashure bin. But... How I keep the trashure in check We’ve all seen those reports of someone lost in their hoarding habit, with sheds and rooms overflowing with stuff they’ll never use. It’s unhealthy and can end up polluting your beautiful land. So how do I stop my trashure from taking over? Once the trashure bin is full, then it is time for stage two. I reuse an old sandbag and fill it with the least desirable bits of trashure. Those bits go to the recycling. I try to choose glass and tin because I know they have a much better chance of being recycled. I usually need to do this once every two months. No, it’s not perfect. Please show me something that is. Having said that, I'm always ready to improve, and the building with rubbish ideas at the end of this article are where I'd start. Beware: While trash can be treasure, you might want to erect some defense against other guilt-ridden consumers who will be itching to offload their crap onto you like you're some local version of China. If you're like me you'll often be too quick to say yes, and then be stuck with something that pollutes your land. Be discerning with what you take from other people or your home ends up looking like a landfill site. 2. Compost it If it’s food or organic, then obviously it goes on the compost heap. 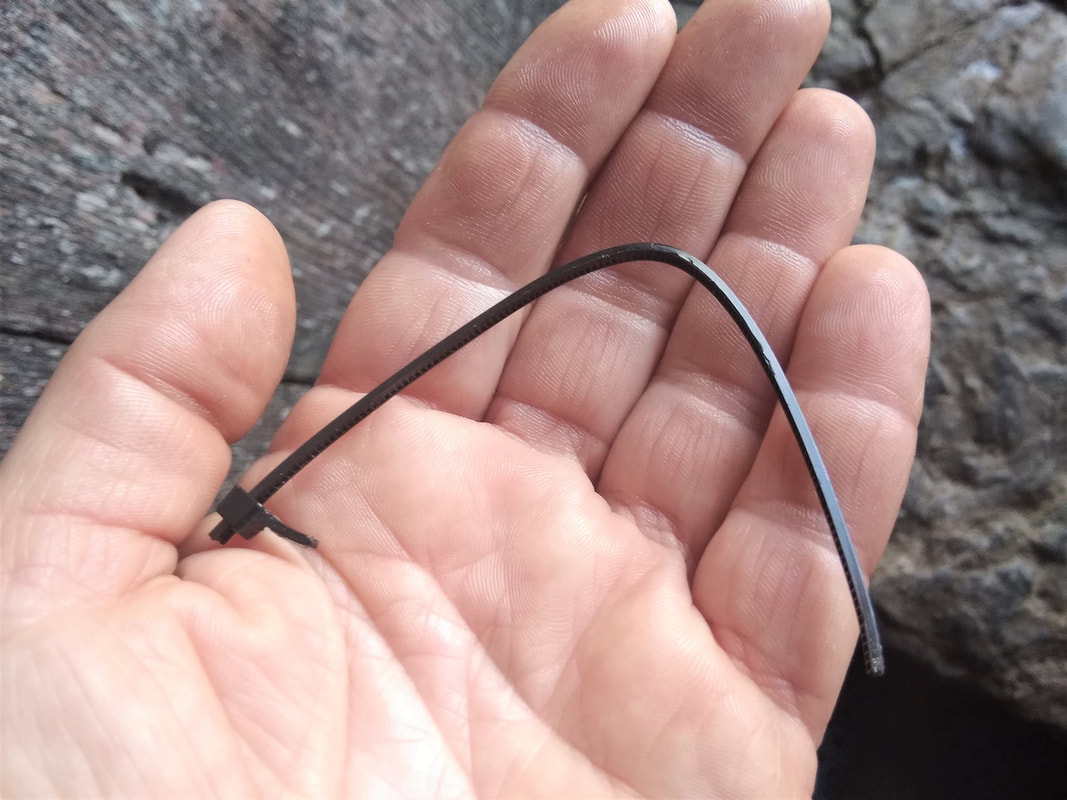 I burn this. Crucify me now. 3. Burn it This is the most controversial of the lot. I use a wood burner to heat my home so I burn all old papers and cardboard in it (actually they are my firelighters). My rubbish may as well keep me warm after all. But here’s the thing that causes the controversy: I also burn small bits of plastic. Huh? WHAT? Oh, the moral outrage! Yes... I shall roll up my sleeves on this one, because urbanite eco-purists haven’t got a flaming clue if you ask me. If there are any tiny plastic pieces that I think will cause an animal harm, such as those stupid bits of plastic they tie stuff up with, or a bit of sellotape, or the scraps from a disintegrated plastic bag, namely anything an animal might swallow, I burn those. And I feel good about that decision. In my opinion the “toxic” gas caused by a finger’s worth of plastic a fortnight is a lot less harmful in the air than it is in solid form in multiple animals’ stomachs. 4. Build with it One of my favourites of course. I reuse a lot of rubbish in building. Glass bottles and jars are the obvious one. I’ve used them all over my building work, creating windows in the chicken coop or bottle walls. Kristen Krash of Sueño de Vida in Ecuador said she stuck lots of trash into the cob walls of her buildings. If you are remote it can be a real pain trying to get rid of rubbish, so it’s a fantastic plan. You can actually embed it into your cob work and make walls out of the stuff. Here’s how Kristen uses rubbish in cob walls: 1. Stuff all the small pieces (bottle caps, wrappers, bags etc) into plastic bottles. 2. Then on top of the wall foundation (usually mortared stones) she lays a row of stuffed bottles. Then, a layer of cob, then more bottles, then cob. 3. She lets each double layer set up for a day in between to stabilise. "It's just like earthship walls, except with cob instead of cement,” she says, and adds that she also once worked on a cob house where the builder put an entire broken TV set into the wall. Please note: You do need to pay attention to how you're impacting the structural integrity of your cob walls when using rubbish in them. Kristen used most of her rubbish in non-supporting walls. 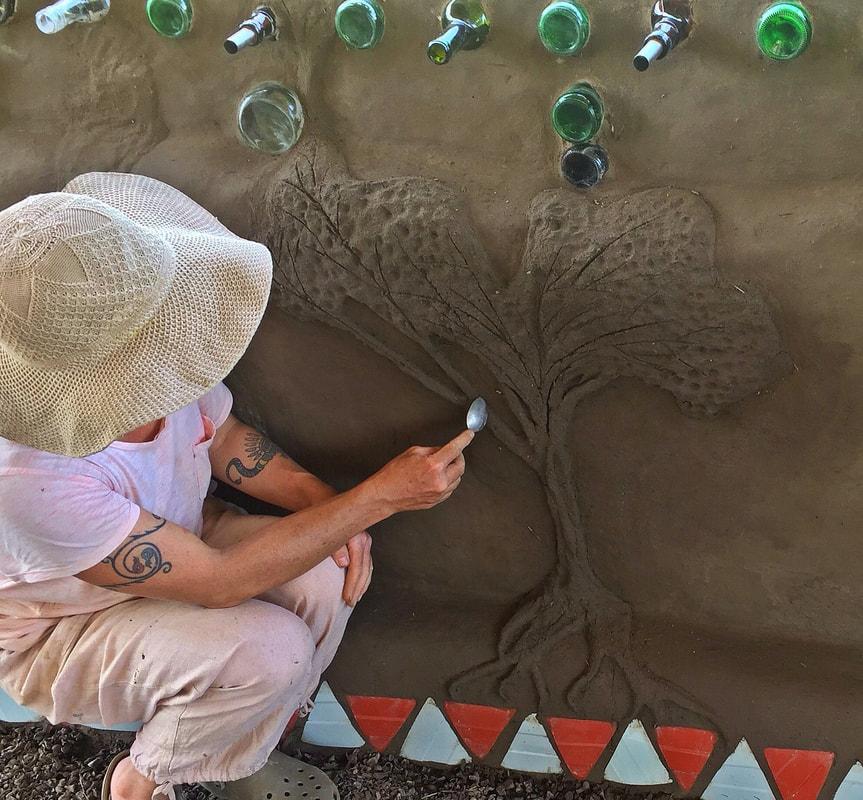 Kristen’s walls are full of garbage:) What did I do with the broken tiles from my roof? I used them as drainage and terracing. 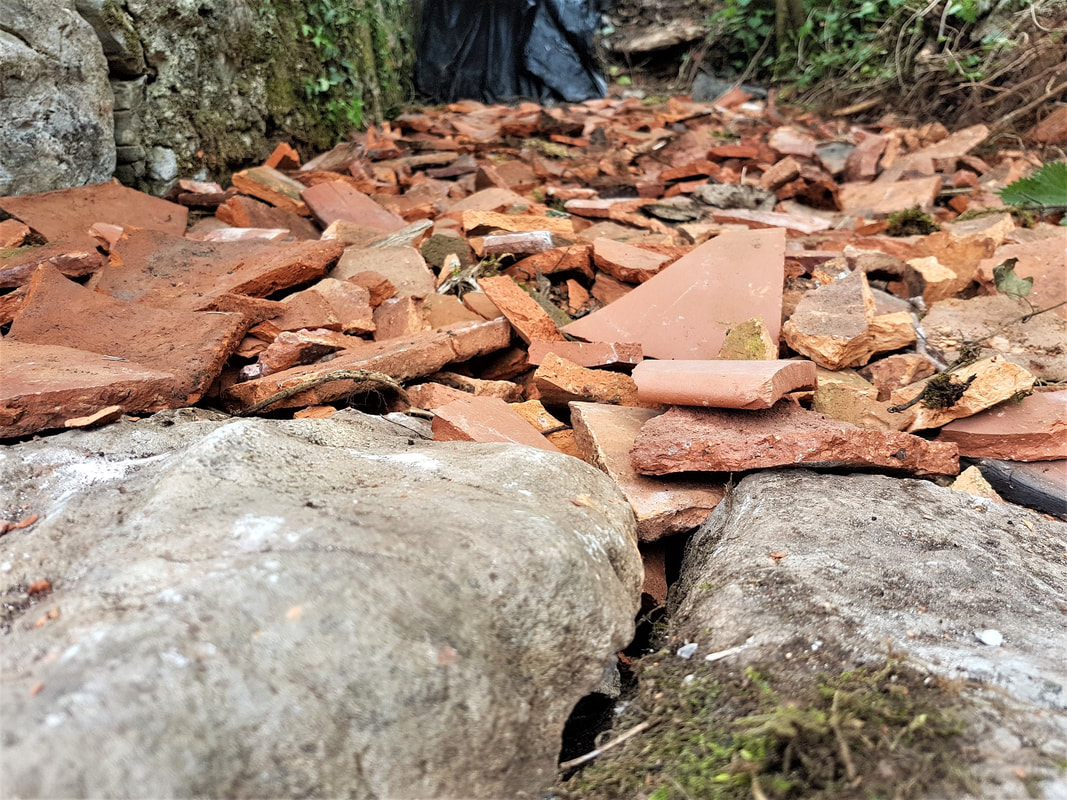 Broken tiles creating a drainage layer for my water tanks. Old cupboards, old doors, old windows etc can all be upcycled into beauty, as Dianne Gungor and Bismil have shown in their work. 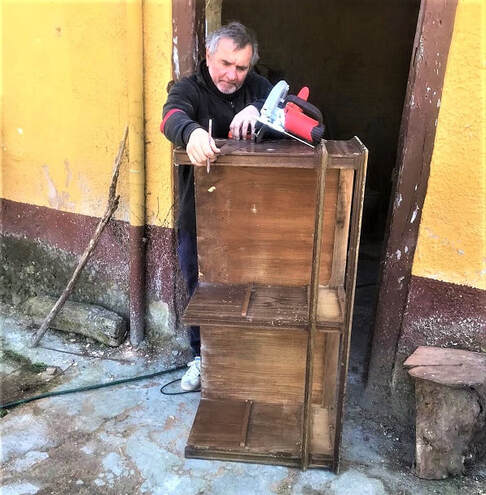 This old cupboard isn’t rubbish. 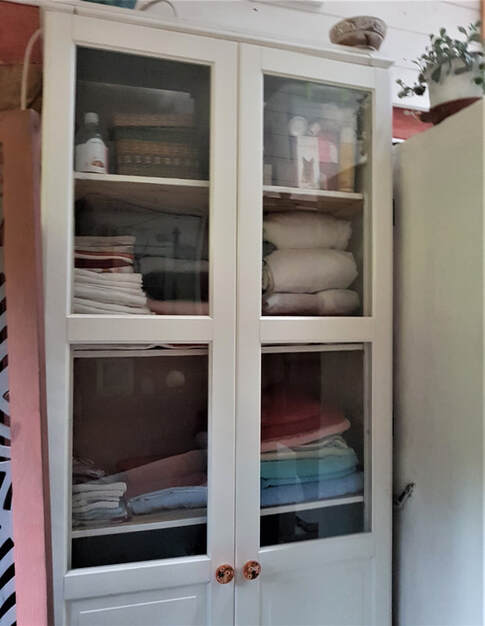 Bismil and Dianne turned it into this. Old Clothes Ah well this is something most rural folk can feel good about. Compared to anyone working the 9-5 or participating in “society,” we off-gridsters don’t usually own big wardrobes. And everything is used until it basically doesn’t hold together anymore. Once it doesn’t hold together, we then cut it up and use it as cleaning cloths, rags, animal beds, etc etc. I can’t remember when I last threw out clothes other than shoes. Reduce your shopping (forage, plunder, re-use, upcycle) Obviously the best way to reduce your rubbish footprint (and your off-grid headache of getting rid of rubbish) is to stop buying stuff. Really, there isn’t such a thing as an eco-product. If it had to be made in a factory somewhere and/or transported, it’s not eco, so stop kidding yourself. If you live in the country this is so much easier. Every time you forage something be it hay, stones, wood, or clay, you’ve saved rubbish. The worst offender? Get ready to be surprised... The worst offenders, which are never discussed, are building materials. Even a natural builder like me who refuses to buy anything and builds out of mud and lime and anything she can find laying around, even so, my biggest non-recyclable rubbish contribution is building materials. Linseed oil tins, rollers, paint brushes, glue cartridges. The other worst offender is of course plastic packaging. You can do a lot more about this one though by shopping in local markets, growing your own food, and not engaging in processed foods. Who wants to eat that plastic packaged poison anyway? Other creative ideas from The Mud Home Facebook Group: “I would turn it into art for your home and or garden. I think it's something to study and ponder at night on how to make creative garden totems, fun wall art, flying stuff, steampunk art,” says artist Daphne Roberts, who turns everything into beauty. “Old cement goes in my own little landfill, trying to build up an area,” says Chris Mack in Ecuador. In fact, if you have a piece of land this is probably the most honest way of dealing with it. You’ll see how much crap you have, and you can always plunder it later. “Cement renders and pointing can be crushed and used as aggregate in hydrated lime mortar, render, and plaster. And pulverized brick (resulting from damage caused by said cement renders and pointing) can be repurposed as pozzolan,” explains Claude, who’s naturally renovating an old house.  Daphne turning something into something. Related link - Dianne and Bismil’s upcycled bathroom:
https://www.themudhome.com/mudbuilding/a-stylish-natural-bathroom-made-of-lime-and-milk Do you enjoy The Mud Home? If you find these articles inspiring or useful please consider joining us on Patreon. Your support pays for the running of this website, my virtual help, and my sustenance. A big thank you to all The Mud Sustainers, and everyone chipping in and keeping these posts and articles coming. Istanbul is famous for its spectacular domes, many of them commissioned by a well-known Sultan called Suleiman (The Magnificent)*, and realised by his favourite architect Mimar Sinan. None of them were earthbag of course. Until now. Get ready folks, this is probably one of the most technically interesting earthbag structures I’ve seen, with some pioneering design features such as an oculus skylight and a slipstraw insulation envelope. Woohoo! Yes it’s ambitious, even so there’s a lot for everyone to learn from this project. But first let me introduce you to Xavier Allard, the quiet French/Belgian chap with plenty of attention to detail who managed this project. Luckily for us he documented it extremely well too. But who is he? And why is he in Turkey? “I discovered Turkey while traveling and decided to stay”, says Xavier. He’s not giving much away here eh? So I shall interpret this as meaning he rather liked the place, possibly because the food is fab, and the people are friendly? Anyway ten years on he’s still in there. 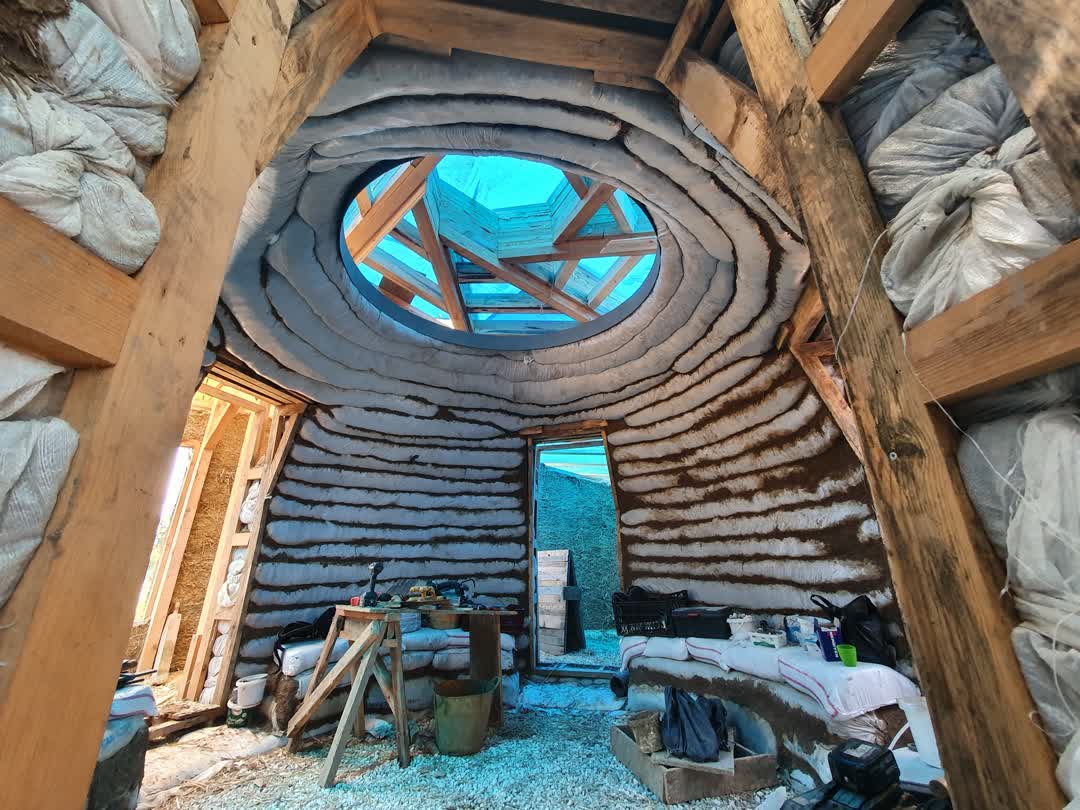 The Magnificent Semi Dome. How did Xavier become the Mimar Sinan of natural building? “No no, I’m not Sinan, that’s Matthieu Pedergnana**”, explains Xavier. “I’m the builder. It all began when I met Matthieu in Ankara. He’s a French architect who was teaching architecture at Yaşar University...I learned everything on site both from him as a building mentor and on my own, first volunteering on alternative building projects, then organizing workshops myself. Eventually I specialized in woodworking”. The Koluba Team After a lot of natural building experience, Xavier set up his own natural building organisation called Koluba. The Koluba team have been making plenty of mud beauty over at the Sihirli Tohumlar*** permie farm about 130km from Istanbul. And it warms my heart to see earthen structures once again sprouting on Turkish soil. As you’ll no doubt remember when I built my earthbag house back in 2011, most people thought it was a pile of poop, that it would melt in the rain, and that concrete was God. Sigh. Xavier also has a valuable partner in Koluba, Okan Demirbaş, a structural engineer specialising in plasters and stonework. “Okan is gifted with both a sharp practical mind, the ability to work fast and well, and a deep interest in true craftsmanship, a combination so uncommon that finding new team members is one of our main struggles these days”, says Xavier. Oh and I hear you! So as you can see, we have a very well qualified and experienced team here. Good job too! This build is not for the faint of heart.  Xavier in action. The Magnificent Earthbag Semi Dome This stunning structure is 80m2, and it’s unusual because it’s an earthbag semi dome built within a wood/slipstraw structure. It has a reciprocal green roof, and comprises three rooms, two storage bays and a terrace. If you’re a beginner to earthbag, don’t try anything as ambitious or large as this. Koluba had a big team and a lot of expertise on their side.  The slipstraw envelope. The Foundations (A New Method) Koluba did something unconventional with the foundations. Instead of the traditional rubble trench, they just used tamped gravel bags laid below grade as a foundation. “We did this a lot on small buildings”, said Xavier, “But this time it had to carry a lot of weight (the roof is 45tons+), and it managed successfully”. This is very interesting news, and it makes sense, because the gravel bags act like a rubble trench anyway, and if they’re laid below grade, they should serve as footings just as well. Post and Beam Structure Next the team attached twenty 10 X 20cm posts onto the earthbags to carry the roof. How did they do that? The posts have anchors, or feet, on the bottom to increase the contact size, and then they were locked in by another layer of bags laid over the top. The large roof beams that create the roof mandala rest on the posts, and they meet at the centre of the building to form a heptagon over the oculus of the dome. This is the awesome skylight, and it’s beautifully reminiscent to me of the Blue Mosque roof. To see all this more clearly, watch the timelapse video.  The oculus. The Slipstraw Insulating Envelope For me this is one of the most brilliant parts of this building. We always hear how you can’t build earthbag in cold climates. But if you are in a cooler climate, and want to do earthbag, here’s a fantastic way to insulate your structure. First, a series of wall panels were installed between the posts. Then they were filled with 20cm of slipstraw (straw with a small amount of liquid clay, compressed into temporary frameworks). Finally, the earthbag semi dome was built in the centre of that structure. Neat huh? 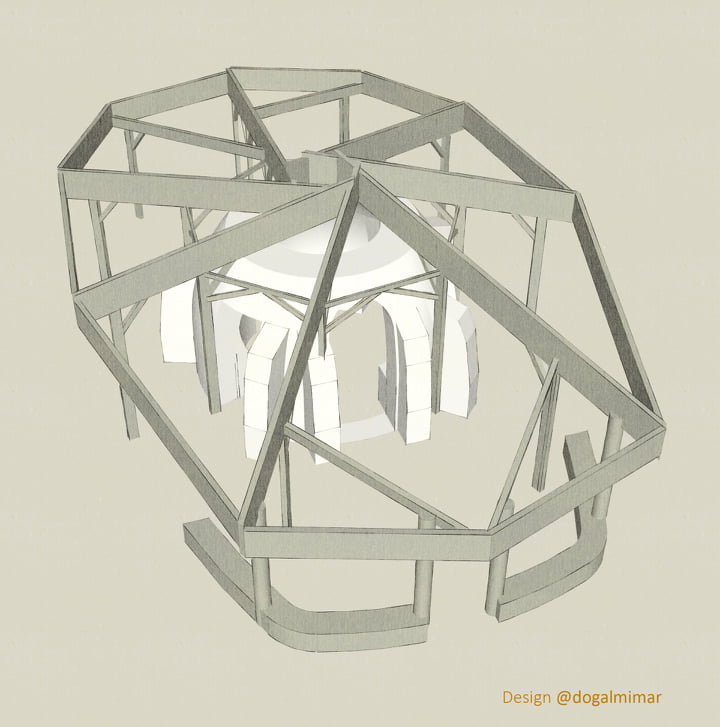 The plan. Designed by Matthieu Pedergnana, built by Koluba. The Semi Dome “The earthbag semi dome in the centre is 4m in diameter, 3m in height. It has 5 openings and is quite flat so we had to add buttresses in the rooms”, explains Xavier. Which brings up a point I’m eager to highlight. Plans always have to shift if you’re a pioneer builder, and you may have to add things you didn’t want to initially. But I tell you what, they always end up being some mighty useful or beautiful feature at some point, as you’ll see at the end. The Roof The roof beams are connected with about a hundred 10 x 20cm purlins. Then about 20cm depth of hemp chips were poured around them. After that wooden roofing boards were laid, then an EPDM waterproof membrane, and finally 25cm of soil for the living roof. For more details you can see exactly how they did all that in this short but informative video: https://www.youtube.com/watch?v=AlgFqNyno6w 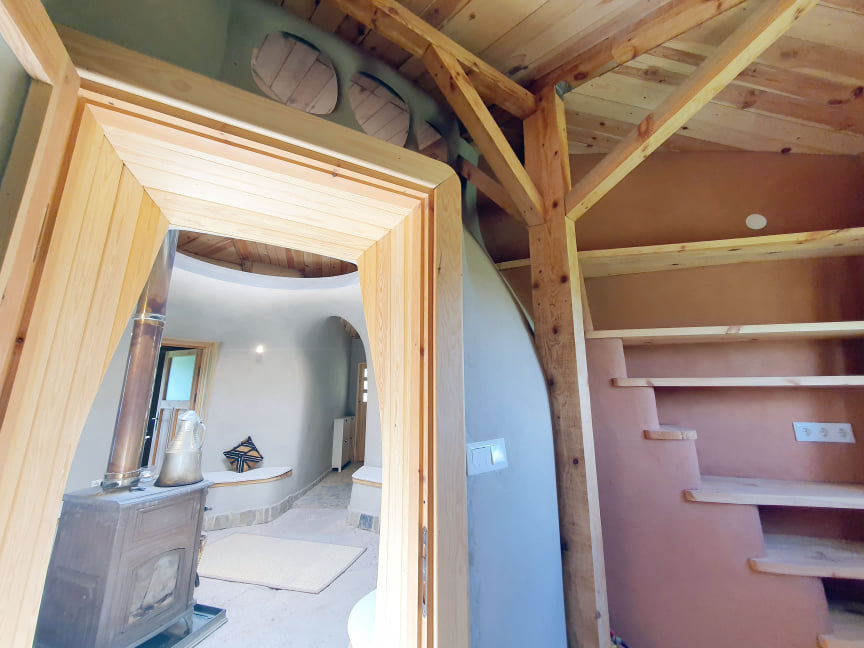 The attention to detail is impressive. The Interior There is a kitchen and a bathroom, and the dome serves as a living room. The floors in the three rooms were insulated with hemp chips poured under a wooden floor. Everywhere else, the floor slabs were made with a mix of lime and LECAT (expanded clay) and those slabs were topped with stones. The walls were rough plastered with an earth/sand/straw mix, then the interior walls were finished with clay plasters. The exterior was finished with a lime plaster. The bathroom is tadelakt. And all the furniture and trimming is handmade (beds, stairs, benches, shelves etc).  A pretty amazing place to sit. 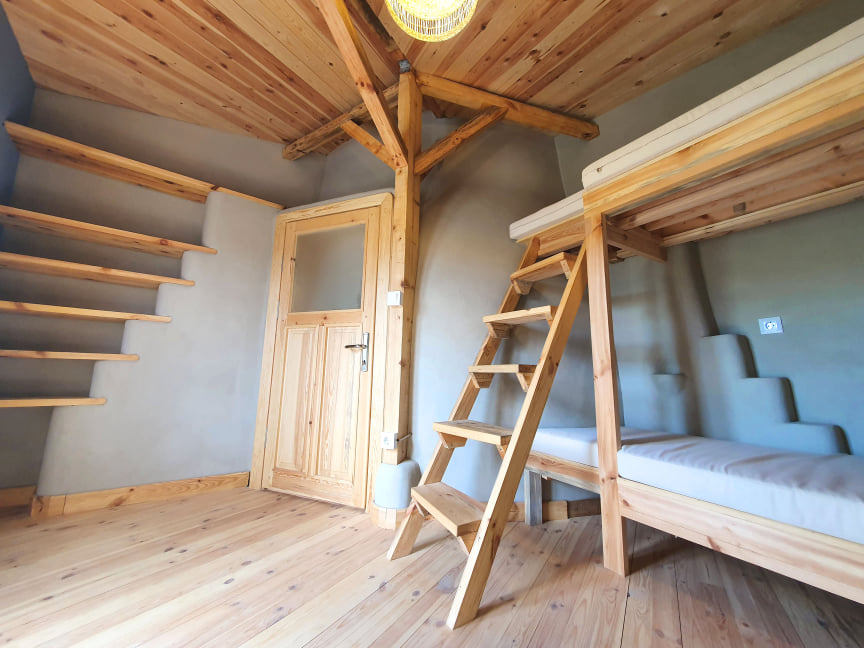 A spotless interior. Challenges I always like to mention challenges in building, because there is a naive idea floating around the minds of those who haven’t actually built anything, that if you just plan and research and think about it enough, you’ll avoid all difficulty. You don’t get natural builders and architects more qualified and better-prepped than the ones mentioned here. And yet when I asked Xavier about challenges, he was very transparent and offered a long list. For me, this is the ultimate test of confidence. If you have to pretend nothing ever goes wrong, you’re probably not a pro. All the challenges Xavier mentioned were so familiar to me. And they’ll be familiar to everyone who builds. Plan changes, plaster, roofing, and volunteers, always guaranteed to make you sweat. Notice how Xavier deals with challenges, (namely flexibility, determination, and a good old prayer every now and again:)) 1. Roofing stress. “The roof was very complicated with difficult angles and large parts to handle. There was very little space for error”, says Xavier, who had to organise the placement of beams weighing up to 300kg onto the roof. Yes it was stressful. And yes it’s a good job he’s a woodworking expert. 2. Dome moving outwards. “Another critical moment was when we noticed that the dome was moving outwards due to it having too many openings. We took the difficult decision to add several buttresses sticking out in the middle of the rooms, reducing their surface, but later these buttresses became nice features of the rooms giving support to the stairs or shelving”, explains Xavier. 3. Plaster troubles. I always say plaster is one of the trickiest parts of a build. It looks deceptively easy. It isn’t. “Exterior plasters were (and will be) a struggle. The building is very exposed to strong northern winter winds and lime plasters got badly damaged in some places. We repaired and reinforced this year but there might be much future maintenance needed at those sensitive points”. 4. Finishing that never finishes. “This actually took most of those 11 months”, laments Xavier. “Hundreds of details to care for, starting with the rough plaster phase”. Yup brace yourselves. The structure is the easy part. The finishing phase is misnamed and should be called the punishing phase instead. It will demand every ounce of determination from you. 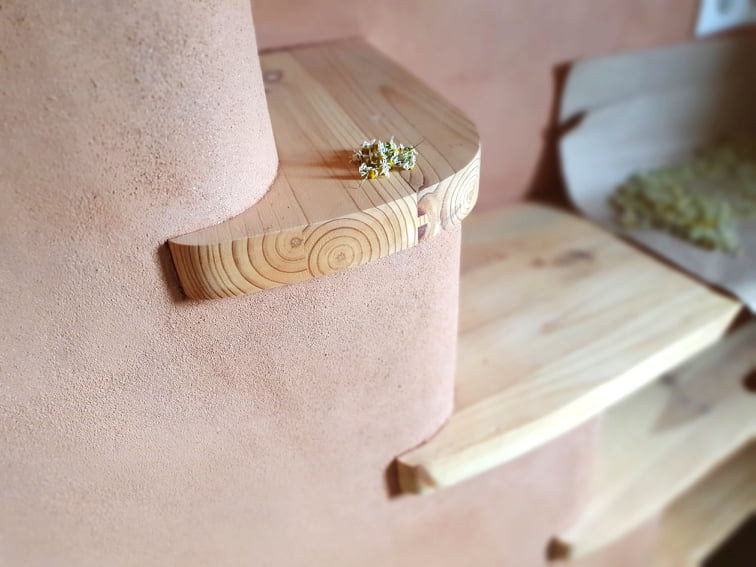 A perfect finish (eventually). 5. What, no shower? “Another problem was the shower”, says Xavier. “That little room had been designed to house a toilet only, but the owner asked for a shower on the way”. He he he. Oh the joys of doing commission work. He continues, “Walls were there, a big wooden post in the middle of the only possible spot for that shower. So we embedded burlap mesh in the lime, waterproofed as much as we could, applied tadelakt over and prayed to whichever god deals with plaster cracks. A year later the shower plasters are intact”. I love that they prayed to the plaster crack gods. And I love that it worked:)) 6. Volunteers. “I can also add that having to work with volunteers is sometimes a major challenge in this type of project. Some people will be capable, learn quickly and turn out to be productive, others will be a burden whose work you’ll need to check constantly, perhaps even redo and waste even more time. It is a lottery”. Oh preaching to the choir with that one Xavier! But despite the mixed experiences, Koluba are still bravely taking on new volunteers. Want to Volunteer with Koluba? Koluba are accepting volunteers with some woodworking experience this year. It will be a different location, in the beautiful Kazdağlar mountains near Çanakkale. For more details contact Xavier/Koluba at the address below. 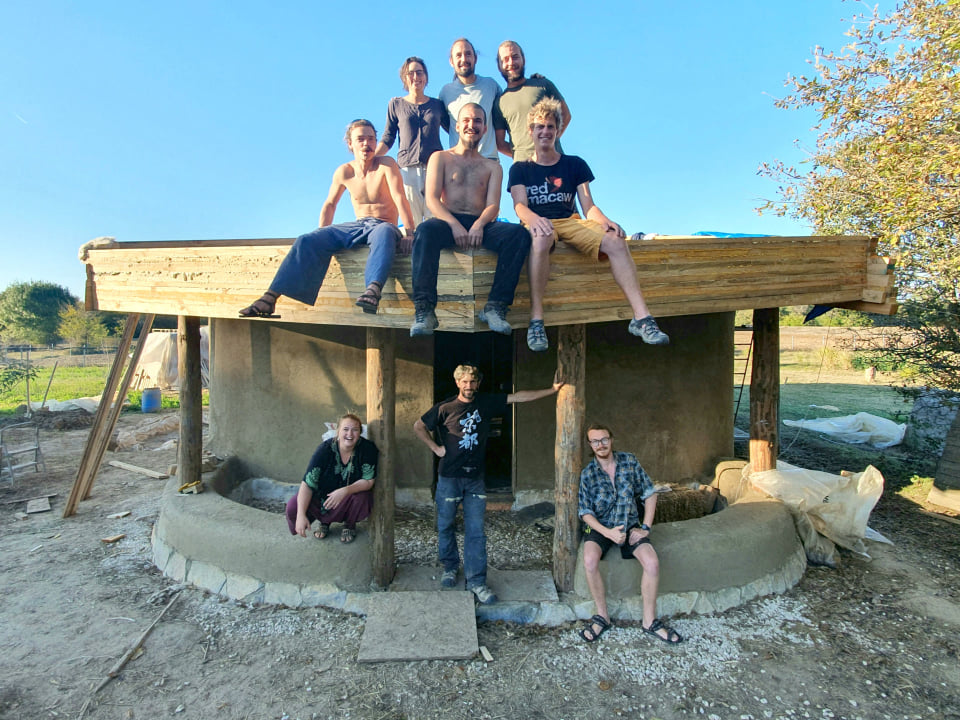 Volunteering at Koluba. Contact Koluba (and see a stack more stunning photos) at: Instagram/Facebook @kolubakolektifi Website: www.koluba.org Other related links: **Architect: Matthieu Pedergnana @dogalmimar ***Location: @sihirlitohumlar What is slipstraw? https://strawclaywood.com/natural-building-techniques/straw-clay-or-slipstraw/ * And if you want to catch up on a glittery piece of Turkish history (albeit glammed up to the hilt), then grab some popcorn and indulge in the historical romp that is Magnificent Century, one of Turkey’s best-selling media exports. https://www.youtube.com/watch?v=N2ZlLE4z__4  Do you enjoy The Mud Home?
If you find these articles inspiring or useful please consider joining us on Patreon. Your support pays for the running of this website, my virtual help, and my sustenance. A big thank you to all The Mud Sustainers, and everyone chipping in and keeping these posts and articles coming. It’s always hard to explain to people about leaving the grid behind if they haven’t experienced it. It’s such a different life, with different rewards and different challenges. I find myself either making it all sound like a herculean endurance effort, or some butterfly-filled, free food utopia. Being off-grid is both and neither of these, and a whole lot more. It’s another paradigm. I could never return to the old ways, to working in the system, to having a boss or contorting myself to fit someone else’s timetable, to the pollution and noise, to the EMFs, to wi-fi, to the awful processed food, to the chemicals, aircon, and concrete. It’s unthinkable. I haven’t enjoyed running hot water for ten years, nor a washing machine, nor a fridge (not that these things are necessarily inevitable if you go off-grid). But despite the seeming lack of comfort, I’m still saying I’d never go back. I miss my land when I’m away just one night!  Living the dream. My köşk in Turkey where I’d commune with my land. The trouble is, if you’re in the urban world and imagining life without a washing machine or a fridge, chopping your own wood, and boiling water on a stove, it looks hard. But that’s because you’re in a world that’s completely unadapted to those things, with days rammed full of appointments and rushing and nonsensical bureaucratic duties to the point that spending half an hour hand-washing would be a disaster. My days simply aren’t like that. I get up when I want and sleep when I want. I’m in a world where hand-washing could even be a pleasant diversion. I’m also not having my body and mind continually attacked by noise and pollutants, nor have I been sitting at a desk eight hours a day. You only understand what those things are doing to you when you live in a mud or stone hut without power cables long enough for your body to clean and revive itself. On the other hand, when people don’t understand why I can’t make that hundredth flipping Zoom call, or why I can’t say for sure I’ll be free at 4:15 pm on Friday, or why I don’t want a puppy right now, it’s hard to explain. These people are flicking everything on with switches. I’m literally building every damn thing I use, from my bed to my water systems to my fire each night. And I’m reliant on the weather to do these things. So if it’s rained all day and the sun happens to pop out at 4:15 pm on Friday, I need to go and find wood, not chat on the phone! Probably the best way to get an idea of the transition from the system to off-grid is to read my book Dirt Witch, but for a more right-brained approach, here’s a tidy(ish) list of pros and cons. Most of the cons are also pros though, as you’ll see.  My memoir about how I transitioned from the system to freedom. “This is such a compelling book, it will make you want to abandon everything you know and commune with the trees and the dirt.” –Luisa Lyons The challenges of being off-grid: 1. Being off-grid is very physical. You aren’t sitting on your butt all day, you are out there building, gardening, cooking, digging, chopping wood, dragging things up hills, moving rocks, etc. So you’ll get very tired at certain points, especially in the beginning when you are setting up. You need to learn how to pace yourself and manage your energy. Getting a puppy isn’t the best idea at the outset. 2. You are at the mercy of the weather. Climatic forces are the thing you’ll worry about most – not money, not admin, not power, and definitely not critters. Fires, snow and rain can all get pretty dangerous pretty darn fast. Your world and what you can do is entirely controlled by meteorological forces. You will understand what no one down there in the modern world seems to be able to wrap their deluded heads around. Nature is Queen, and we are her subjects. Forget your plans, they count for nothing. You will work with and around the weather. 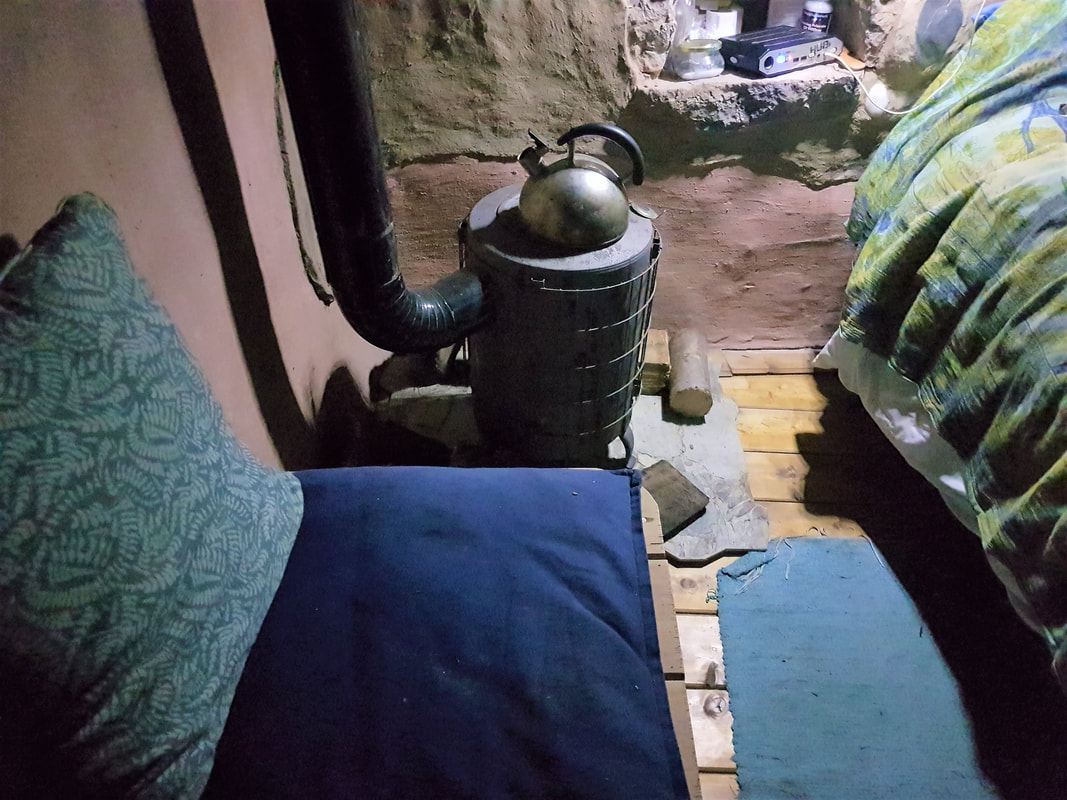 Winter days by the stove. But it doesn’t light itself, or find its own wood:) 3. Lack of structure. Some people find the freedom and open days a burden, some think it’s the best thing that ever happened. This does a bit depend on personality. Generally creative types do well when they are free. I have an inexpensive course on structuring your day outside the 9-5 for those finding their days are being frittered, or who feel lost in all that freedom. 4. Possible isolation. Again this is personality. Just be aware you are not in the hustle and bustle anymore, so there’s more space, more quiet time to stop and think. If you are a people-needer then make sure you buy land in places with people around and knit yourself a community. 5. Inaccessibility: You can’t just nip to the corner shop and buy yourself some salt if you run out. When you shop, you need to be focussed about the supplies you need. And when you’re back on your land you have to learn to use what you have well. Inaccessibility means you'll want to be smart regarding accidents too because it’s hard for ambulances to reach you, and hospitals are far away. Remember your first aid, have a decent first aid kit to hand, learn how to use herbs, get on with your neighbours, and be careful when hanging off ladders.  Ah, this was my road at one point. 6. Income: I add this a little doubtfully because I notice Westerners worry way too much about two things in their off-grid planning: money and electricity. That’s because in that other world, money and power are crucial. You’re leaving that old world behind though, so what counts there doesn’t necessarily count half as much when you’re in the countryside off-grid. Yes you still need a bit of money to get by of course, and make your life more comfortable, but 300 USD a month per person will usually be enough once you’re set up (depending on where you live it could be a fair bit less). Even so, for those of us who are more happy-go-lucky in the money department (ahem), you do need to consider how you are going to earn those 300 bucks. (see this article for more ideas on that). 7. Iffy internet: I forgot about this one, I’m so used to it. In fact, I’ve enjoyed some better internet connections off-grid, than some people do on grid. But you do need to consider that you’re probably not going to be using Wi-fi. I’ve been on pay-as-you-go metered internet ever since the internet began, and I work online! I actually prefer it because a) I don’t like Wi-fi signals, b) It means I have to be focused with my internet usage, so I don’t get lost on Youtube videos or Netflix for hours at a time. I write and store all my articles offline, and only turn on the internet to upload. For those who want limitless internet, there are off-grid options too, the most cost-effective of which is usually satellite internet. The advantages: 1. Being off-grid is physical. You will get in shape. Fast. In the longer term, your body is going to thank you. We were designed for working in nature, and our bodies adapt incredibly quickly. You will lose weight while gaining muscle, strength, stamina, and overall health. 2. Freedom. You never have to get up to the sound of an alarm again. You never have to commute again. You never have to take crap from a boss again. You can set your own schedule and make your own rules. You are sovereign of your own life. And yes it is just as good as it sounds. Not a day goes by when I don’t wake up relieved that I don’t have to yank myself out of bed to reach some godawful job that I don't believe in any way. 3. No power or water bills. There are so many aspects to this I love. Obviously the financial aspect is one of them, but just imagine never having to go through the torture of phoning the water company to cancel or change a contract. And just imagine also having the beatific feeling of not funding some ecocidal CEO’s yacht in the Bahamas at the same time. 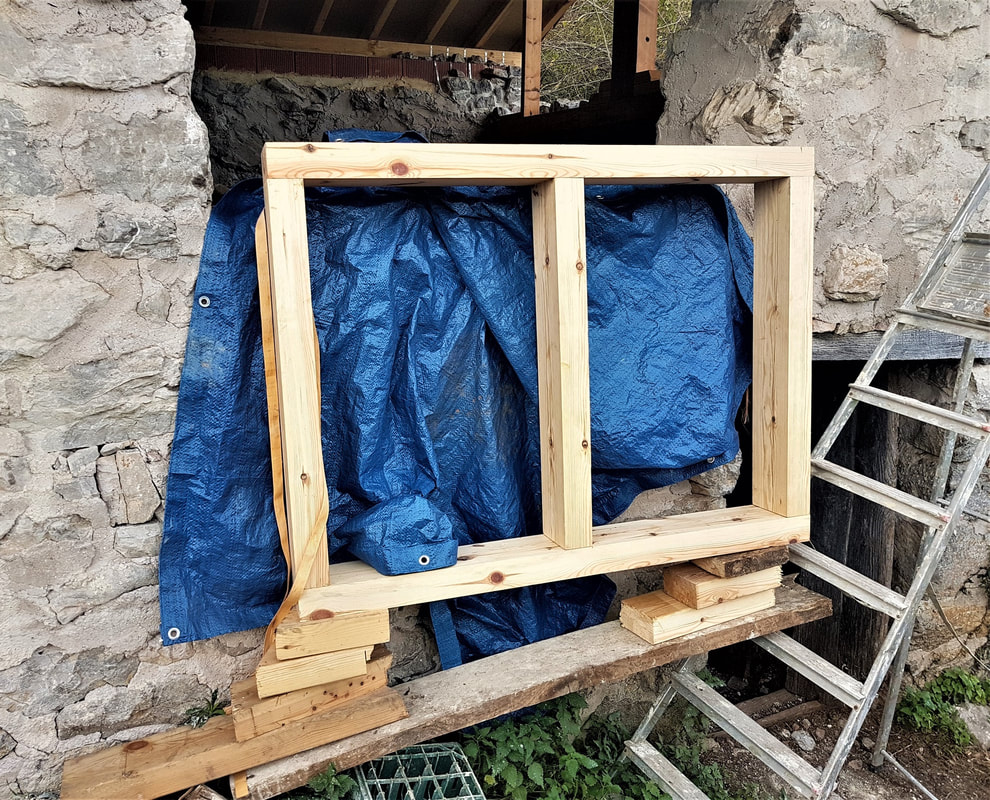 Enhanced problem solving:)) 4. Enhanced creativity and problem-solving ability. Once you’re off-grid in nature you’ll begin to access your inner creativity, and solve all manner of problems you were previously so sure you needed to hire someone for. You start to realise you don’t need to buy half the things you thought you did, and you find yourself tapping into a wellspring of natural inspiration. It’s all very empowering. 4. Nature and wildlife. This is the part of the adventure most moderns are clueless about, and that’s such a sad fact. This is what I do it for! Nature is our home. It is impossible to relay the joy of living amongst all these creatures and observing the ever-changing beauty of the plant life, the sunsets, and the cloudscapes. Poor little rich moderns with their radiation-spewing screens and their soulless shopping malls, always feeling something is missing and never knowing why. This planet is a wonderland, and the ‘wealthiest’ don’t even know. 6. Resilience in the face of societal collapse. Depending on how well you’ve set up your system, and (more importantly) how well you adapt to working with nature, you find that pandemics happen, societies break down, and economies collapse, but not much actually changes for you. If you didn’t have some kind of media harrying you, you’d probably not even know! 7. Clean food and water I’ve been drinking pure mountain spring water fresh from the source for about fifteen years now. If you like chlorinated, fluoride-treated, Lord-knows-what-esle contaminated mains water, carry on drinking from your tap, but you won’t convince my taste buds or my body that it’s healthier. There’s no comparison. Spring water from the source tastes and feels life-giving. The same, if not more, goes for shop bought vegetables. I still have to stoop to buying some of them, but the difference in quality is astounding. The only way to be sure your food supply isn’t contaminated with pesticides and poisons is to grow it or rear it yourself somewhere clean.  More inspiring and entertaining than any Netflix series. If you want to know more about going off-grid you might like to try my free off-grid prep course. There are five questions you need to ask yourself before you take the plunge. Do you enjoy The Mud Home?
If you find these articles inspiring or useful please consider joining us on Patreon. Your support pays for the running of this website, my virtual help, and my sustenance. A big thank you to all The Mud Sustainers, and everyone chipping in and keeping these posts and articles coming. Courtesy of Helen Atkinson in Baltimore Now for something a little different. Something a little fun. Not that Helen’s cob oven is particularly ‘little’. Au contraire, this wonderful project is quite the cob oven piazza:) Ah, there’s so much you can do when you learn the art of cob and earth plaster. Your imagination is the only limit. As soon as Helen joined The Mud Home Facebook group last year, she began sharing her oven progress. What I loved about her posts was how she clearly enjoyed experimenting. This is Helen’s third cob oven now, and each time they get better and better. There's a lot of very good information coming here, no matter how much you've researched cob ovens, so do read it all. 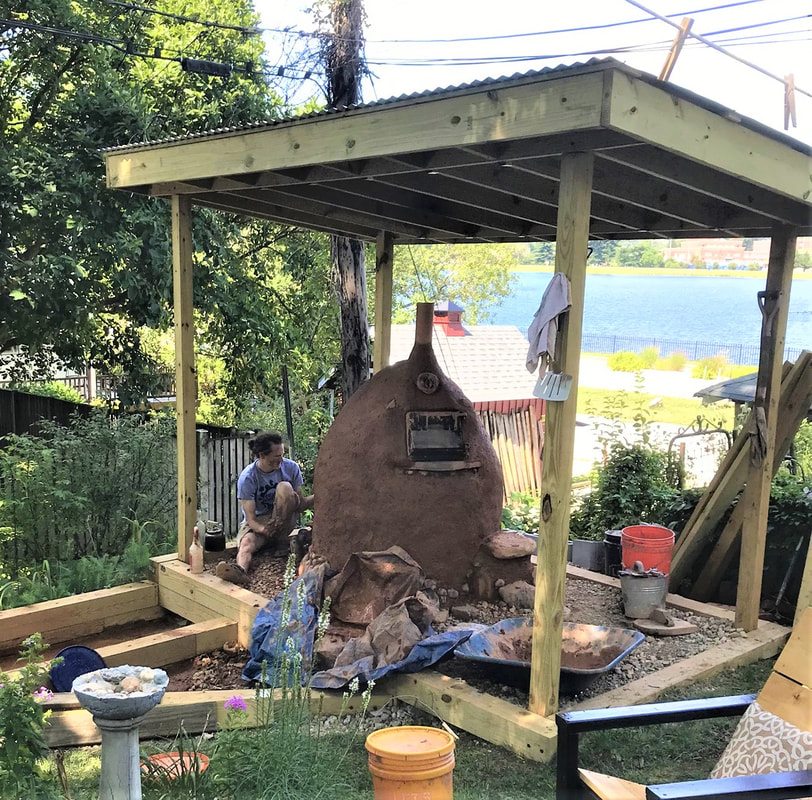 Helen’s cob oven piazza. Imagination is the only limit here. Why Three Ovens? “The first one had way too many deep cracks in it,” explained Helen, “So I tore it down a few days after the build and rebuilt. The second one included a four-inch layer of insulation and was great. We had some lovely pizza parties, but when I forgot to put the tarp on and it rained, there was some definite erosion. Now the third iteration has a whole new (flat) floor under it and roof.” Do You Need A Roof? A roof over a cob oven is pretty much always recommended, unless perhaps you are in the desert. Rain will indeed erode that cob dome. But I love how Helen kept improving her design like this. Cob ovens routinely fail, for many reasons. I know when people experiment and tinker and redesign, they have learned deeply what works and what doesn’t. Not being one to miss an opportunity like that, I asked Helen for all her tips. This oven is very well done. Many thanks to Helen for this very detailed explanation. It will be useful for anyone wanting to give this a go. How Helen Made Her Cob Oven 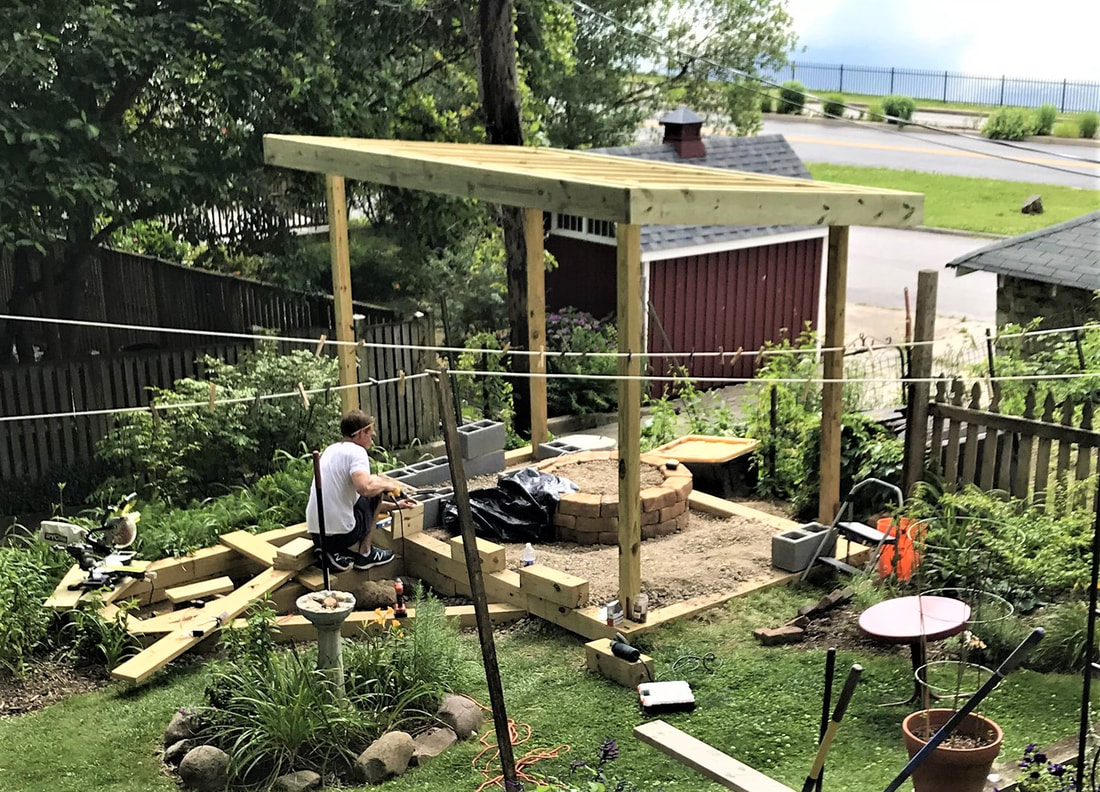 The cob oven base. 1. First she built the foundation out of stacked prefab stones from the hardware store. “The ones that are used to build round fire pits,” says Helen. 2. Next she filled the empty round base (which was almost hip height) with ‘urbanite’ from a roadworks nearby. "We fetched it in wheelbarrows," said Helen. "And then added sand to fill the tiny gaps. After that I put a border around the base made of large and small river rock collected from a park nearby.” 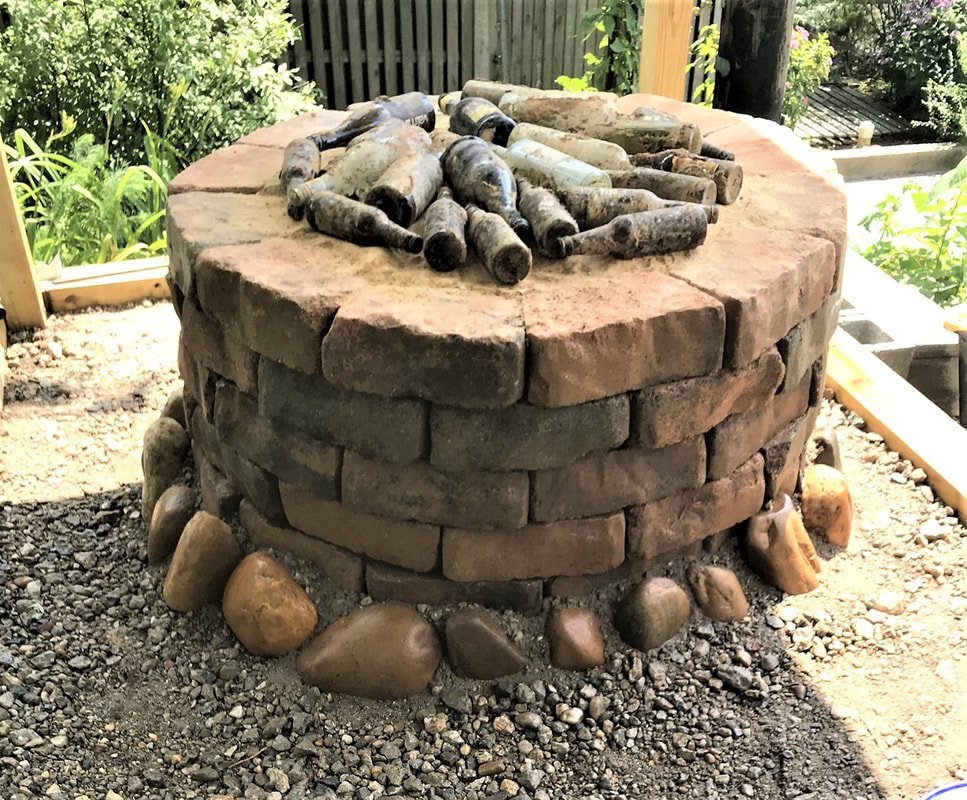 Glass bottles for the insulation layer. 3. It’s advisable to add a decent insulation layer underneath the actual oven. This helps the oven heat up fast (otherwise all the heat is sucked down into the base). A good way to do this is with a layer of recycled glass bottles. Helen embedded the bottles in sand and then about 3-4 inches (10 cm) of cob.  From front to back. The firebrick base (turquoise arrow) with firebrick doorway, and flat stone at the front acting as a lip to drag out the ashes (green arrow). 4. The oven base is formed out of fire bricks. “I put a 3-4 inch layer of cob on top of the insulation layer, so that the outer edges would meet up with the oven sides and be like a chocolate covered peanut. Next I put some sand down in which to arrange the fire bricks, laid the fire bricks carefully in the centre in rows and a large flat stone to stick out the front so I have a lip to drag the ashes out into a bucket,” says Helen. 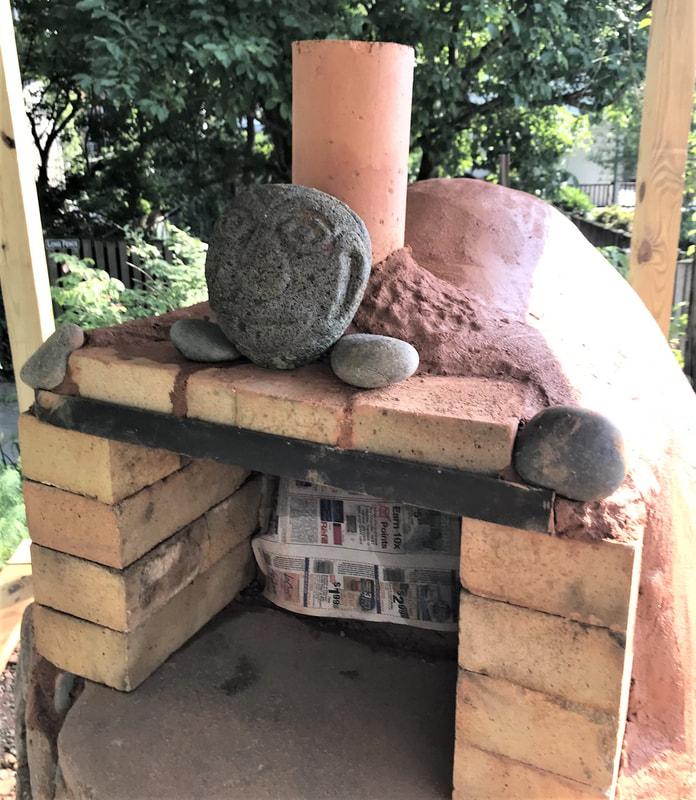 Firebrick base with first part of the cob oven now on top of the firebricks. 5. The dome of the oven is made from cob. Here’s how she made the cob dome: i) Helen shaped a sand pile into a round mound on top of the firebrick base (16 inches high). ii) She covered the sand pile with wet newspaper (makes it easier to remove the sand at the end). iii) She covered the sand mound in 4 inches of cob. This is the layer that is built to take the heat. Her tip here was to press the cob down and around the sand dome in a spiral (rather than patting it against the sand dome itself, which moves the sand around in the middle. iv) Once that was completely dry, she carefully dug out the sand, leaving the clean oven floor (firebricks) with a cob dome on it (Sigi Koko has a great YouTube video on how to do this step). 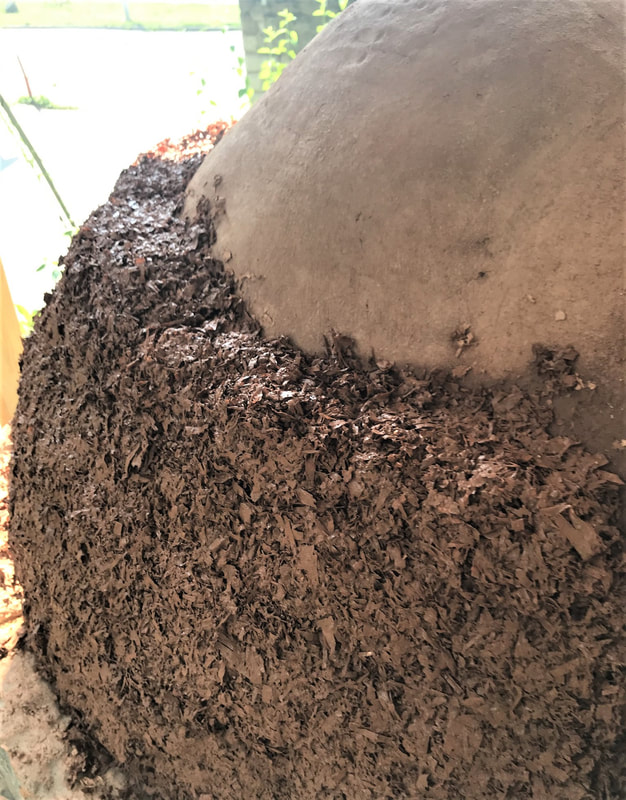 The layer of insulating mud plaster, made with hamster bedding. 6. Next she added a 3-4 inch layer of insulating mud onto her cob dome, that included dry hamster bedding. The hamster bedding is supposed to incinerate and create pockets of air. “A friend gave me an old cast iron stove door, and I built a doorway out of fire brick with a chimney made from an old piece of ceramic pipe, and used a stiff mud plaster to cover it all and hold the chimney in place,” Helen said.  Another layer of mud plaster to cover the whole oven. 7. Now that the oven structure was built, Helen plastered the whole lot with an earthen plaster she made with deer poop added (for the record: you don’t have to plaster the base of the oven, it was an aesthetic touch).  Finishing plaster layer with sculpture beginnings. 8. Next she decorated her new oven in beautiful mosaics and sculptures. Once it had completely dried she coated it an a whopping 7 coats of linseed oil. “I think this is what really saved me,” she said. “Even though I had built the shelter to cover the oven there is enough sideways wind and rain to wash the sides away without the oil.” Take note folks! So there you have it. How to make a very good cob oven that heats up fast and doesn’t collapse in the first rain of the year. Of course I have to ask what will come next. Perhaps an entire cob oven complex with cob benches and picnic tables and… Just joking Helen:) 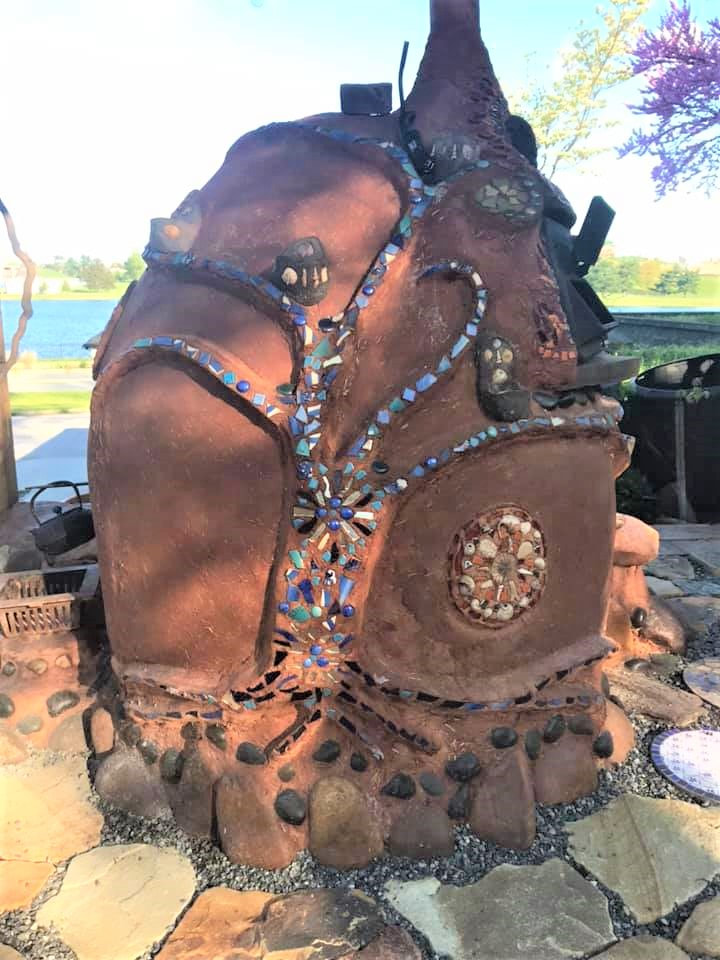 Such a stunning result. The Top 3 Reasons Cob Ovens ‘Fail’ As I said, cob ovens do misfire quite often. That’s not really the end of the world if you’d like to just have a go. Ultimately we all learn from our mistakes a lot faster than we do from online commentators like me:) But for the record, here are the most common pitfalls: 1. The oven isn’t adequately protected from the weather. You really need it well covered, preferably by a roof. And if you’re in a rainy climate, some linseed oil won’t go amiss either. 2. Not enough air flow, so the fire struggles to get going. For the best suction, you want an entry point for air (small flue or tube, or open oven door), and an exit point for smoke (chimney or flue). 3. No insulation. This means it takes an age for your cob oven to heat up. If you’re baking pizzas all day this may not be such a drama. But if you want to get cooking fast, then insulate. Related links: The free earth plaster course: http://www.themudhome.com/earthplaster-sign-up.html Cob vs earth plaster, what's the difference? http://www.themudhome.com/mudbuilding/earthen-plaster-and-cob-whats-the-difference Do you enjoy The Mud Home? If you find these articles inspiring or useful please consider joining us on Patreon. Your support pays for the running of this website, my virtual help, and my sustenance. A big thank you to all The Mud Sustainers, and everyone chipping in and keeping these posts and articles coming. 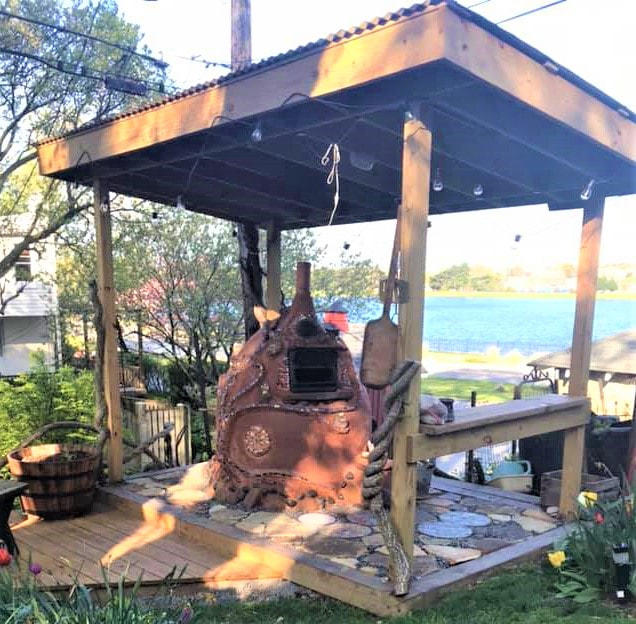 Lots of peeps are asking questions about building into the side of a hill, or semi-underground. I’m in a good position to answer this, because all my stone huts have been built into the rock face. In fact the barn uses the rock of the land as one of the walls. This is quite common in both Spain and Portugal, but brings with it some issues, the main one being damp.  Semi submerged Why build into the landscape at all? Despite the drawbacks people have been building underground for eons (there are 10 000 year old underground cities in Turkey). Why? Well there are quite a few perks to being a little lower down. Advantages
Disadvantages The most obvious drawback is that underground houses are notoriously prone to damp, or worse flooding. How to build underground The key to a semi-submerged house is two-fold. You need a vapour barrier and decent drainage. Whether you are considering an earthbag bunker or a stone root cellar, the same applies. 1.Vapour barrier I’m usually quite ambivalent about vapour barriers in natural homes, but this is the clear exception. You definitely want a vapour barrier (plastic tarp) on the exterior of your outside walls if you are underground. The barrier should separate your structure from the earth/rock outside. Some people even add a double barrier. 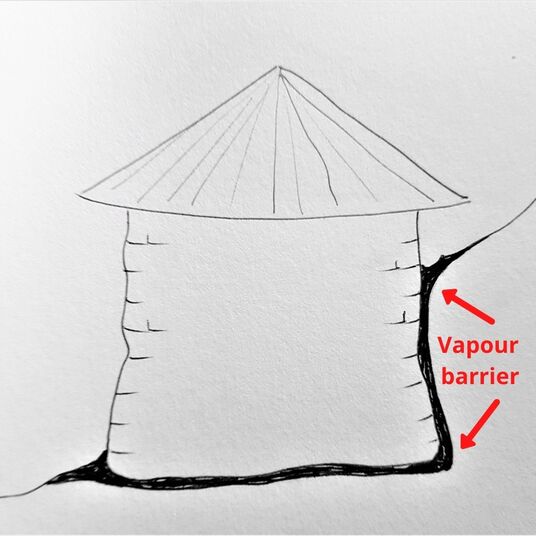 Separate your walls from the ground. The black is the vapour barrier. 2. Drainage Dig a decent trench all the way around your structure, line it with geotextile membrane and fill it with rubble (rubble trench). You could also add a french drain here, but do it properly (see this article). The main point about drainage that seems to get forgotten is gravity. You need a decent downward slope, and no amount of perforated plastic tube is going to help you if said tube is laid flat, or nearly flat. I often think a decent rubble trench lined with geotextile membrane sloping well downwards, works better anyway.  The rubble trench. Line it with geotextile membrane to help keep the dirt from seeping in and clogging it up. 3. Guttering This is super important. Make sure the water running off your roof, isn’t sinking into the ground around your building. Add guttering all the way round your roof eaves and channel that water away from the house and the ground surrounding it. Extra note: There’s no getting away from it really. Submerged buildings often feel a bit damp. A good solution to damp is a wood burner. It will dry a building out very fast. But of course that’s only a valid option in a cooler climate. If you’re in the warm then think long and hard about ventilation and possibly a dehumidifier. Which types of sustainable building suit going underground? Now, there will no doubt be those who disagree, but having seen a couple of examples of strawbale rot in the damp, personally I wouldn’t be itching to stick strawbale underground. Nor would I prefer to use wood. The safest options are stone and earthbag because they can handle the wet. Hempcrete might also be OK but I haven’t seen any examples of that yet.  Marvao in Portugal built into the landscape. Related links:
Earthbag root cellar: https://www.wildernesscollege.com/earthbags.html Underground earthbag room: https://youtu.be/8dM2It_T3nE Rubble trench: https://cordwoodconstruction.org/rubble-trench-the-basics Do you want a french drain or not? https://www.estormwater.com/drainage/french-drains-and-their-downfall Do you enjoy The Mud Home? If you find these articles inspiring or useful please consider joining us on Patreon. Your support pays for the running of this website, my virtual help, and my sustenance. A big thank you to all The Mud Sustainers, and everyone chipping in and keeping these posts and articles coming. Domes have been an integral part of human construction for a long, long while. From the mosques of Istanbul to the basilicas of Rome or Moscow, from adobe vaults in Mexico to the snow igloos of the Arctic Circle, the curved roof can be found in an awful lot of places. So that must mean it’s great, right? Hmm. There’s a lot to like about the dome. There’s a lot to be wary of, too. And there’s a very good reason it was only the Inuit of certain areas who built igloo snow domes. Others further south used other techniques. It's not just coincidence that the mud dome was traditionally built in places like Cameroon or Mexico, but not in Cornwall or Galicia. Dreaming of a mud Sistine Chapel in your back garden? Read on. 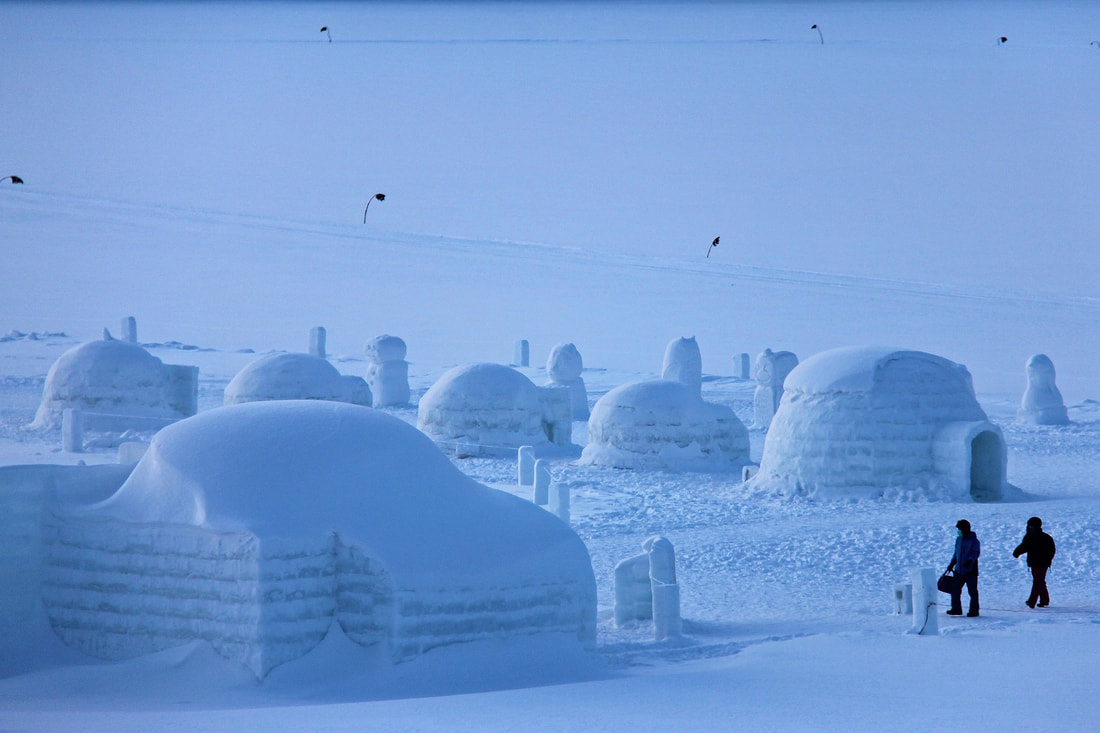 Modern-day igloos on a frozen lake. (Photo by Sharonang) The dome became something of an architectural darling in the ’60s. A lot of this has to do with Buckminster Fuller, who began pioneering geodesic dome structures and biospheres in the ’40s and ’50s. A decade later domes became popular on a more individual homeowner level, when space-age architecture became trendy. This is also when the limitations of the dome as a house became clear. 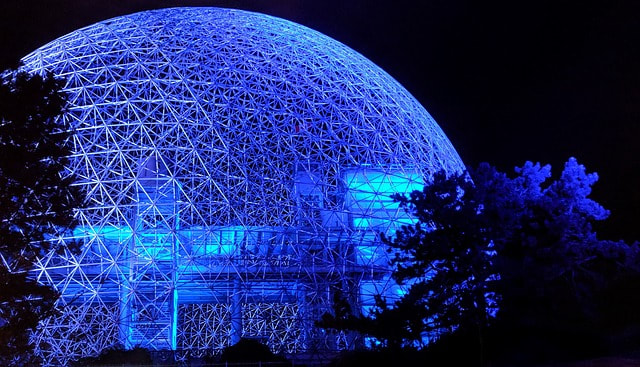 Montreal Biosphere by Eduardo Ponce de Leon. The Good Domes are beautiful for sure, and they feel extremely calming to live inside. They are like wombs or caves. And heck, for an artist they're both original and funky. With their soft lines and circular form they soothe both eye and spirit. But beware, like most sexy things, they come with some potentially costly drawbacks. The Bad Lloyd Kahn of The Shelter Blog wrote two books on domes. They were his most popular and lucrative publications. Yet he pulled them off the market because, to quote him, they were “smart but not wise”. Here’s a list of reasons why: 1. Impractical One interesting issue Lloyd Kahn has with domes is that they are impractical. You can’t dissect them easily into sub-quarters, meaning they’re great for meditation centres or lecture halls, but not so great for a house, where you might want to cut the space up into separate rooms. Solution: Well, I suppose here I’d say if everything had to just be practical in this life, I’d probably hang myself from boredom. That isn’t to say Lloyd doesn’t have a good point. I experienced the same issue on a lesser scale with my roundhouse. Pretty much all building materials are designed for squares. And you’re probably going to be making your own furniture if you go dome. But as far as the separate rooms are concerned, if your heart is set on round then the solution is to build multiple smaller round spaces that are linked, like Rhonda did here in Mexico.  Rhonda’s dome world. 2. Leaking One of the more serious disadvantages of the dome is they are notoriously difficult to waterproof, because unlike most housing structures, there's no roof, and therefore no 'hat' to protect the structure. This is fine in a desert, and even more fine if you only have soft powdery snow sitting on ice blocks. But bring in some serious rainfall, and you’ve got major problems. For the geodesic domes there are masses of joints where the triangular panes all tessellate, all of which are potential leak points. That’s a lot of sealant you’re going to need, and a lot of potential maintenance. For mud domes, in particular earthbag domes, water-protecting is the thing you absolutely have to wrap your head around. Because what you really don’t want to do is what every mainstream builder will tell you to do, namely coat it in Portland cement. Don’t cement over a mud dome! If you slap Portland on, you have basically stuck an impermeable crust over your lovely breathable walls. So you’ve just killed the airflow. Boom! This will lead to an increase in mould and damp. The house won't be as cool in summer (or warm in winter) as it would have been if it were all mud. Also, there’s a reasonable chance the cement will crack and fall off too, as clay walls expand and contract with humidity changes, while Portland can’t. See this experience kindly shared by Gautam. Please note this was lime render not Portland, but basically it's the same issue (though at least the lime render will breathe). http://www.themudhome.com/.../gautam-and-kims-earthbag..  Here’s what often happens when you try and plaster over mud with concrete. Proper solutions: There are two main ways to keep a dome dry: 1) Do what Jehane Rucquoi did at 3 Moons and build a deck on it, or add some sort of cap over the top. This is easily the best way to protect the dome. Jehane's design was ace if you ask me. 2) Use shingles. See more about them here: https://en.wikipedia.org/wiki/Roof_shingle Yes, domes are a tough one. But I'm not going to lie, I'll probably make one before I die, because for a creative soul they are beguiling structures.  Jehane’s deck dome in Nevada. Related links:
Kelly Hart’s interview with Oliver Goshey, all about earthbag domes. A must-listen if you are considering building one! https://abundantedge.com/abundantedge-xzmogh2g479mqg866e0v765lb804l6 Lloyd Kahn interview, where he discussed the limitations of the dome: https://www.buildingsustainabilitypodcast.com/45-years-of-building-inspiration-lloyd-kahn/ Rhonda’s dome world in Mexico: http://www.themudhome.com/mudbuilding/rhondas-sculpted-earthbag-dome-home-in-mexico Jehane’s earthbag domes in Nevada: http://www.themudhome.com/mudbuilding/the-85-year-old-dome-builder-of-arizona Do you enjoy The Mud Home? If you find these articles inspiring or useful please consider joining us on Patreon. Your support pays for the running of this website, my virtual help, and my sustenance. A big thank you to all The Mud Sustainers, and everyone chipping in and keeping these posts and articles coming. |
Many thanks to the Mud Sustainers supporting this site!

Do you find The Mud Home valuable? Please consider supporting the blog on Patreon. For as little as $2 a month (not even a coffee where I'm from), you can join the club.
BENEFITS FOR PATRONS INCLUDE:
Email priority, private Facebook group, review copies of my books, sneak previews of courses and books, Q and As, priority for courses and more. AuthorAtulya K Bingham 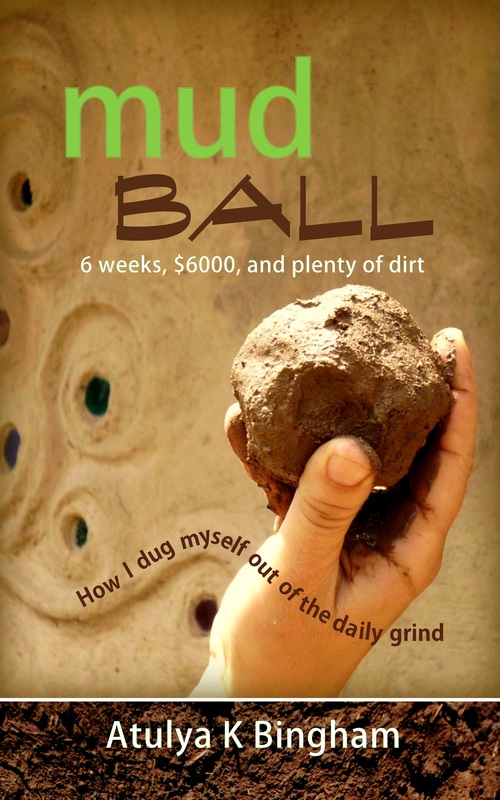
"Beautifully written and inspiring." The Owner Builder Magazine
FREE!
If you want the step by step guide of how I built my house, sign up for the PDF.
WHY NOT? IT'S FREE! Categories
All
All the Mud Home How-to posts have been compiled into a PDF package with 75 articles and over 200 photos. You can still buy it now, and enjoy lifetime access to all the updates.
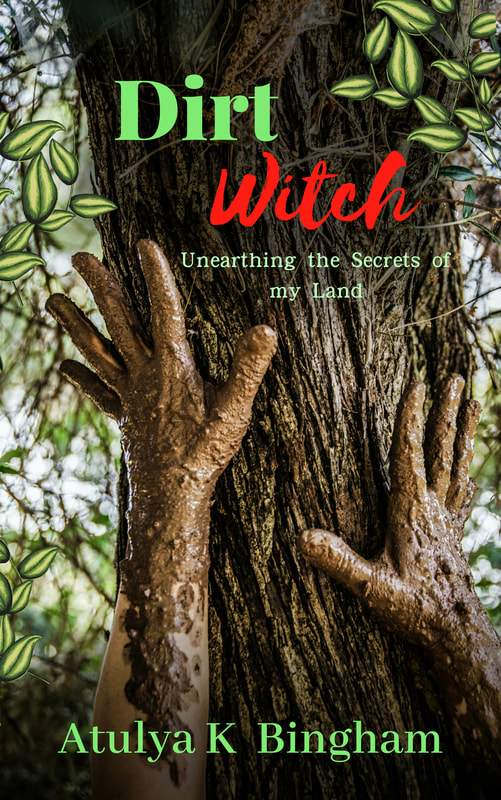
“Entranced! Be inspired by one who’s lived and breathed dirt.”
Kim Fraser, Get Rugged |
|
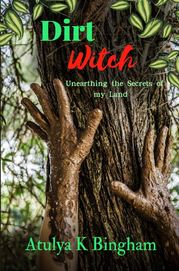
|
The Mud Home takes many hours a week to run, and costs a lot to sustain. If you find this site useful or inspiring, please consider supporting it so that it can continue.

Many thanks to all those who've already become Mud Sustainers.
|
 RSS Feed