Want to learn earthen plaster?
|
When you learn how to create gorgeous clay plasters from the earth around you, you begin an amazing journey into natural building.
|
Lime is a natural non toxic substance, but it is caustic, so can cause burns. It's important to wear the right safety gear when slaking, mixing or applying lime. See the full health and safety guide for lime here. So you need a hard slab on your floor but you don’t want to use Portland cement, because you’ve done your homework (or learned from experience) and know that Portland cement floor slabs are bad news in natural/ancient buildings. In this case, what you need instead is limecrete. It still baffles me how few mainstream builders use lime, especially limecrete. I really don’t get, it to be honest. Are they scared? Too stuck in their ways? What is it? Lime isn’t any harder to use than Portland cement. It takes longer to cure, which means it’s a lot easier to correct mistakes than if you use Portland. It looks a lot nicer, too. It’s cheap, uses a quarter of the fossil fuels to manufacture, and it will pull damp out of buildings like nothing else. If you’re in a wet climate, lime is the way. What’s not to like? Luckily for us, a friend of mine who shall thus be called ‘S’ has shared how she and ‘E’ made their limecrete floor for their Victorian cottage in Lincolnshire. Yes it’s to code, too. How S and E Made their Limecrete Floor Because S and E are in the UK, there are building regulations that have to be observed. But the system outlined here was pre-approved so it’s a great guide for anyone looking to make a limecrete floor system. Here we go: 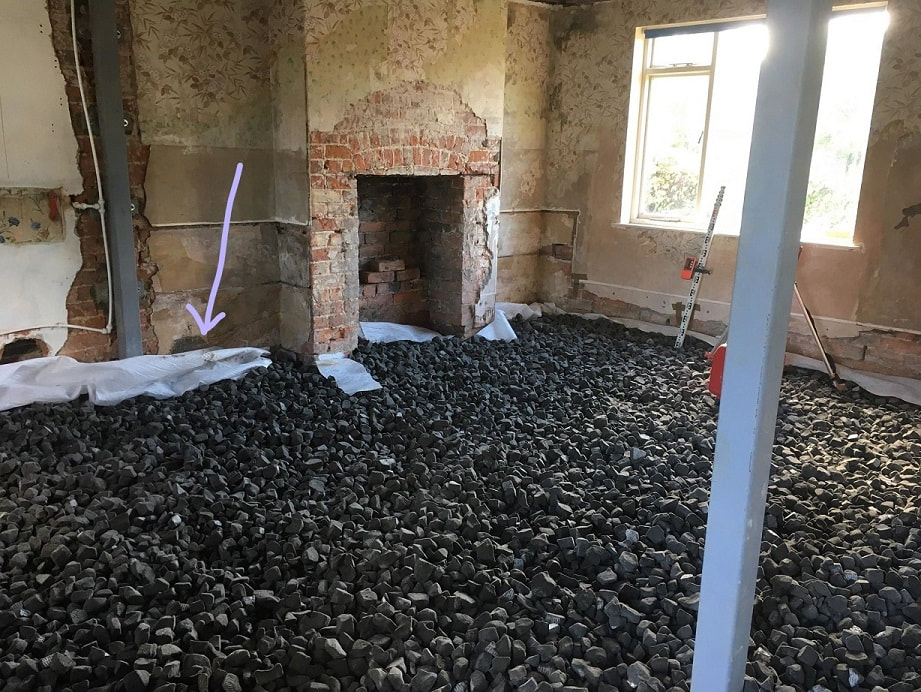 Geotextile membrane shown by the lilac arrow. 1. First, because this is an old house that someone had unwisely stuck a concrete slab in (damp issues in abundance), the existing concrete floor had to be dug out to a depth of 30cm. You can do this yourself but it’s a nasty, heavy job requiring serious machinery, so you may prefer to get a builder in. “We removed all the rubble ourselves, seemed about a million wheelbarrowsful. You have to remove absolutely every bit of it, because if you don't any sharp bits leftover will puncture the geotextile membrane,” explains S. 2. The geotextile membrane (shown above with the lilac arrow) stops the dirt travelling up into the glapor insulation. Once you have a rubble-free base to your floor, you lay the membrane. 3. Next, S and E added the Glapor insulation. Glapor is foamed recycled glass and laid to a depth of 30 cm throughout. “More long days of shovelling and wheelbarrowing,” laments S. 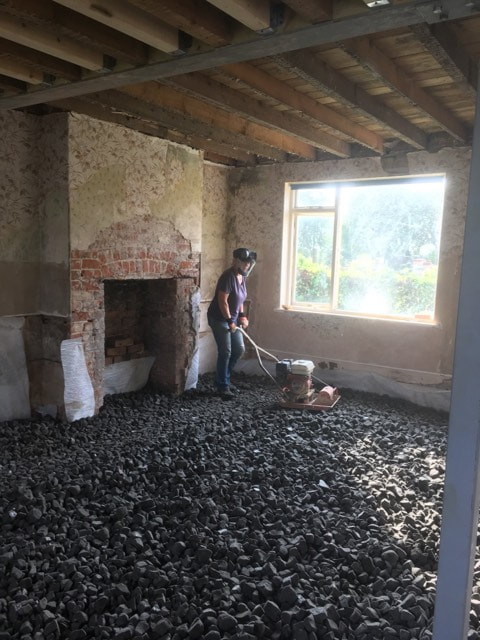 Glapor is foamed glass and used for insulating floors. 4. The next stage was to compress the glapor to 20cm. For this, you need a plate compactor. "There's just no other way to do it," S says, "It's a nasty, noisy, heavy, slow job.” (He he he, I think a picture is emerging here). 5. Not yet defeated, once the glapor was compacted S and E then put down another layer of geotextile on the top. This stops the limecrete from sinking down into the glapor. 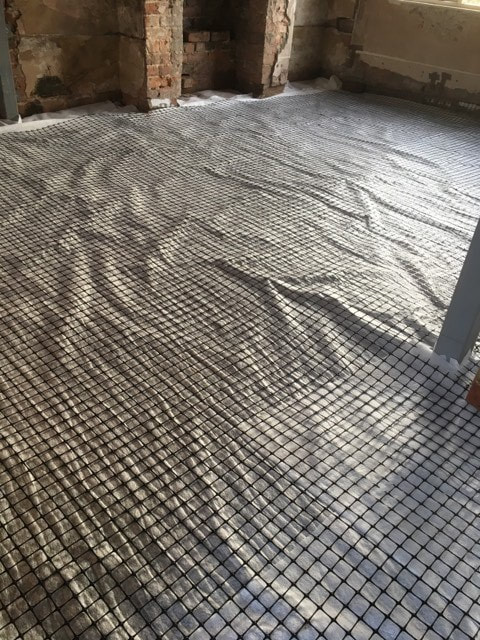 Geotextile on the top of the glapor to create a barrier for the limecrete, with geo-grid for heating on top. 5. Because they were laying underfloor heating, S and E installed a geo-grid to hold the pipes in place, before laying the pipes themselves. They then used a pressure pump to pump water through the pipes to check there were no leaks, because once the limecrete goes down, that’s it! You can no longer access the pipes. 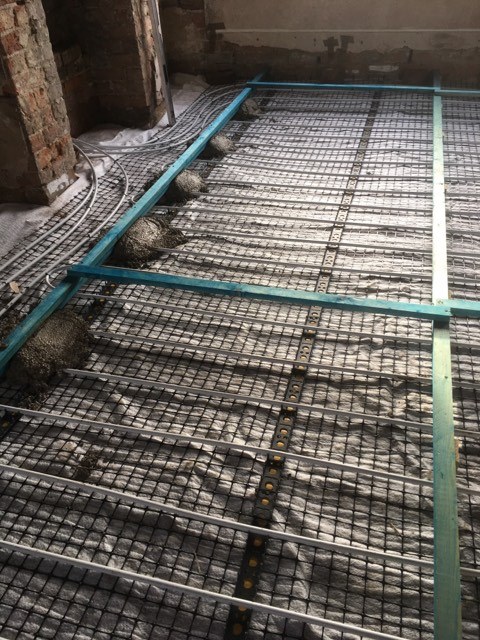 Water pipes going down for underfloor heating. 6. Once that's all done, the limecreting begins. First, you shutter off the section you're going to limecrete. “Obviously, start furthest from the door and leave the area around the door to last. Limecrete is much more forgiving than concrete and can be done section by section, provided you do the sections quickly enough that it doesn't dry out,” explains S. 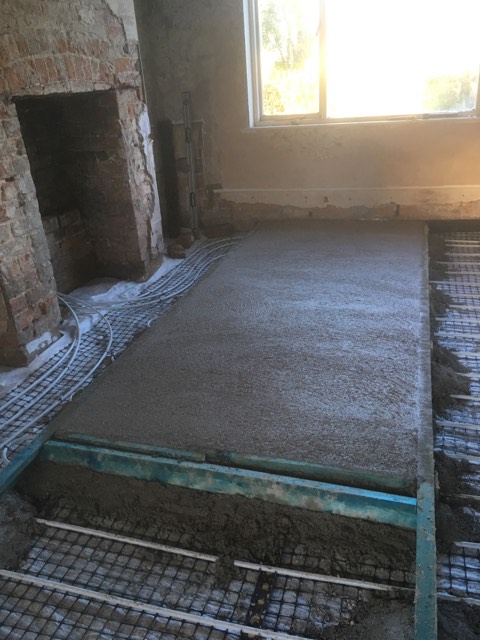 You can see the limecrete poured in sections here between the shutters. 7. The limecrete mixture was made as follows: “Our builder lent us a concrete mixer. The mix we used was 2.5 buckets of slabbing aggregate and one bucket of NHL lime, with a handful of fibres added for strength. Because of the slabbing aggregate we used, we did not need to use sharp sand, but many other systems do require sharp sand. You then add water bit by bit until the mix is the consistency of stiff porridge. Keep it mixing for 20 minutes, then empty into a strong wheelbarrow and wheel it indoors.” 8. While one person lays and tamps the limecrete in the shuttering, the other person mixes the next load. Once the entire section is laid and tamped to the level of the shuttering, you can finish it with a float or trowel, and create the type of surface you want.  9. Finally leave the limecrete overnight, before removing the shuttering on that section and setting up an adjacent section. Continue until the whole floor is limecreted. 10. Limecrete takes about three months to fully cure, but you can walk on it long before that. If you’re in a hot, dry climate, you need to damp (but not soak) the floor regularly to prevent it from drying too quickly and cracking. Once it's cured, use a stiff brush to remove all the loose dust. “You will need to do this repeatedly for quite a long time,” says S. Something tells me S is happy this floor business is over:) 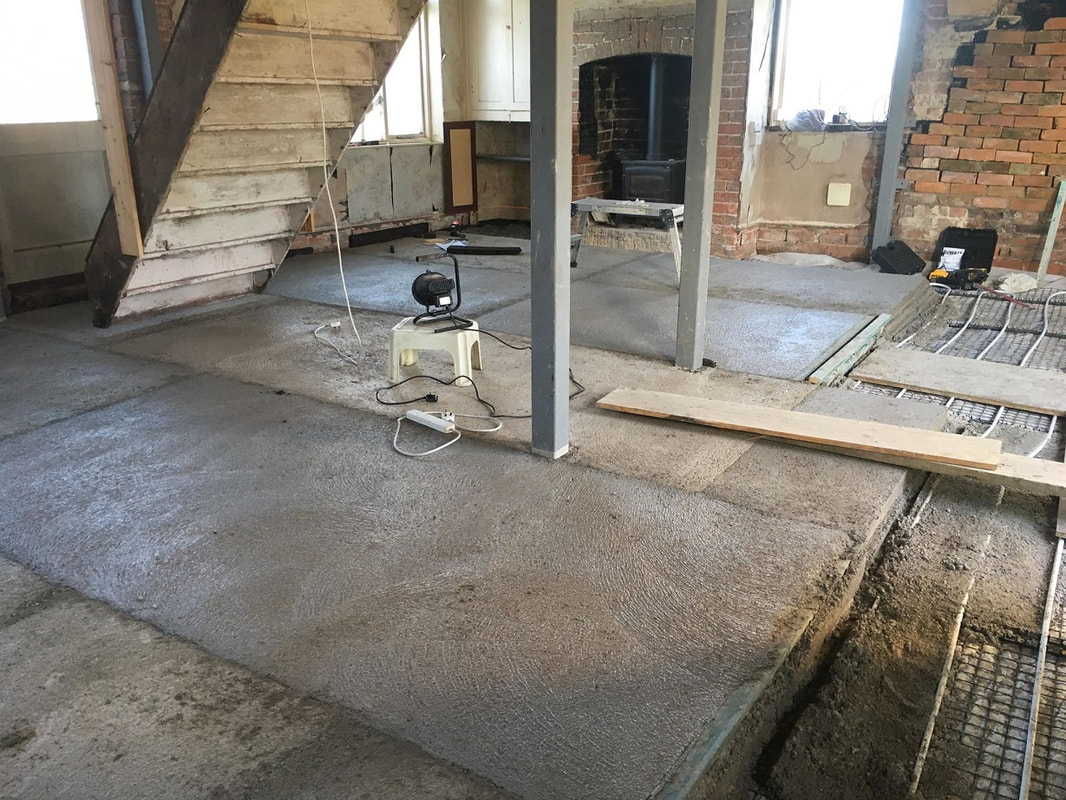 Last word on the matter from S "This was by far the biggest, heaviest, hardest, nastiest job we had to do, but once we'd done it, we felt like we could tackle anything because no job we're likely to do here now will be as physically taxing as doing that floor!" Do you enjoy The Mud Home? If you find these articles inspiring or useful please consider joining us on Patreon. Your support pays for the running of this website, my virtual help, and my sustenance. A big thank you to all The Mud Sustainers, and everyone chipping in and keeping these posts and articles coming. Another Way to Contribute If you don’t for any reason want to contribute on Patreon, you could consider buying the Mud Home Building PDFs instead. You get all the wonderful Mud Home content compiled into three comprehensive and illustrated PDFs. They are currently $25, and are updated every six months. Once you’ve bought them you always have access to the updates. 
14 Comments
Two Hybrid Timber-Bale-Cob Houses in Cantabria, Northern Spain You may remember I visited a rather spectacular natural building complex in Cantabria a couple of years ago. You may remember two straw bale houses in the process of being built. Those houses are now complete (yippee!) Robert Alcock from Abrazo House gives a brilliantly detailed rundown on how they were made, and shows us around.  Abrazo House If you're a regular follower of the Mud Home blog you'll have already read a bit about Abrazo House. At this ecological learning centre in a tiny village in the green mountains of Cantabria, we've spent the past fourteen years building natural homes and doing permaculture with the help of hundreds of volunteers from all over the world. You can read all about the project in our free ebook: (http://abrazohouse.org/en/book/) In 2016 we decided to apply our hard-won experience to a further natural building project: to create two new, beautiful and efficient eco-houses on another plot of land in the same village, with the aim of attracting like-minded people to live and work in this amazing part of the world. The houses are now complete and are on the market. (http://abrazohouse.org/for-sale/) For all you natural building fans out there, here's a quick rundown on the essentials of the project. Design The site is 5000m2 of south-facing terraces with young woodland (planted after we bought the land in 2005) and a stream, in a small village in Cantabria. The "urban" zoning of the land meant we could get permission to build two homes there, and we went down the legal route of architect's plans and municipal permits. (NB We've never run into legal issues because of the unconventional nature of our buildings.) 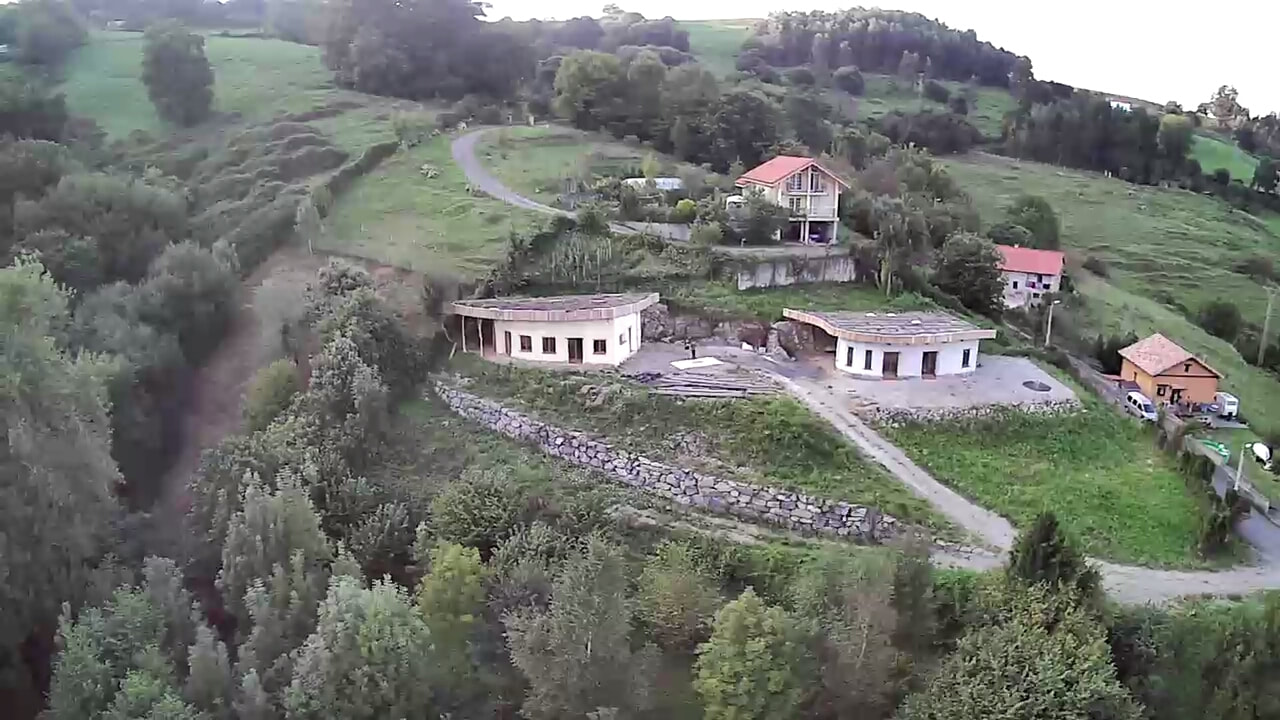 Aerial view of the houses, land and surroundings. Because of the steep, south-facing site, we decided to cut away into the hillside and build earth-sheltered houses. A key design element is the addition of a semi-enclosed garage to the north, in between the house proper and the hillside: basically doubling your useful space for just the cost of the roof. Materials The choice of materials was based on ten years' experience of natural building in this bioregion. Of course there would be loooads of cob: we love working with cob, it's cheap and easy to mix with our well-honed rotavator technique, and it makes gorgeous organic shapes. But we wanted these houses to be completely passive solar—not needing any additional heating in winter—and cob alone isn't quite warm enough to do that even in our mild climate, so we went for a hybrid construction: straw bales laid on edge (35cm thick) with a good 15cm of cob inside and out for protection and thermal mass. A notable feature of our local landscape is the humungous areas of eucalyptus plantations. These non-native trees are mostly used for making paper, but they actually make a very good structural timber which is very durable if treated with borax solution. So we decided to erect a timber frame structure and green roof first, and build the bale-cob walls afterwards, allowing us to work under cover. We cut and peeled our eucalyptus trunks on a friend's land, less than 1km from the building site. Using them in the round meant stronger beams, and saved us an expensive trip to the sawmill. 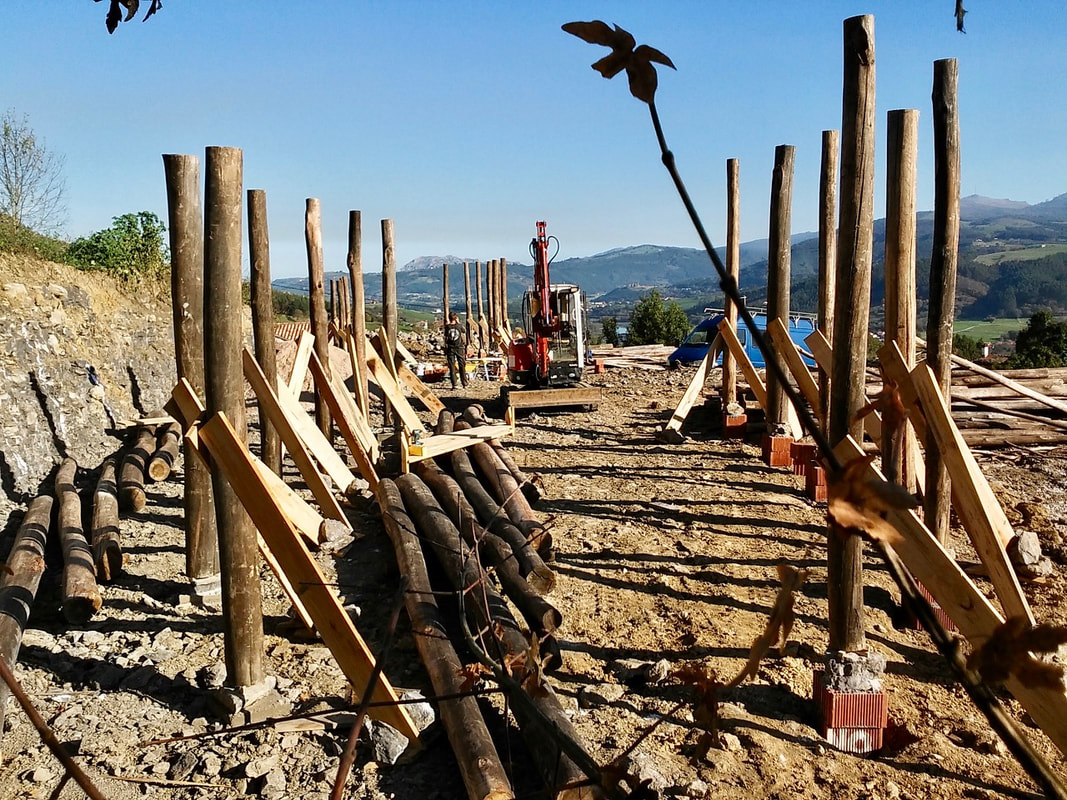 The posts in place with temporary supports, ready to install the beams. Earthmoving and Foundations On site, our digger crew scraped away the topsoil—which we piled up for use in mixing the cob later on—and found that the underlying subsoil wasn't soil at all, but rock. This meant a lot more expensive digging, but it did have two benefits: a nearly infinite supply of stone for building retaining walls and foundations, and a very solid base for the houses, with no need to pour a concrete foundation. In some areas we could go straight up from the bedrock; in other places we built a brick pier for the posts to rest on. Timber Frame and Roof Due to administrative delays we weren't able to start building the timber frame until December 2016, but once we got going it went up in just a couple of weeks. With the main frames up and temporary supports in place, we put on the rafters and the roof during the winter, luckily blessed with good weather, and were ready to start filling in the walls by March. 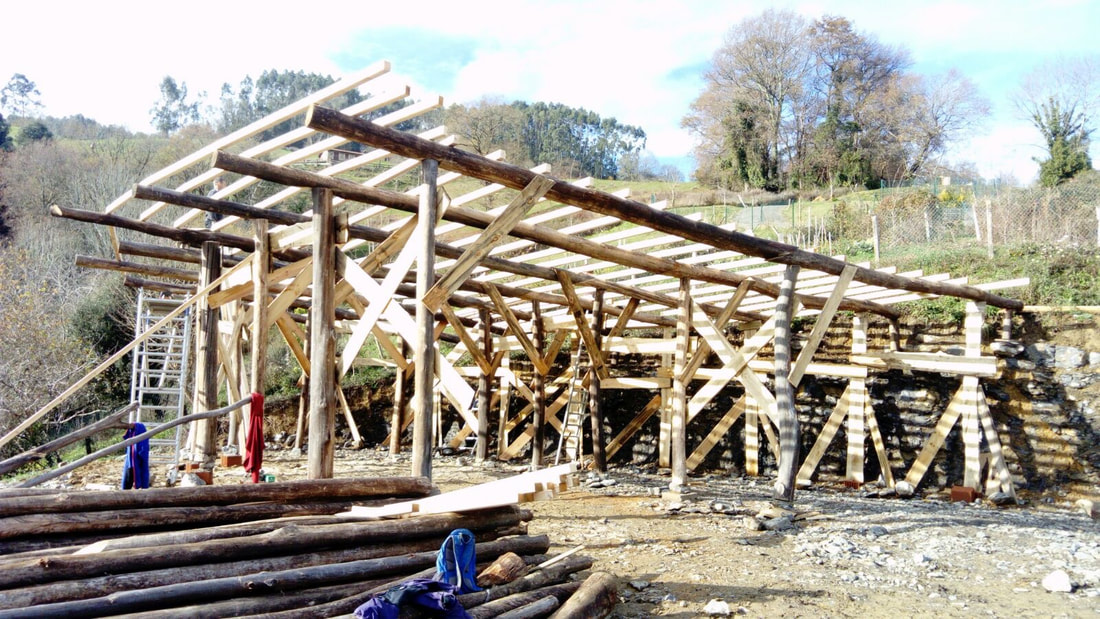 West house frame, eucalyptus beams in place. Walls To keep the bale-cob walls dry, you need a good stemwall. Despite having plenty of stone on site, our stemwalls are mostly built from termoarcilla, a specially insulating type of brick that interlocks like Lego, because it's way quicker: we only used stone on the visible exterior walls. We filled in between the two layers with expanded clay pellets (arlita) — a lightweight insulating pellet that's a bit like Rice Crispies. 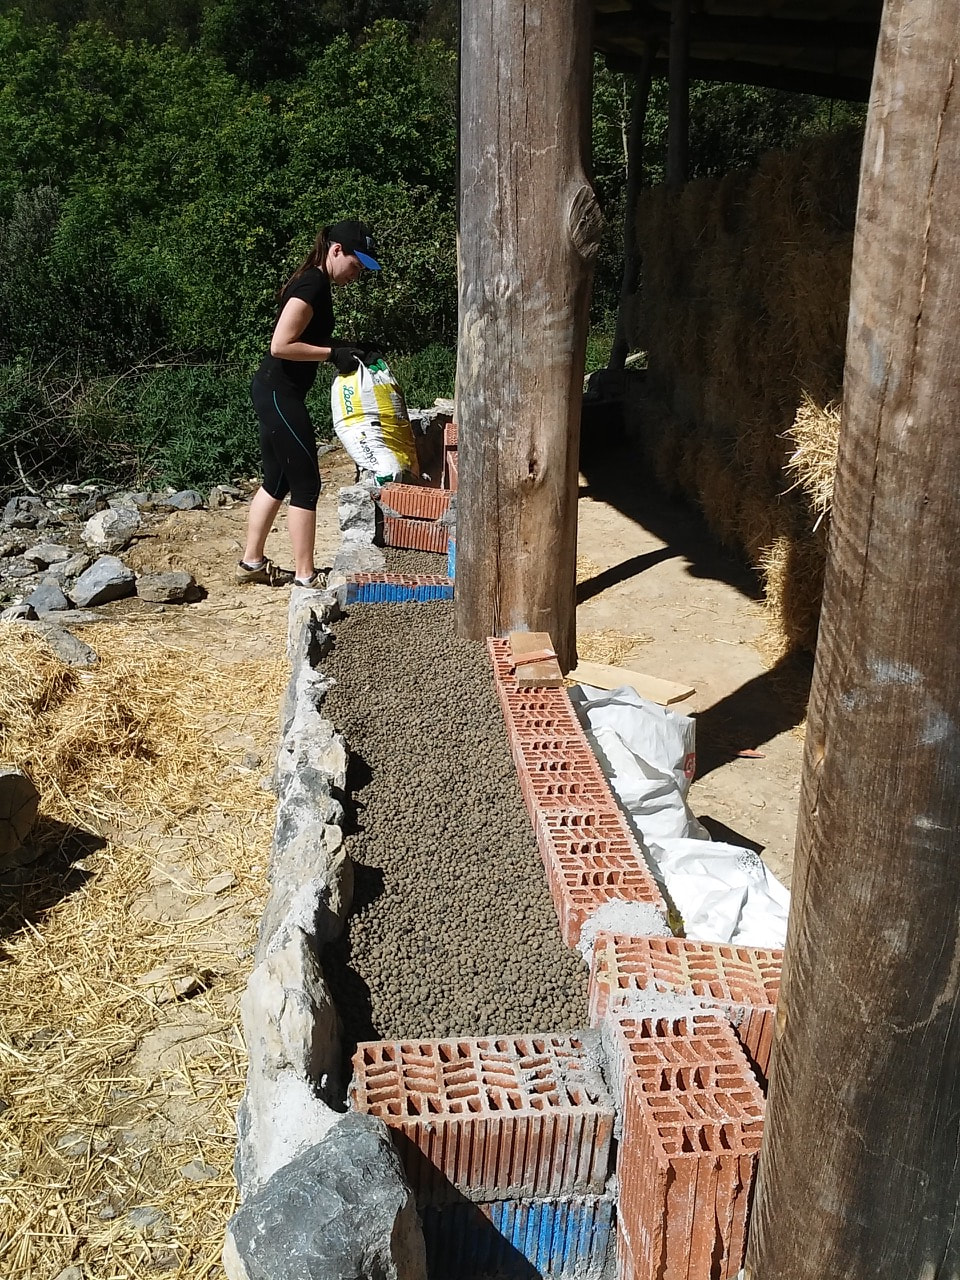 Filling in the stemwall. Straw bales On top of the stemwall we put a thin layer of cob, and then it was bale time. It was pretty easy to keep the bales straight and stable by tying them to the post-and-beam structure; in some places, we strengthen them with bamboo poles tied through the wall from inside to outside. At this stage we just left a big enough gap for each window or door, added a wooden lintel and kept going with the straw bales. It's important to take into account that the straw bales will settle over time, so the lintels must be able to move with them. (Our lintels could have done with being a bit stronger, too.) Later on, we would come back and hang the doors and windows from the lintels, filling in around them with slip-straw. 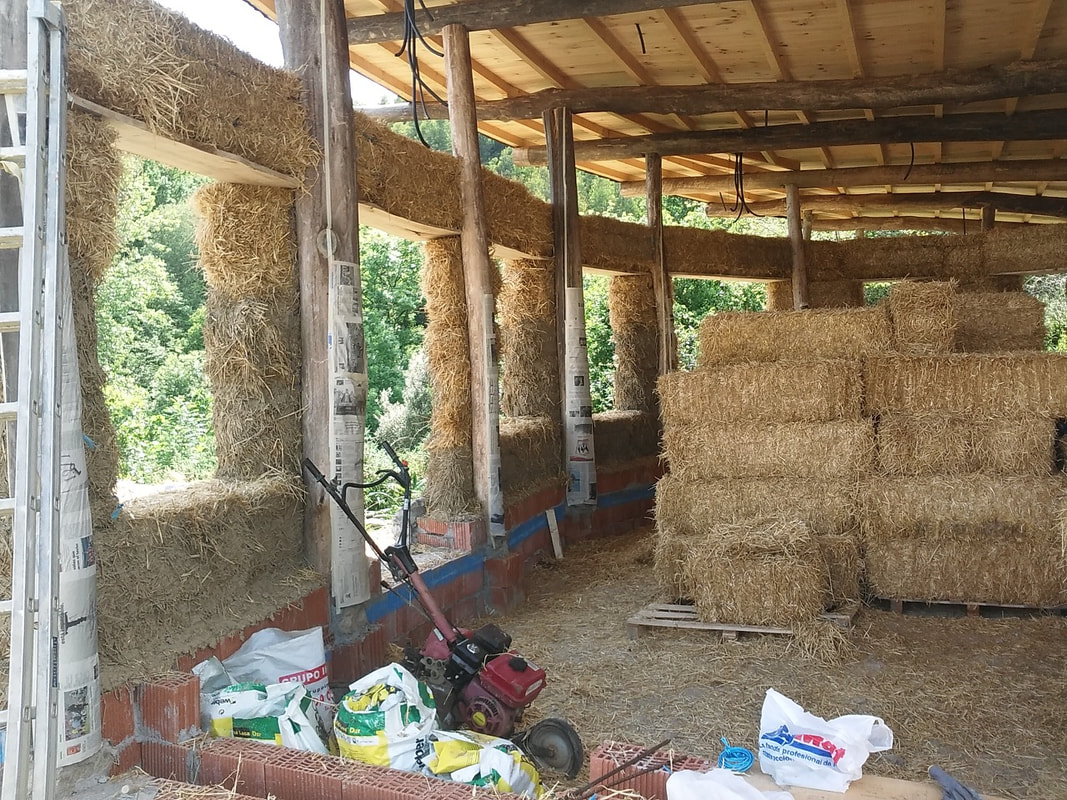 The wall goes up. Plastering The first layer of plaster we added to the bales was a clay slip—just clay soil and water mixed by hand and foot in a pit (an excellent way to make friends and get incredibly muddy), and applied to the bales by hand. 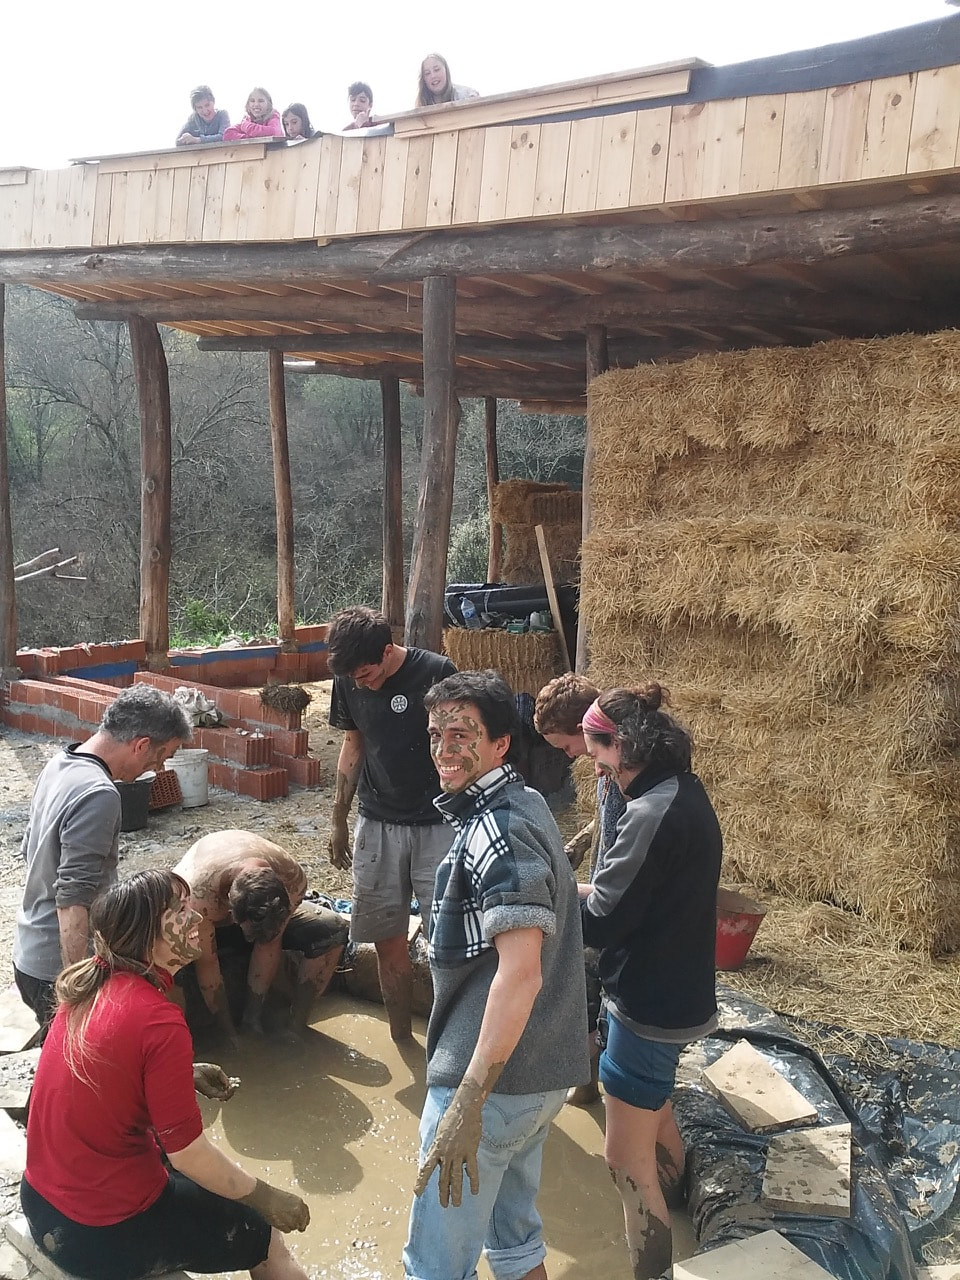 Mixing the slip. The kids can't quite believe the adults are really doing this. Electricity tubes get fixed straight on to the straw bales. Then it's time for the cob plaster—layers and layers of cob plaster until the walls are weatherproof, thick and straight. 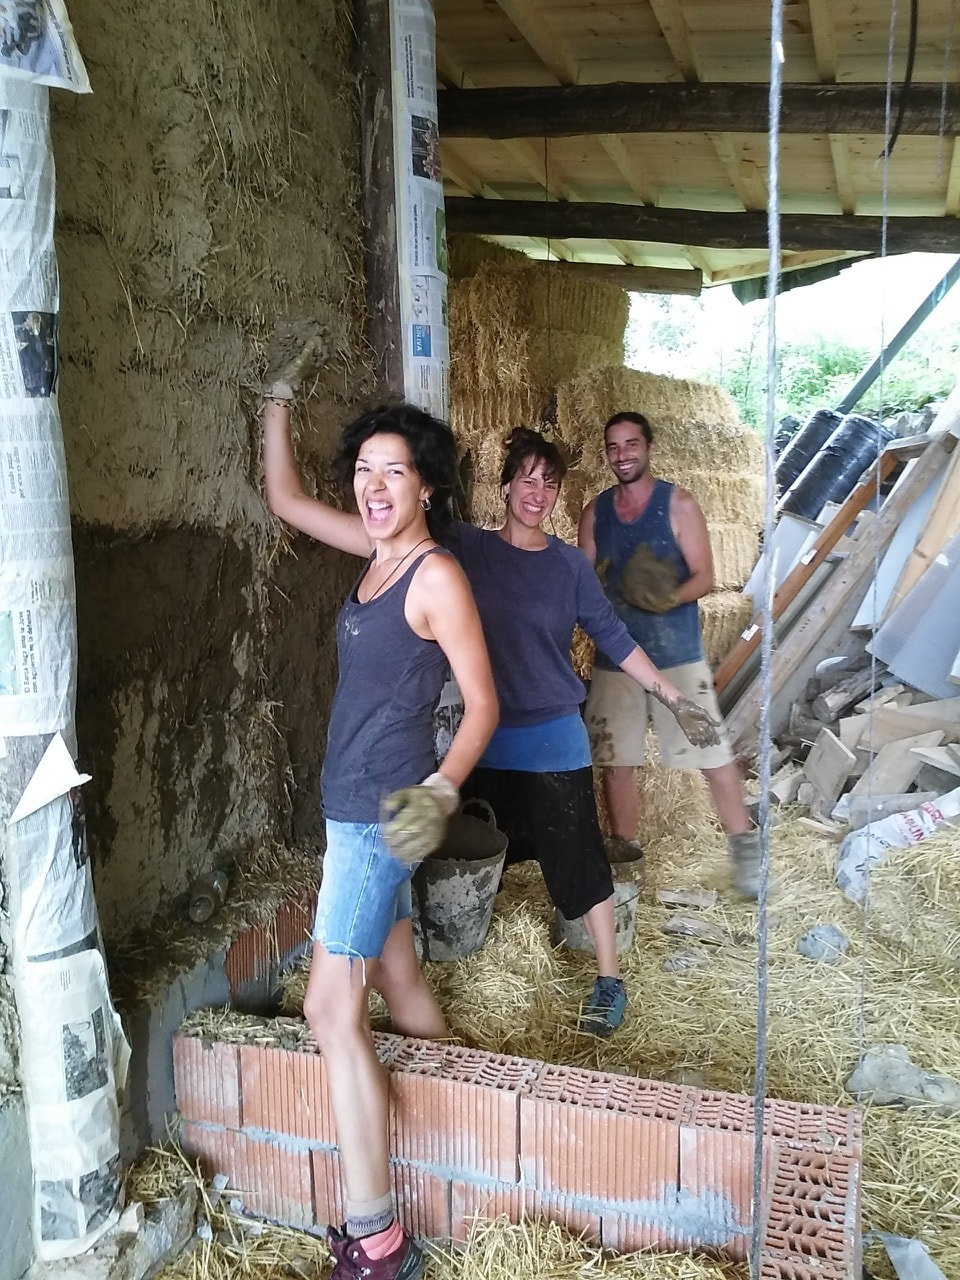 Cob plastering team. On top of the cob we applied Ecoclay, a commercial earth plaster—basically a much finer version of cob. Then came the finish layer: gypsum plaster inside the West house and an extra fine commercial clay plaster in the East house, with lime plaster on the exterior of both houses for strength and durability. 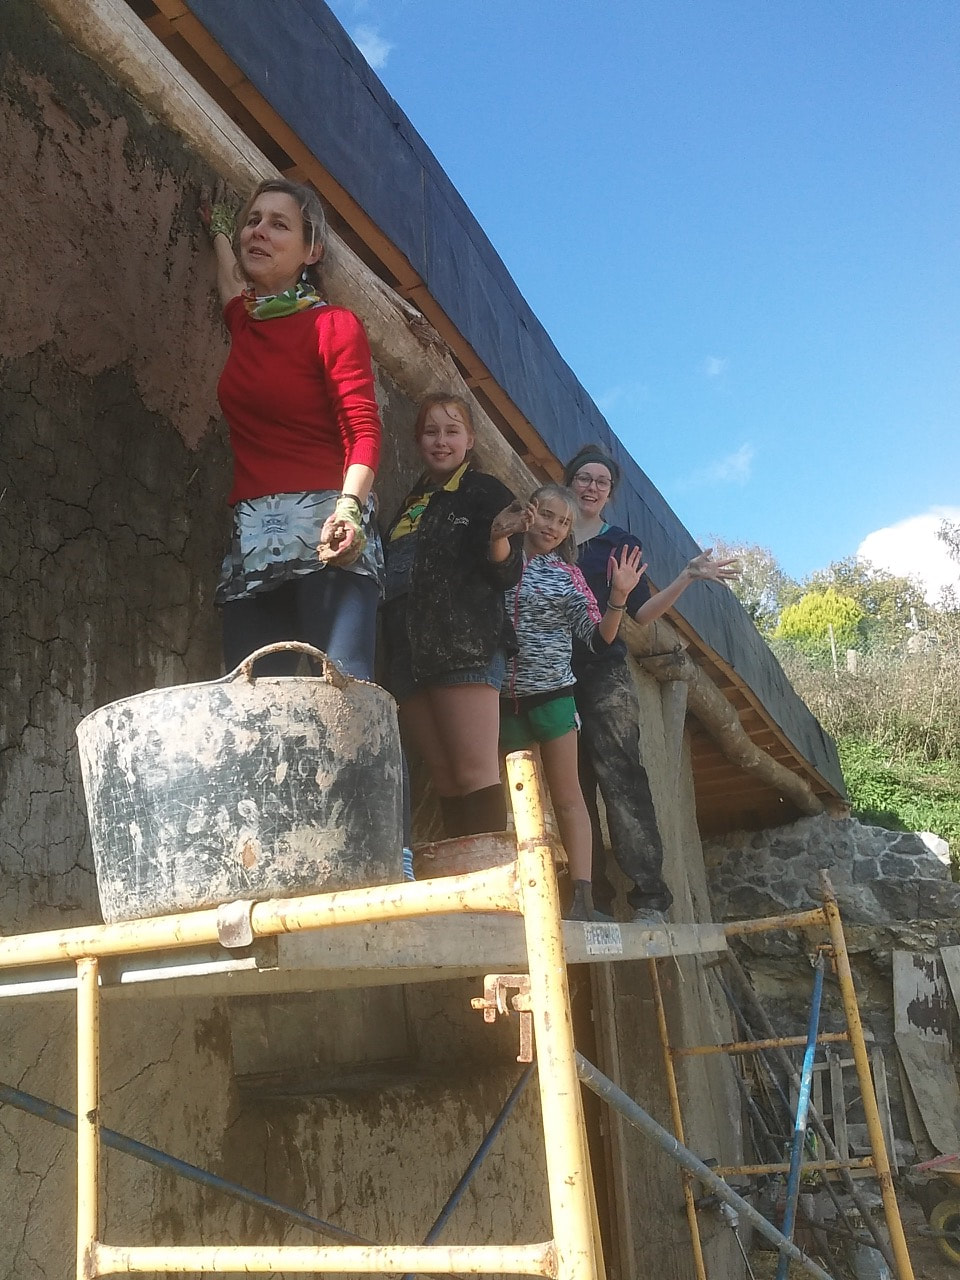 Applying ecoclay. On the market The two houses are now on the market, together with 5000m2 of land with wooded terraces and a stream. The East house is furnished as a small family home, while the West house is slightly larger, with a loft and two bathrooms, and would be ideal as a studio space for working, running courses or as a rental property. We believe this is an exceptional property for the right people, who are looking for a place to realise their dreams of a life in harmony with nature. Please take a look at our webpage (http://abrazohouse.org/for-sale/) or check out our promo video (https://youtu.be/mgMiTj5ujCA) and get in touch if you want to know more. 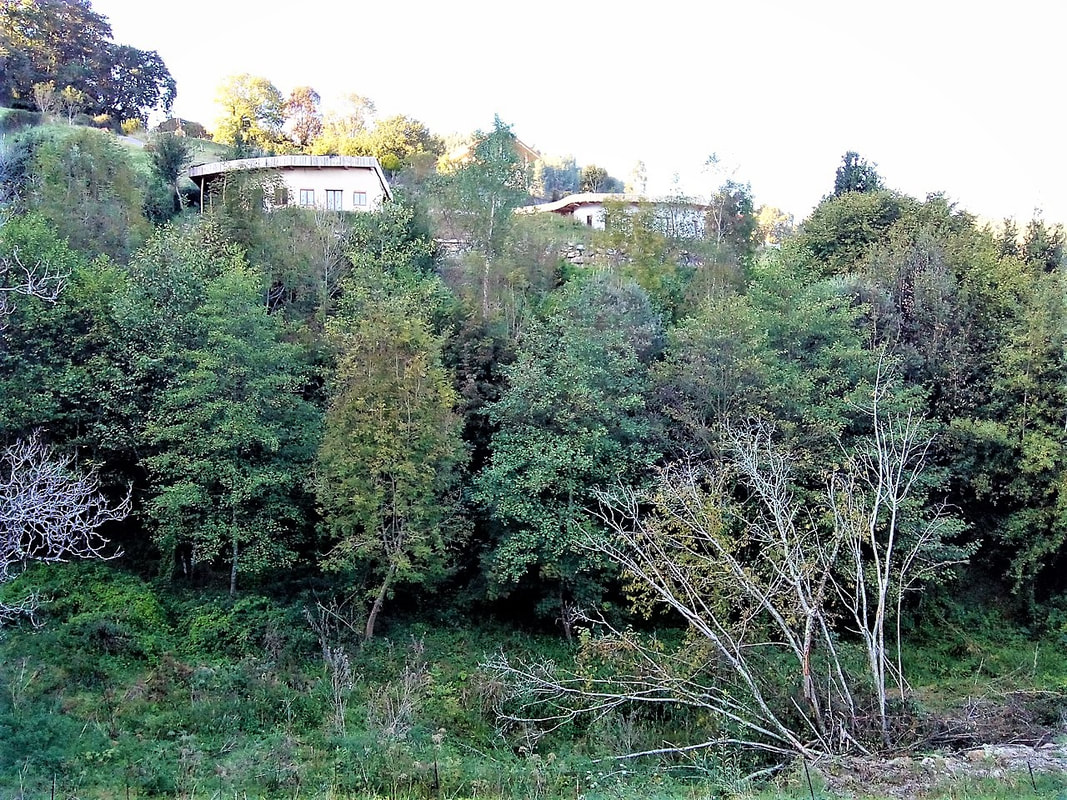 The whole land 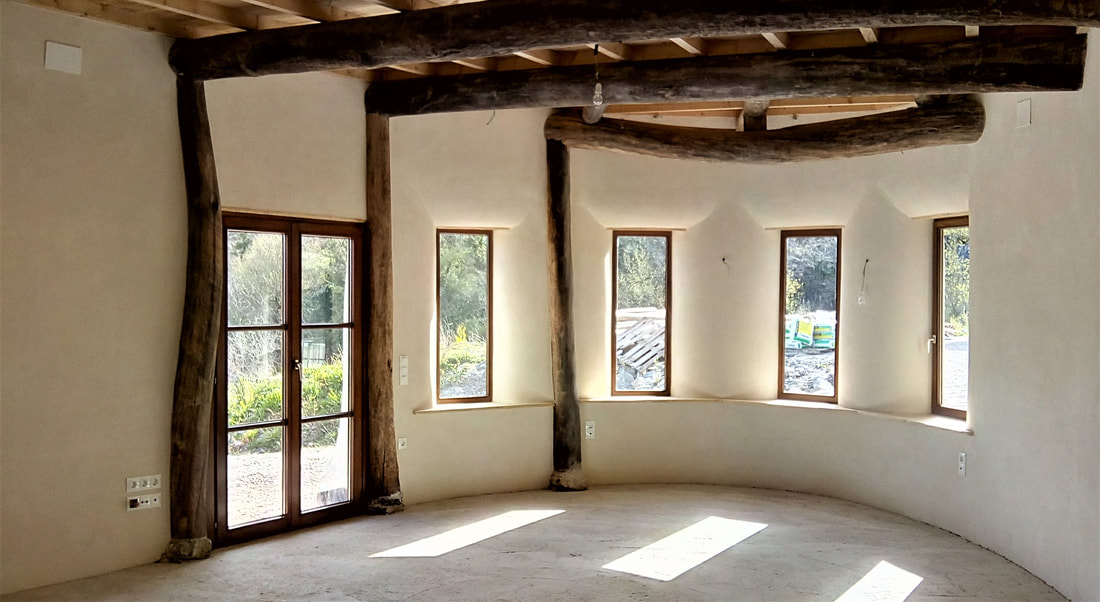 East house interior Do you enjoy The Mud Home?
If you find these articles inspiring or useful please consider joining us on Patreon. Your support pays for the running of this website, my virtual help, and my sustenance. A big thank you to all The Mud Sustainers, and everyone chipping in and keeping these posts and articles coming. It’s actually pretty easy to add window and door frames into earthbag buildings. The most important thing, as always with earthbag, is anchoring things to the walls. But there are a couple of potential issues, so it pays to be aware of them. 1. Making a mould The standard way to create space for your door or window is to make a mould. Some people use tyres, some use hay bales, most build a box out of wood or ply and insert it onto the wall where they want their window.  Perfect example of a mould for an arched doorway from Sam, Leora and Murat’s earthbag build in Costa Rica. That said, I’ve never done it this way. I’ve always stuck the window or door frame straight into the wall, and built around it. There are pros and cons to both methods, as you’ll see in a bit. 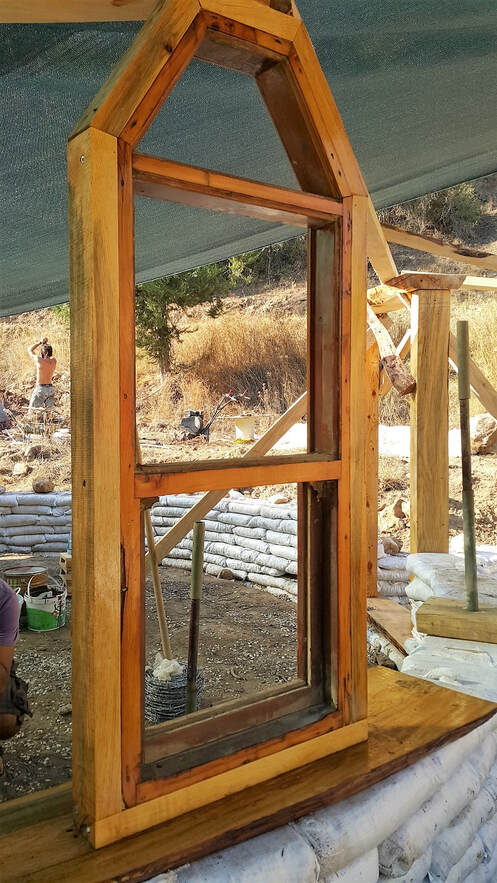 Window frame stuck directly on the wall. 2. Anchors As you lay earthbags up to the edges of the mould or frame, it’s crucial to add anchors between the bags that you will attach your frames to. What you don’t want in any kind of construction is the frames shifting or sliding about. They need to be securely nailed into the earthbag wall. How? You can either make your own anchors from small planks of wood and slot them between the bags like this: 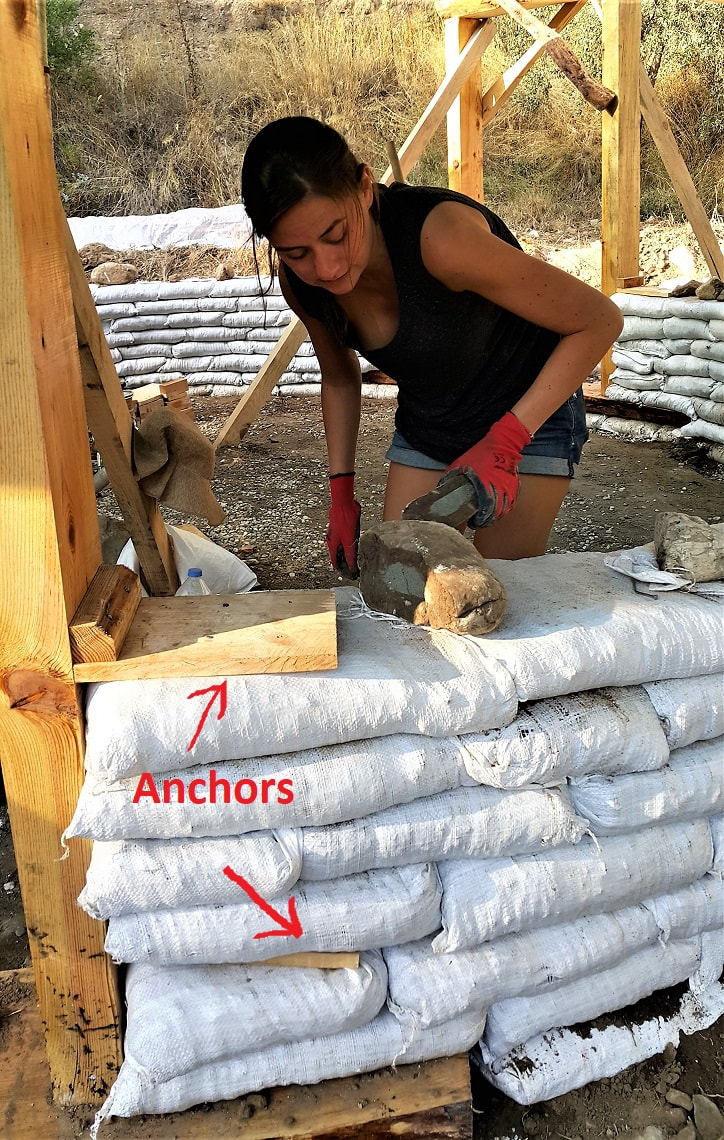 An example of a wooden anchor for a door frame. Or you can use metal brackets to do the same job (see Owen Geiger’s method). 3. Fixing anchors onto earthbags Fix the anchor onto your earthbag by driving big fat nails (minimum 10 - 12cm) right through the anchor and into the earthbag. 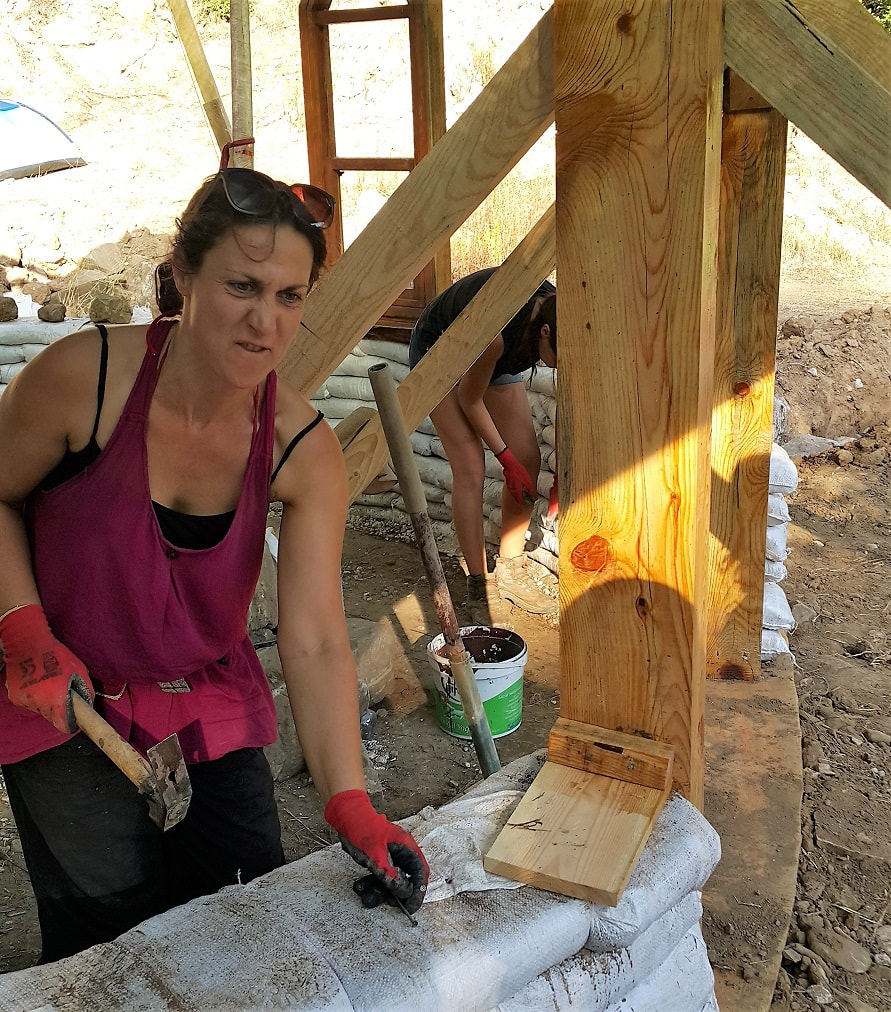 Nailing the anchors. Not sure what the grimace is for, but you get the picture. I’ve found you want one anchor, every three or four rows of earth bags. Any less and things start wobbling. 4. Barbed wire Once your anchors are secured, you lay the barbed wire over the top of the anchors, and nail it into place. This gives the upper row of bags something to grip onto. Once you tamp the lot down, that anchor is wedged. Now you have something to screw/nail your window or door frame into. 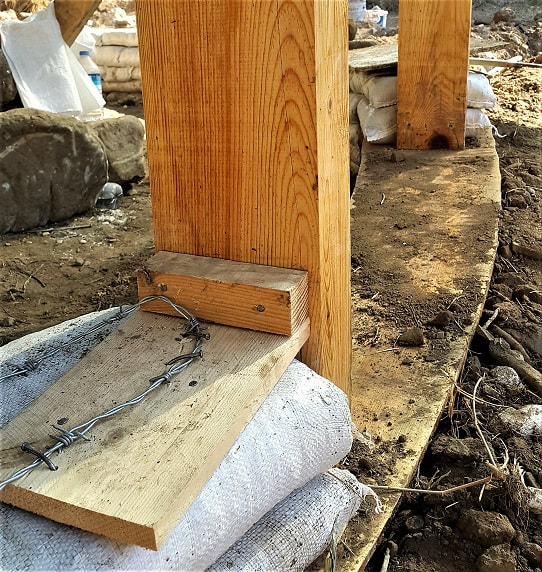 Barbed wire nailed onto the anchor. Issues to watch out for: The snag with earthbag is this: The higher up you go and the more you tamp, the more pressure is exerted on the lower bags. So they will naturally squeeze inwards, pressing against your window or door frame, or indeed your mould. If you are using a mould this can make it difficult to yank out. The common recommendation is to stick wedges between the mould and the earthbag wall. Even so, most people still seem to find it hard to pull the mould out. A mould without rough edges will help your cause. Or perhaps a bit of plastic sheet between the wall and the mould would help it slide? 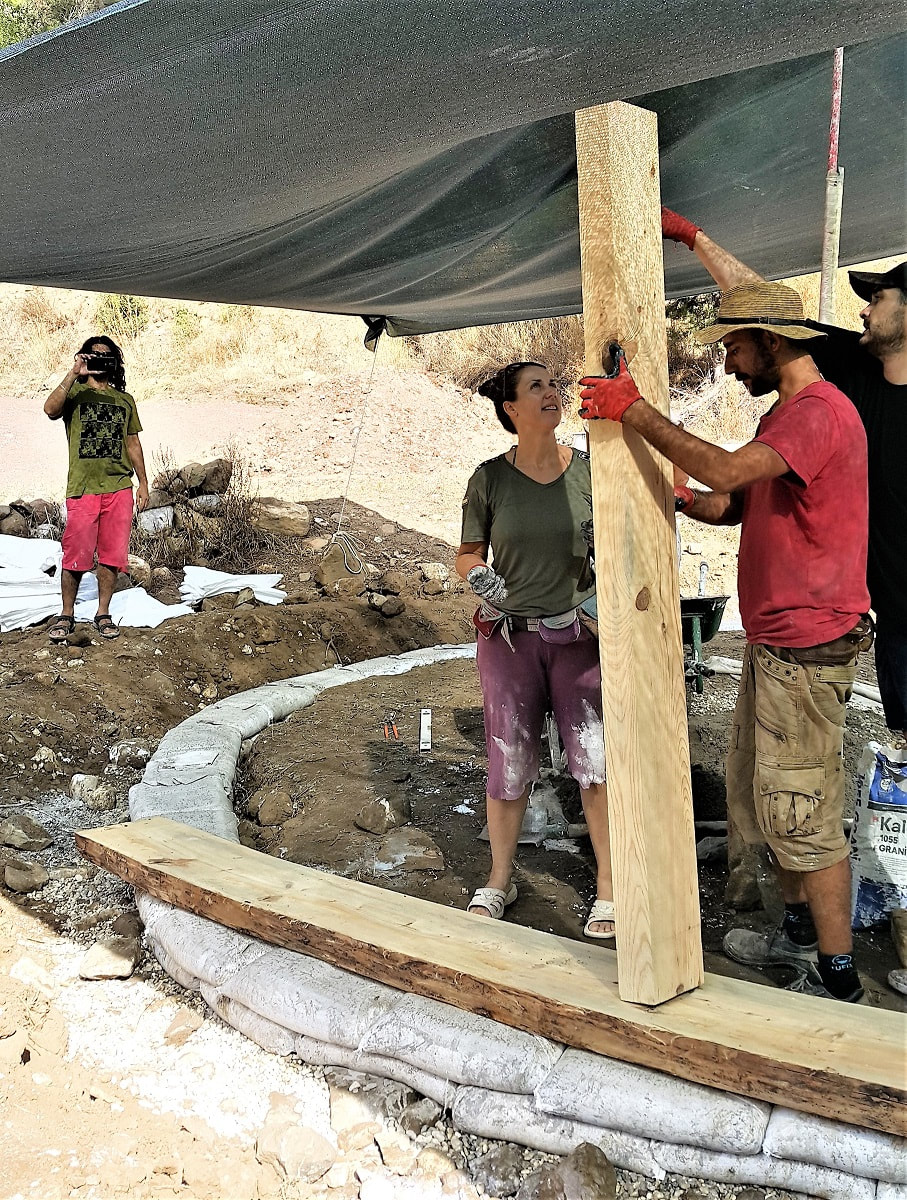 Nice fat lintels ensure your frames won’t buckle under the pressure. If you want to add window or door frames directly into the wall, your issue is this: Your frames must be tough or they will buckle under the pressure of the bags. This happened on my first house, where the window frames turned into trapeziums :)) You need to pay attention that your lower, upper and side lintels are heavy-duty, because they all bear the brunt of the pressure. We used 10 x 30 cm lintels on the build in Olympos, and they held up. 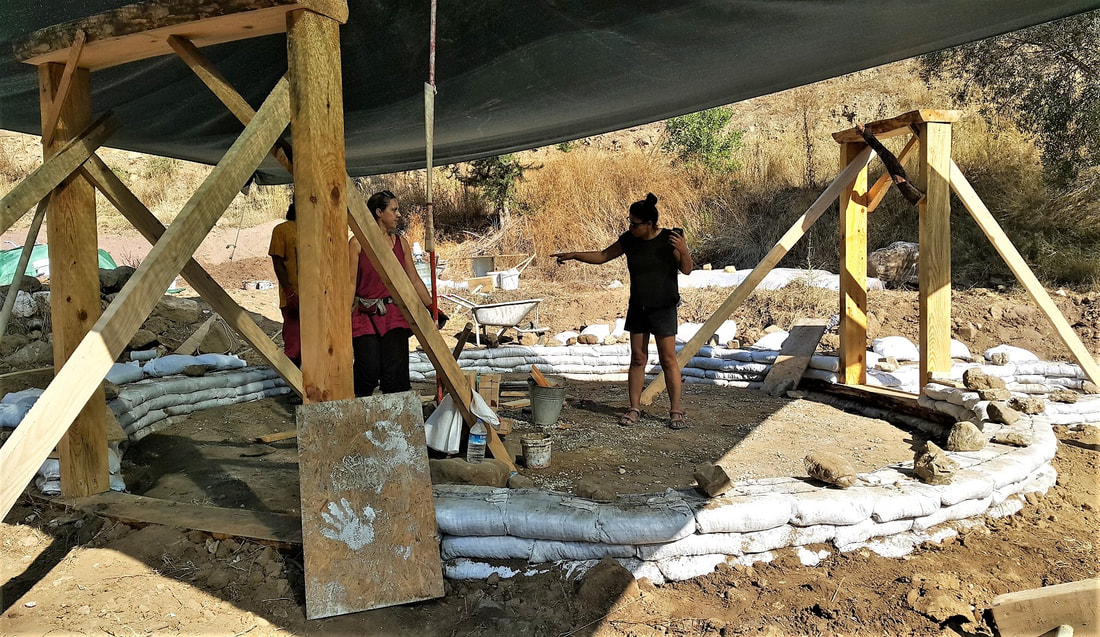 Door frames. The lintels are also attached to the wall using anchors. Good luck folks! And remember, everything has to be anchored together in earthbag building. If it's not anchored into your wall, it's not secure and may well wobble. Do you enjoy The Mud Home? If you find these articles inspiring or useful please consider joining us on Patreon. Your support pays for the running of this website, my virtual help, and my sustenance. A big thank you to all The Mud Sustainers, and everyone chipping in and keeping these posts and articles coming. Starting Your Own Project?
The Mud Home small, private and very supportive Facebook group is a safe space for new mud builders and off-gridders. It’s also the most inexpensive way to get assistance from me. It’s filling up, though. The number of members will be capped at 100 so I can give everyone the proper help they need, so if you want to be part of it, don't leave it too long. This is such an important post by Kristen Krash over in Ecuador. I wrote an Earth Whispering a while back on the subject of letting go of control and allowing your land to be. But there is no one-fits-all answer or prescription. This is why I love and strive to maintain The Mud Home’s worldwide perspective. Because every space on this Earth has a different story. Each place and people face different challenges and possess different strengths. I’ll hand over to Kristen for her hard-won tips on land guardianship in the degraded tropics of South America, plus her fantastic hacks and money-saving tips on reforesting. Are you sure you want to rewild? So you have some land and you want to manage it in a way that's good for you and good for the earth. You have your garden and maybe even a food forest planted and you're wondering, "Now what to do with the rest of it?" Here I'll discuss three options, how to determine what is most appropriate for your land, why, and how to do it. The first is simply to let the land be. Relinquish control. Rewild it. What a lovely concept, humans stepping out of the way for nature's innate wisdom to unfold. Perhaps you might need to build some fences to keep farm animals out of the area you've set aside, but intervention is minimal. It's the cheapest and least problematic way to manage land and allows wildlife to thrive where it lives best, away from people. But..Before you have visions of a spontaneous Eden in the back 40, make sure your land is a good candidate for rewilding. Are there trees and shrubs on the land or nearby? A mix of undergrowth? Lots of birds and small mammals to help distribute seed? Bees, bats, and other pollinators? Great. Wild away. But if you are missing any or all of these crucial factors, your land may be degraded enough to need help. It's a disgrace really, but some ecosystems has been so badly damaged by human avarice and ignorance that they have reached a point of no return. Generous and thoughtful human intervention can (and should) set the regeneration process in motion.  Looks pretty, but it's actually a degraded artificial pasture. Know your land’s eco-history Note that not all regeneration is necessarily reforestation. In the American midwest, for example, just a few meters of natural prairie contains dozens of species of grasses and topsoil several inches thick. Compare that to the mega farms of soybeans and corn growing in chemical-laced barren soil. Any diverse multi-layered combination of plants that functions as a system is regeneration. Know the eco-history of your land before intervening. The story of Ecuador’s forests Forest is the mature result of many ecosystems, and forests are at the most risk of destruction. Where I live in Ecuador, there's a lot of grassy pasture. It's green and pretty to look at at, but there's nothing natural about it. This was a dense cloud forest, replete with jaguars and monkeys, not cows. Logging companies cut down huge swaths of trees, then sell off the stripped land as "ideal for cultivation." In reality, food forests originated in the tropics (5,000 years ago) for a good reason: without a protective canopy of branches above and network of roots below, heavy rains hit the delicate soil like a blitzkrieg, making a muddy slurry and leaching out nutrients. Fertility is quickly lost. The big plantations of banana, cacao, and palm are completely dependent on chemical inputs to pump out the crops. People who can't afford chemical-intensive farming sow grass for pasture, cloned GMO seed designed to spread and prevent any "competing" vegetation (i.e. trees) from getting a foothold.  Hot open grassland in the sub-tropics. The logging and agro-industrial barons aren't just cutting down trees, they are committing outright ecocide. In the rainforests of Columbia, Peru, and Brazil. In India, Borneo, Malaysia, and Australia. In nearly every country in Africa that is not yet a desert. Pastures and monocultures spread like a green plague, eradicating old growth forest, the animal species that live there, and the know-how channelled through generations, a treasure trove of plant lore lost forever.  Ahh… the shaded, deep, damp forest. Jump-starting the recovery The good news is, where humans have done the damage they can also jump-start the recovery. The other day I pulled on my high boots and hiked over to an area of former cow pasture we haven't touched since we began working three years ago. Apart from a very few struggling pioneer shrubs, I literally clawed my way through an acre-wide ocean of chest-high grass that formed a mat so thick over the soil nothing else could grow. A veritable green desert. In vivid contrast, on the land where we have taken action, over a thousand trees and plants of a hundred plus species now thrive, providing food for us, fodder for our horses, habitat for increasingly abundant wildlife, foliage for beauty and shade, leaf fall to build soil, and interweaving roots to prevent erosion. Our regenerated land isn't merely a bunch of trees; it's a developing ecosystem that will improve with maturity.  More birds come to our reviving land every day. If those aren't enough reasons to regenerate, here's the biggest "why" of all: trees, diverse plantings, and soil rich in organic matter constitute the most effective terrestrial carbon sink on the planet. Conserving forests and regenerating stripped land are our best chances for mitigating climate change, hard stop. Tips and hacks on how to get a forest started Now that you're pawing the ground to get out and plant trees, here's some hard-won nuggets of wisdom onu how to get your forest started. 1. First, research. Find out what your land was like fifty or a hundred years ago. Talk to locals. Find out what trees live long and prosper in your climate. Native trees are wonderful, but you don't have to be a purist. We've planted mostly native and a variety of species from around the equator. Diversity is key to resilience. Biospheres are shifting as climate change escalates. Dry areas are getting drier, wet areas wetter, and the whole planet hotter. Choose plants that have the best chance of withstanding likely changes. 2. Whether you have an acre or five hundred, regenerate what you can. Our land isn’t huge, but it lies midway between two reserves, serving as a resting point for migrating insects and birds. Every reforested acre counts. Don’t think you have to do it all in one shot. It’s easy to get overwhelmed and if you have tough pasture and compacted soil like we do, it's hard work. Cultivate smaller chunks of land, expanding your forest outward from a center. Plant fast-growing trees first. As they begin to create shade, habitat, and biomass, the work gets easier and more visibly rewarding. 3. Start a nursery. Buying trees can get really expensive. Save and germinate the seeds from local fruit. If you have trees on your land, collect seed pods when they fall. Cuttings are also a good way to propagate. Don't spend money on seed starting kits and sterile soil and all that stuff. One part compost mixed with three parts soil from your land will go much further and the seedlings will be more adaptive once planted out. We’ve planted hundreds of fruit, nut, medicine, and valuable hardwood trees from saved seed and have hundreds more getting ready for field. All for free. 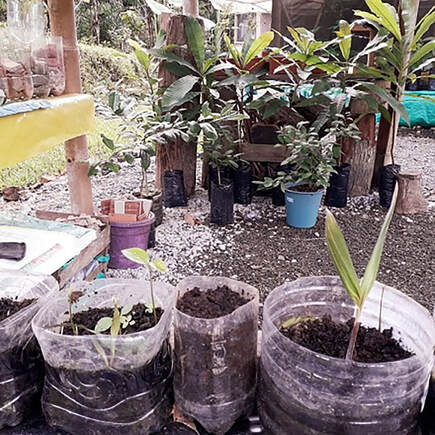 Seedlings open while trees ready for the field await planting. 4. Open your mind to different kinds of “productivity.” All trees are useful and productive of the five F’s: food, fodder, fuel, fertilizer, and fiber. Even if you never use your forest for anything, it’s still producing a sanctuary for wildlife, preventing erosion, building topsoil, and sequestering carbon. 5. Look for help, financial and physical. It’s out there. Our tiny two-person operation recently received a grant of 2,000 trees from a reforesting foundation. Find seed exchanges where you live and if there isn't one yet, start it. Get volunteers to help you plant; fine skills aren’t necessary. Don’t have land yet? If you're reading this in your row house or apartment thinking, as I once was, someday... you can do something now. Donate to a foundation or private reserve. In my personal experience, smaller projects have very low overhead and high commitment to making a difference. Your $5 or $20 or $100 would assuredly be allocated to the critical task at hand. Final word. You can only post so many horrific articles about razed forests and melting ice caps without getting abysmally depressed. Got climate crisis anxiety? Plant a forest, or help make it possible. Lead by example and others will follow. 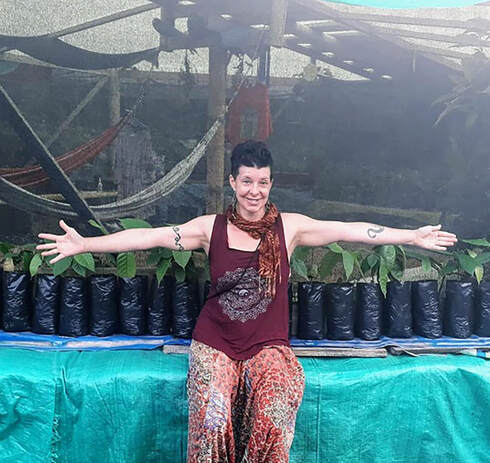 The author outside her nursery with heirloom cacao trees cultivated from free seed. Kristen Krash is the co-creator of Sueño de Vida, a nature conservation center, permaculture farm, and natural building experiment in the cloud forest of Ecuador. To learn more about the mission, courses offered, work exchange opportunities, and land for sale, see their website: http://www.suenodevida.org/our-dream 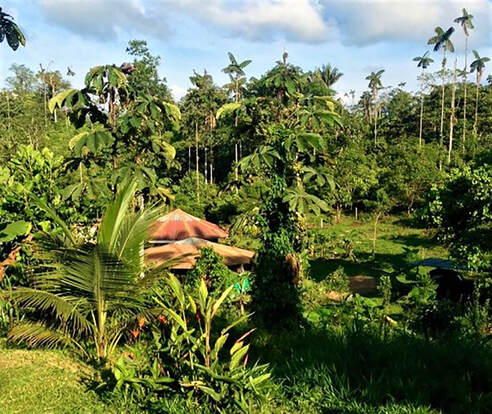 Sueño de Vida today. Do you enjoy The Mud Home? If you find these articles inspiring or useful please consider joining us on Patreon. Your support pays for the running of this website, my virtual help, and my sustenance. A big thank you to all The Mud Sustainers, and everyone chipping in and keeping these posts and articles coming. Starting your own project? The Mud Home small, private and very supportive Facebook group is filling up. The members will be capped at 100 so I can give everyone the proper help they need, so if you want to be part of it, don't leave it too long.
(With details of how Cath made her super living roof) Time for a different earthbag build. I’m letting you in on a mud adventure that has touched my heart rather. It’s one you won’t have seen before. Deep in the urban badlands of Brixton is a mud home with spirit. It’s plucky, original, and despite its size has plenty of personality – much like the woman who built it, in fact. Welcome to Mud Hut, built by Cath Coffey and the Mud Hutters.  Mud Hut in Brixton For those outside the UK or who don’t know, Brixton isn’t some rural off-grid wilderness, it’s London. But while Mud Hut squats in the capital’s backyard, it harks back to somewhere else, somewhere much further south. Its roots stretch right back across Europe, over the Mediterranean, through the Sahara, and into East Africa.  Cath taking a well-earned break. “I always loved visiting my grandparents in Kenya,” Cath told me. “They lived in mud huts in a village on the foothills of Mount Kenya. My grandfather had two wives, each with their own hut, thatched with reeds from the river. Kids, goats, chickens and wood-fired cooking smells all intermingled. The sound of Kikuyu and laughter...It felt like a free life, if a strenuous one. They grew their own food, and were mostly self-sustaining.” And it was this Kenyan life and family that inspired Mud Hut. 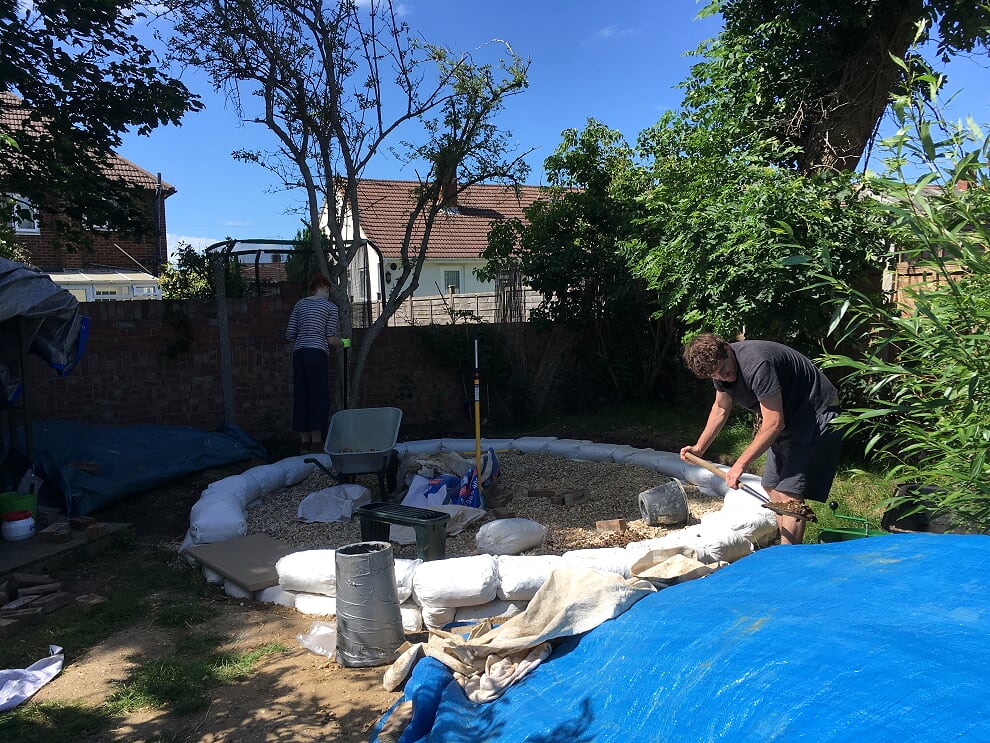 Mud hutters making the rubble trench foundations and stem wall. Mud Hut is 22 feet in diameter. It’s an earthbag house (hyperadobe) with rubble trench foundation, earth plaster, and wooden floor. The house was made with raschel mesh tubing, which Cath found from a certain Mr Jing Hou in China. “He was the only person I found who would send me a small quantity (500 metres),” explains Cath. “I still have plenty enough left for another structure or two! Mr Jing Hou loves the building...calls me Mr Cath.” :) 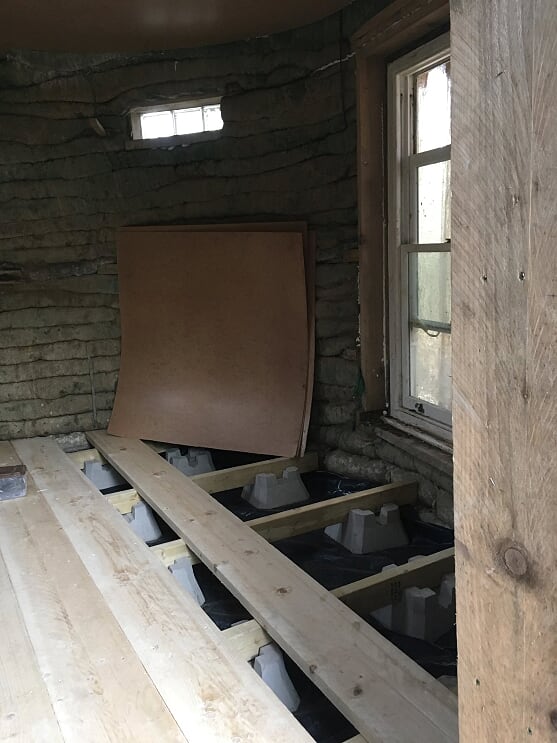 Floorboards going down in the hut. How long did it take to build? “The house took just over a year to build, and that includes a long break for winter. It was constructed by myself and one other helper mainly. Del McCoy was my main wingman. The rest of the family were also amazing, each in their own way. I’ll always be indebted to friends who took time from their busy lives to help. It was a very special time,” explains Cath. How much did the house cost? “Honestly, I don’t know and I’m scared to total it up! I know it cost a lot more than I thought...scrub that...I didn’t think about the cost. I just had a compulsion to build.” 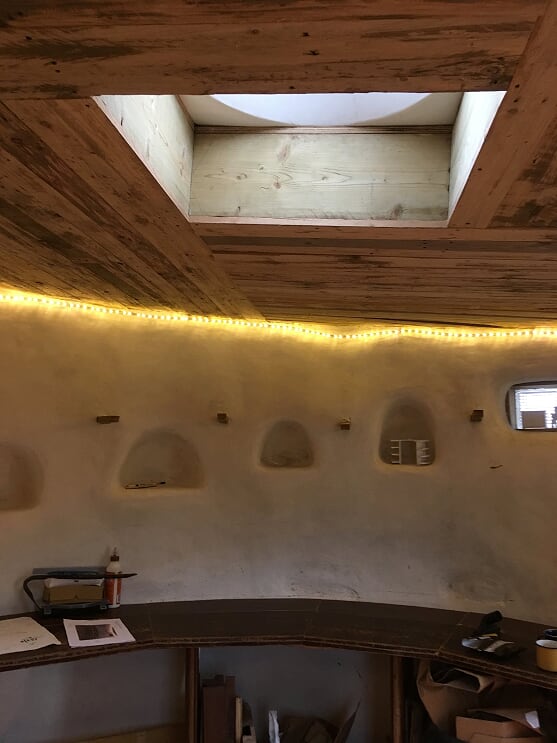 Pallet ceiling, earth plaster with lime wash on the walls. How to reduce the cost of your build On the subject of cost, one thing I can say is that Cath is super smart about reducing building costs by using recycled and reclaimed materials. It makes a huge difference. I often think that with building as with travelling, you spend as much as you have. Do take note of Cath’s tips on foraging below, especially if you are in a first-world country where people shamelessly throw everything away. How Cath made the living roof Living roofs are always made like massive club sandwiches: there are plenty of layers. Cath really did her homework when it came to the roof. It’s designed for a cold, wet British climate. 1. The roof has a wooden frame (60% off from a family member who worked at a large DIY store). 2. The frame was covered with free reclaimed 18 mm plywood. 3. Next layer was carpet from the bins at the back of Carpetland (pure wool!) 4. Then Cath added 6mm EPMD pondliner (expensive). 5. After that there’s a root barrier (root barriers are always non-organic, otherwise obviously roots will burrow and your roof will no longer be waterproof.) 6. Finally sedum modules with Leca (expanded clay balls) infill. “I know from my sedum roof at home that the sedum will eventually migrate and colonise the Leca. The carpet, sedum and Leca all make for good insulation. There is also 150 mm insulation batting in between the roof joists. The building is both warm and cool when you need it to be. Result!” The pitch of the roof People sometimes get this wrong, because unlike tiles or other roof systems, living roofs don’t want too much pitch. If the roof’s too steep you’ve got erosion issues; if it’s too flat you’ve got a swimming pool. About 5 - 10 degrees is optimum (that’s 1:12 or 2:12 max). What about the edging? This is the trickiest part of the living roof, if you ask me. Cath’s living roof is edged with steel garden edging. The EPDM is sandwiched between two layers of edging so that excess water drips off the lower edge. She plans to build planters with water-loving plants at the drip edge to take advantage of the run-off. This is definitely a super model for a living roof on an earthbag house in a wet climate, in my opinion. 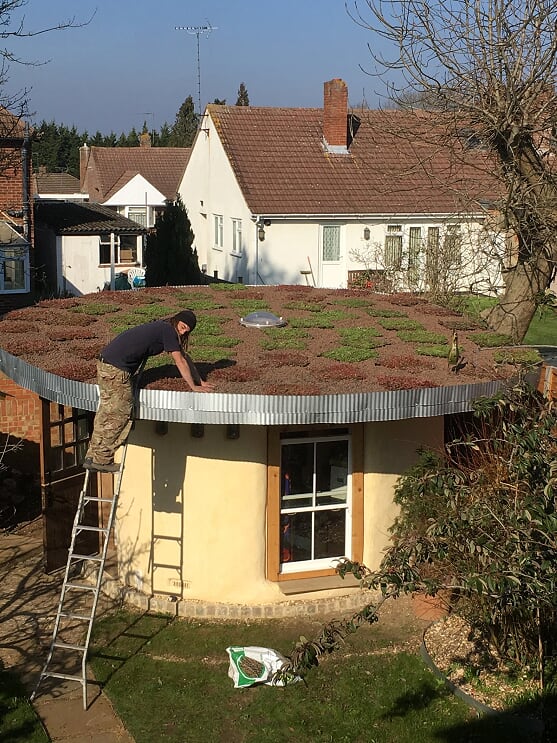 Wingman Del on the roof. What was the most challenging part of the build for Cath? “The doubt,” she replies. “The ‘do I know what I’m doing?’ The physical demands; earth is heavy. The protracted time period. Costs spiralling. The ups and downs of life.” Mud Hut Today Cath built this house for her artist sister, in fact. “She’s a compulsive maker and needed space.” And what a beautiful place for a creative to work within! It’s the ultimate she-shack.  The interior, all ready for a creative spirit. Cath’s Resources: Cath has kindly shared the resources she used to build Mud Hut.
On the subject of Owen Geiger I’ll also pay tribute, because he patiently answered my questions too, and whenever I’m feeling a little frustrated by my inbox, I always remember his generous example.  Magic on the inside. Do you enjoy The Mud Home?
If you find these articles inspiring or useful please consider joining us on Patreon. Your support pays for the running of this website, my virtual help, and my sustenance. A big thank you to all The Mud Sustainers, and everyone chipping in and keeping these posts and articles coming. It was an amazing mud adventure. Kim Siu’s gorgeous hobbit house in Moray is now finished, and it's a showcase of natural building. It ticks every box: a straw bale house with rubble trench foundations, living roof, earthen plaster, wattle and daub/cordwood interior, and a stunning earthen floor. Not only that, but it was built to code. In the UK. Yup, you read that correctly. It’s 100% legit. Building permits In. The. Bag. 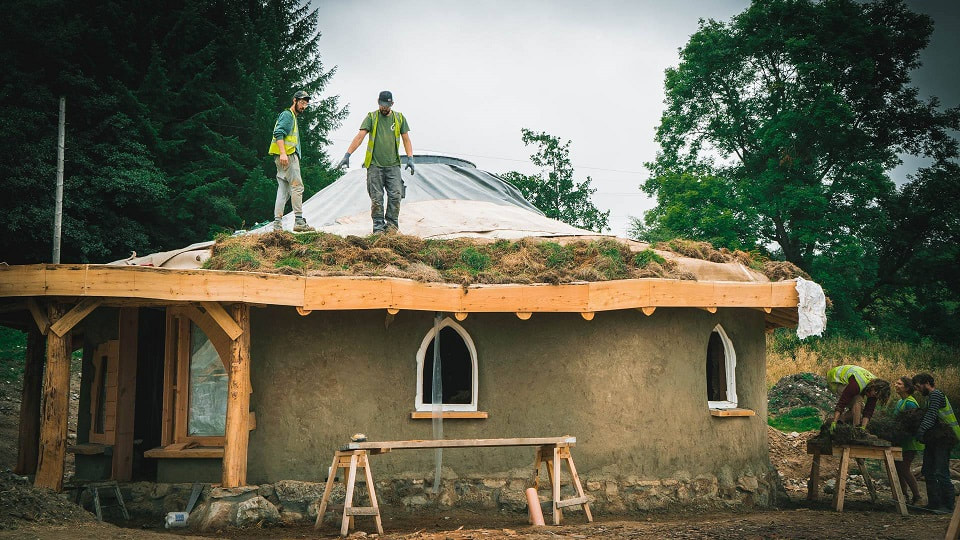 But let’s not lie. Clawing your way over those bureaucratic hurdles is anything but a picnic. “I’m not building again,” says a somewhat frazzled Kim this end of the build. “I don’t think my frayed nerves could take it. Two builds is quite enough. I’ll stick to buildings that don’t need permissions such as gazebos or chicken sheds!” Many thanks to Kim Siu of Get Rugged and the Hobbit Hideaway for sharing with me this honest, warts-and-all story of a phenomenal build. 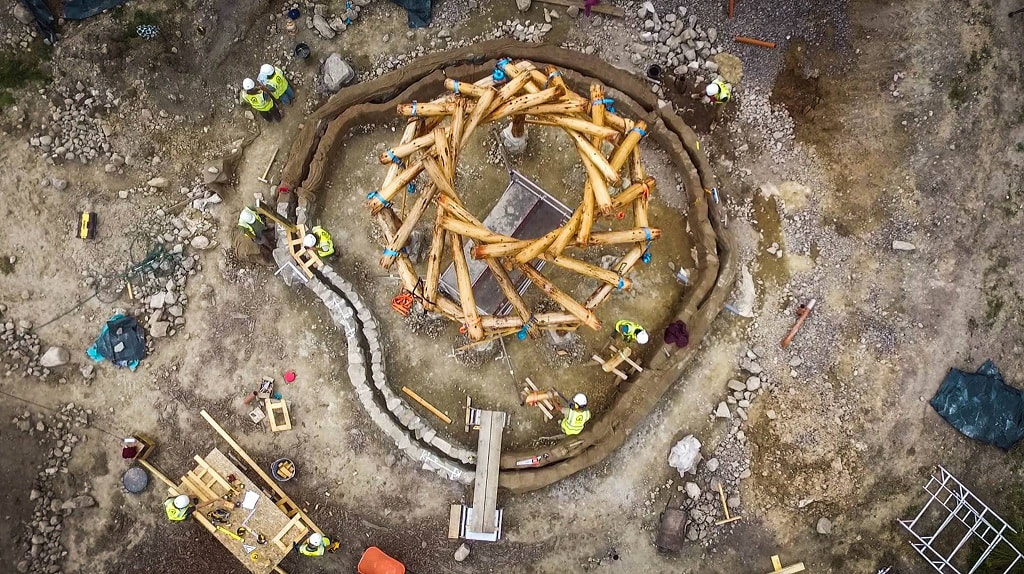 The Foundations There really is no better foundation for a natural build than the rubble trench. Tried and true, it beats concrete hands down in terms of cost and drainage. You can read exactly how to build one here, but basically it’s a trench, in this case lined with geotextile membrane, and filled with stones and rubble. That’s it. 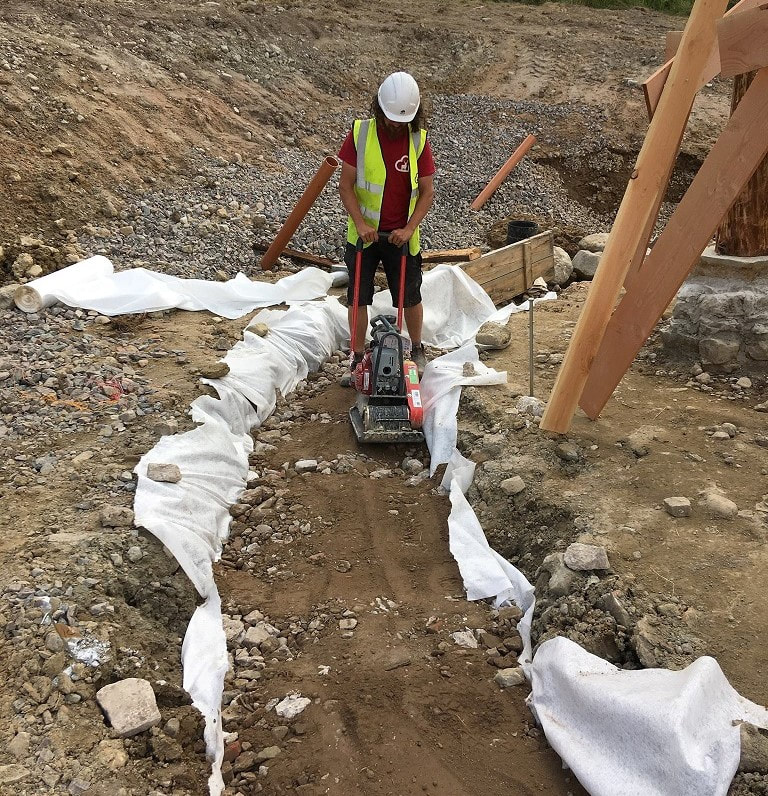 Jeffery the Natural Builder (@Hartwyn) tamping down the rubble in the trench. As with most straw bale structures, you throw up the post and beam structure first. That includes the roof. The straw bales are basically the infill for the walls. The advantage of constructing your roof first is that you have this wonderful sheltered area to store materials, use as a shelter, and work within. 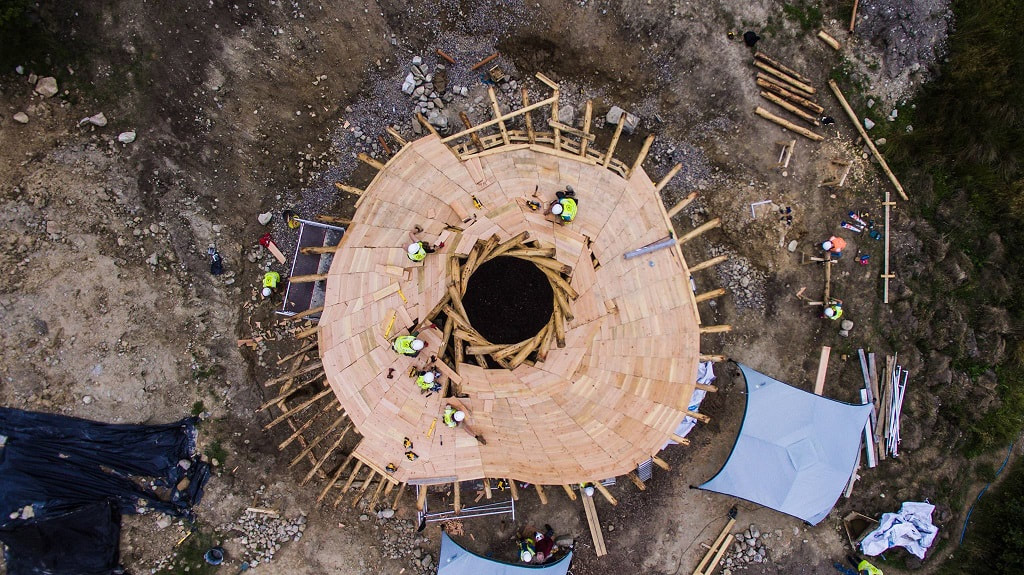 Roof going on. The permits I asked Kim how she went about obtaining those elusive building permits. This isn’t her first house and we documented the UK permit process in detail in a post on Kim’s other larger straw bale house. “Getting planning permission and the building warrant followed exactly the same procedures as our other house,” explains Kim. “It was far easier this time though, as we had an architect that not only knew his stuff, but knew how to communicate with officialdom. Sam at Rocket Architects restored my faith in architects! He got us through all the permissions gracefully, without too much stress.” 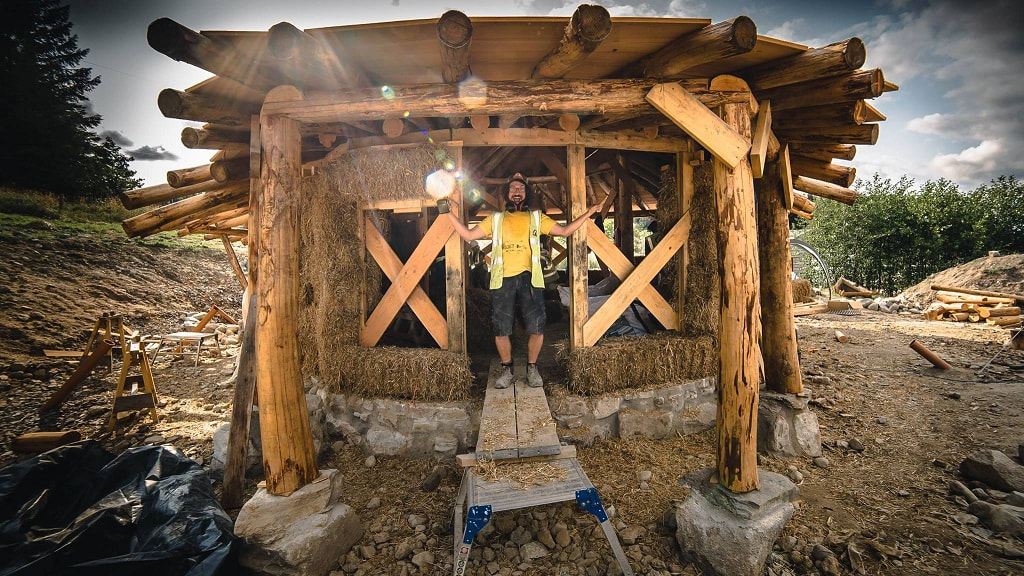 The Building Team Kim employed an alternative building firm in the UK called Hartwyn to build this gorgeous house. Yes, you don’t have to do it yourself, and there are some definite advantages for getting a professional in. “Hartwyn commission Rocket Architects as part of their package. That’s one of the reasons that we chose them for our project, because we knew we needed to jump through many, many hoops. Especially as this build was a hardcore eco-house,” says Kim. “Hartwyn were the natural builders and educators. Another reason why we chose them was because they would recruit and teach students as part of the build. This was such a great fit for my vision of the build and how it could be beneficial to others.” Yes, it was a wonderful concept. I followed the process online and found it heart-warming to see the next generation of builders being trained in another, more sustainable construction methodology. You can see plenty of photos of the students at work with Hartwyn on the Get Rugged Facebook page. It all looked great fun. Where did Kim find out about Hartwyn? “Ah from Talking Natural Homes,” she says. When talking to Jeffrey (the Natural Builder) it was very obvious that our values were aligned and it was a no-brainer to choose Hartwyn.” 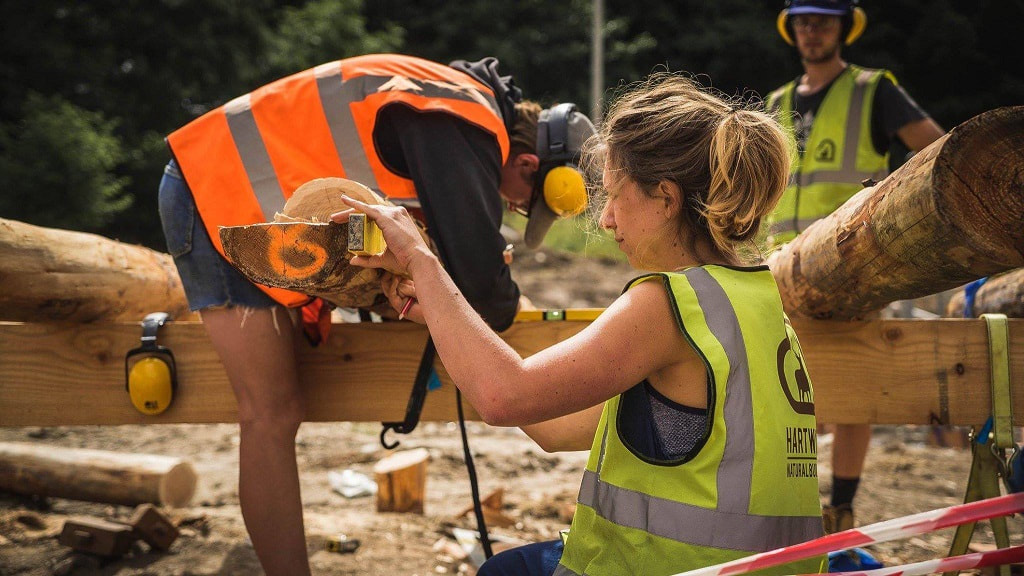 Students learning the art and science of natural building with Hartwyn. The Toughest Part of the Build During the building of the main structure, things move along at a nice clip. Motivation is high, and something is blooming out of nothing. That’s the easier part, in my opinion. I think the toughest section of any project is the finishing. Everyone is tired. Money is running out. And plastering and detailing are trickier and more time-consuming than you think. Kim, it seems, would agree. “I think the final stages where the most difficult as they sapped me of all energy. There was just so much detailing left to finish. We had several months left of sanding, sealing, scraping, painting, fixing and finishing to get it ready and this seemed to take forever. I was under so much pressure at the time as my mother was dying, and we had got into huge debt with the build and needed to get it rented out and bringing in money as soon as possible.” 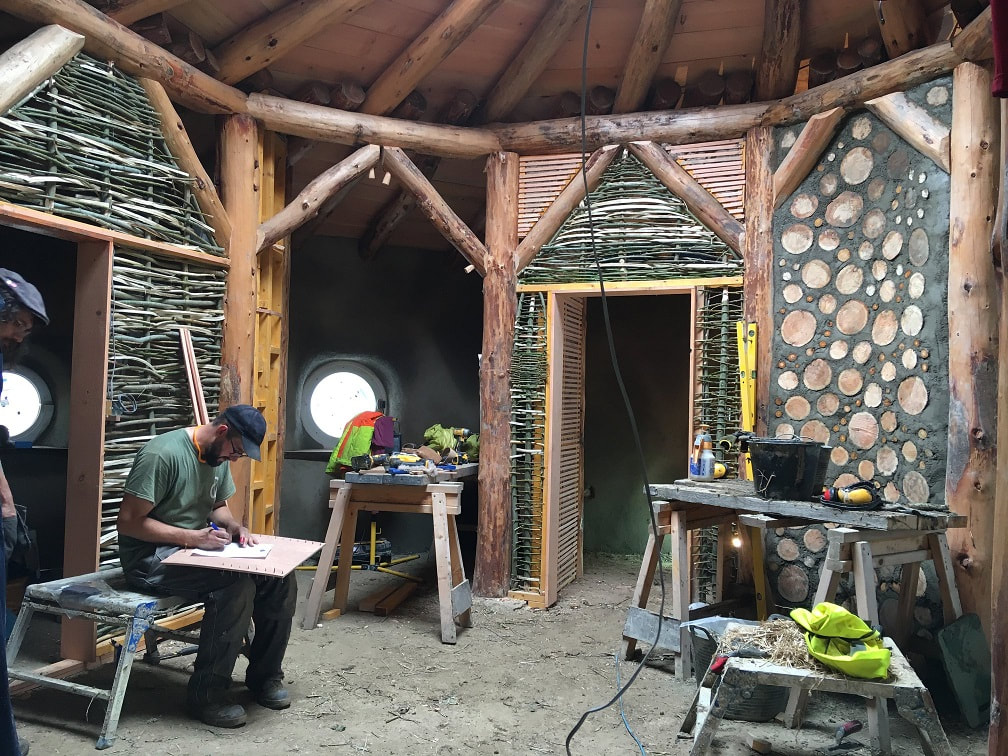 Finishing always takes time. What would Kim do differently next time? This is where Kim said there wouldn’t be a next time. :)) “It’s the financial pressures and permissions that took the most out of me. I’m still knackered. Who knows though, a few years down the line and I may well be looking at an earthbag structure. I think if I did build again, it would be with earth and stone...” He he he, watch this space. :) 5 great lessons to take away from this:
The Hobbit Hideaway now Kim’s hobbit house is now the most beautiful little bed and breakfast cottage where it gives people the chance to taste what life is really like inside a bonafide natural home. Guests continually come away shiny-eyed and rejuvenated. If you’d like to know more about it, or book a stay, look here. https://www.facebook.com/hobbithideaway/ Photos by Dewi Roberts 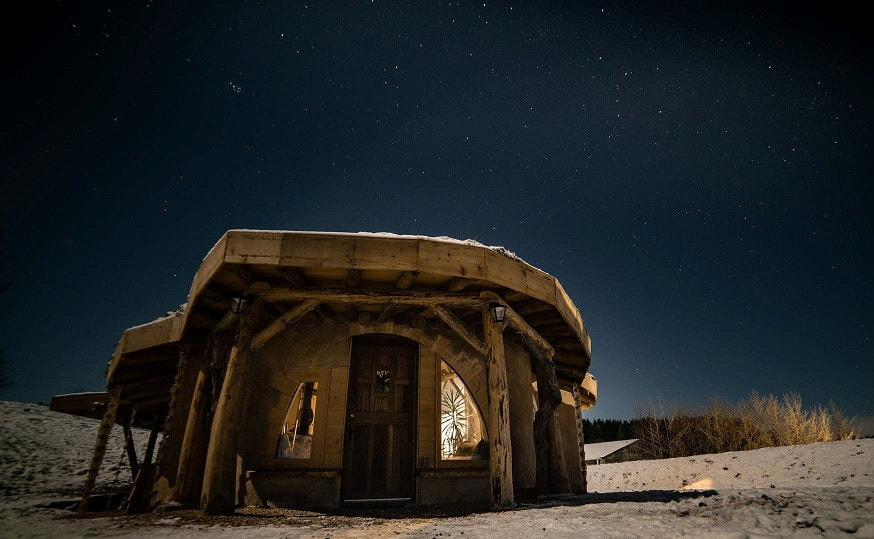 The Hobbit Hideaway at night. Are you building or planning to build? If this is you, consider joining The Mud Home Facebook Group. It will no doubt save you a bunch of money, as many have already commented. You also have the chance to connect with some amazing natural builders and off-gridders. The numbers for that group will be limited to 100 so that I can give the proper attention to each project. Do you enjoy The Mud Home?
If you find these articles inspiring or useful please consider joining us on Patreon. Your support pays for the running of this website, my virtual help, and my sustenance. A big thank you to all The Mud Sustainers, and everyone chipping in and keeping these posts and articles coming. Hold on to your seats. I’m about to blow your mind. I’ve just witnessed the most stunning clay plaster I’ve ever seen. It’s on an earthbag house too, which I can tell you is one of the trickier substrates to achieve a decent finish on. The masterpiece in question is courtesy of the wonderful Geeli Mitti community in northern India. Geeli Mitti was founded by Shagun Singh, who is pretty much as incredible as her houses. What she has created up there near Delhi is nothing short of a dream. 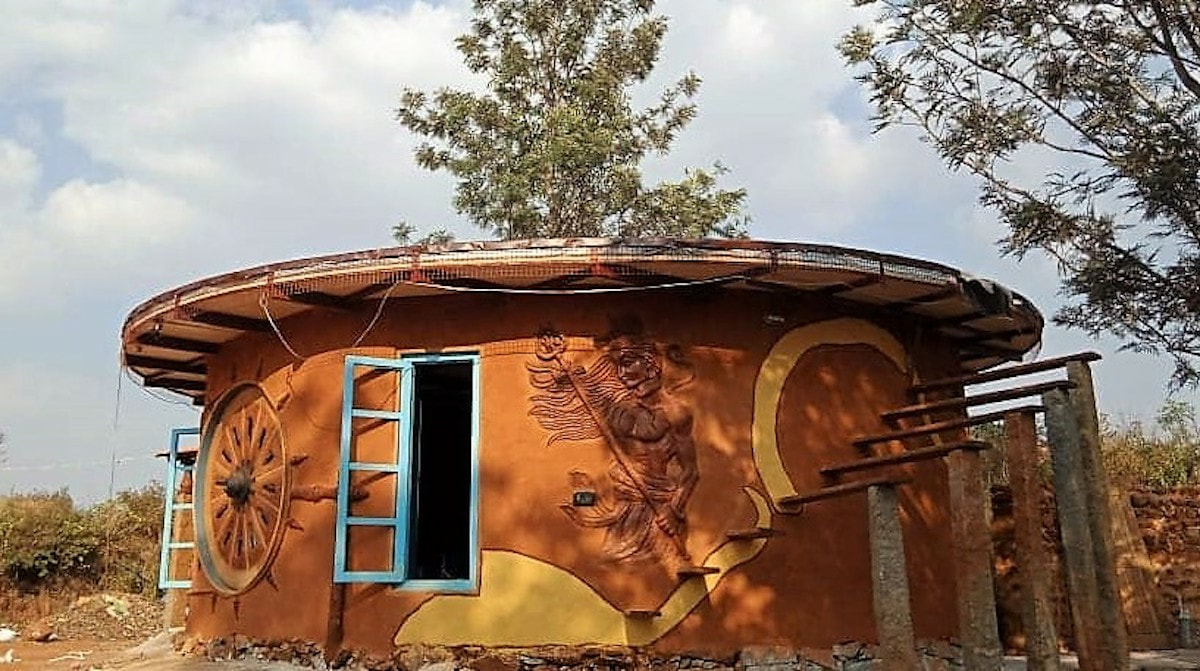 Geeli Mitti’s incredible earthbag golghar. This earthbag house is the latest in a number of revolutionary architectural projects at Geeli Mitti. Shagun and friends love experimenting with different kinds of natural building, and have perfected clay plasters to such an extent, I’d rate it as some of the best out there. And that’s no exaggeration. I’m a bit lucky because Shagun is a member of our private Facebook group, so I was able to get some details on how these colours and finishes were achieved. It’s all surprisingly simple. 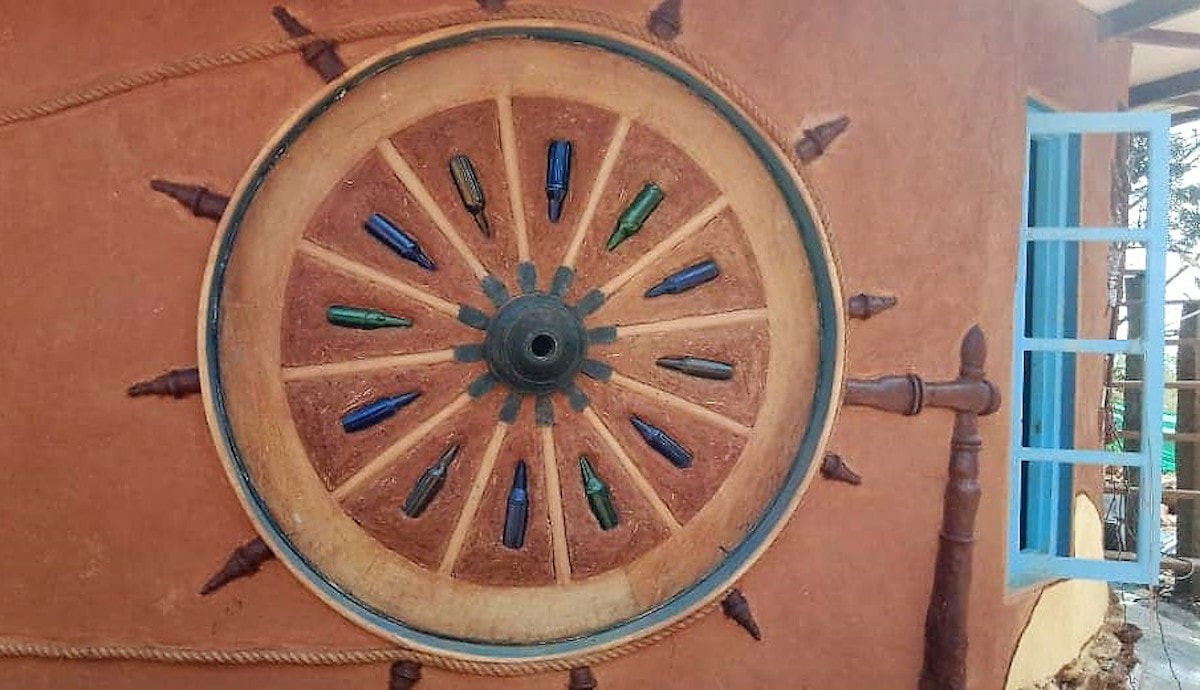 An original way to use bottles in a mud building. How did they create this finish? I originally assumed this was a clay paint finish, but I was wrong. “No paint used,” explained Shagun. “It's the finish plaster coat itself on the exterior. We used red clay soil dug out from a nearby land, and similarly some whitish-yellowish soil that had been dug out, then added some yellow oxide minerals to it to achieve the colour.” Yes, amazingly and wonderfully, this beautiful result wasn’t achieved by importing a bunch of materials, but by searching out and using clays in and around the structure itself. This is so often possible. Unless you’re at the beach, it’s highly likely you have many different types of clay in your neighbourhood, and it’s worth hunting for them because you don’t need huge amounts for a finishing layer of plaster.  Super paint work on the inside. “On the inside, we lime washed the walls with the yellow oxide added to lime,” says Shagun. 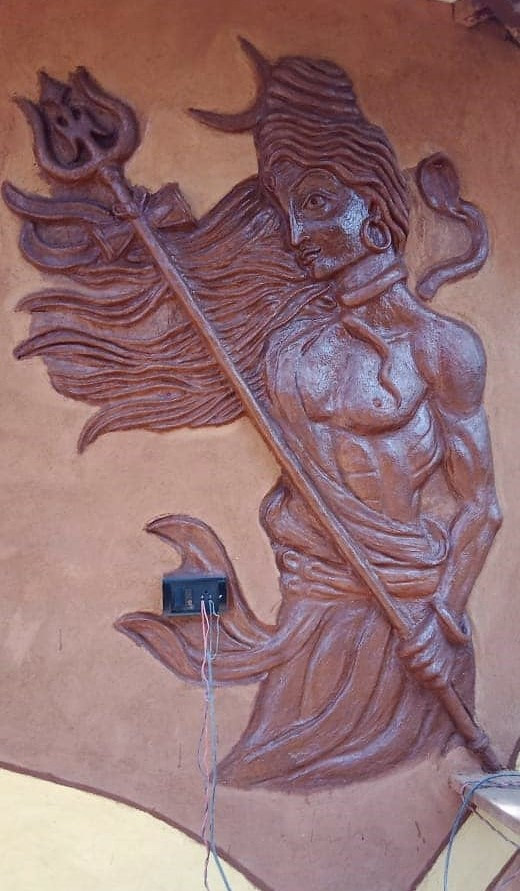 Taking clay sculptures to a cosmic level. But what about this truly eye-opening Shiva sculpture? How was that finish achieved? It's actually a clay, sand, dung mixture sculpted into shape. Then, once the sculpture was completely dry, it was sanded smooth with sandpaper. After that it was coated in linseed oil for sheen, hardness and weather protection. Nice huh? 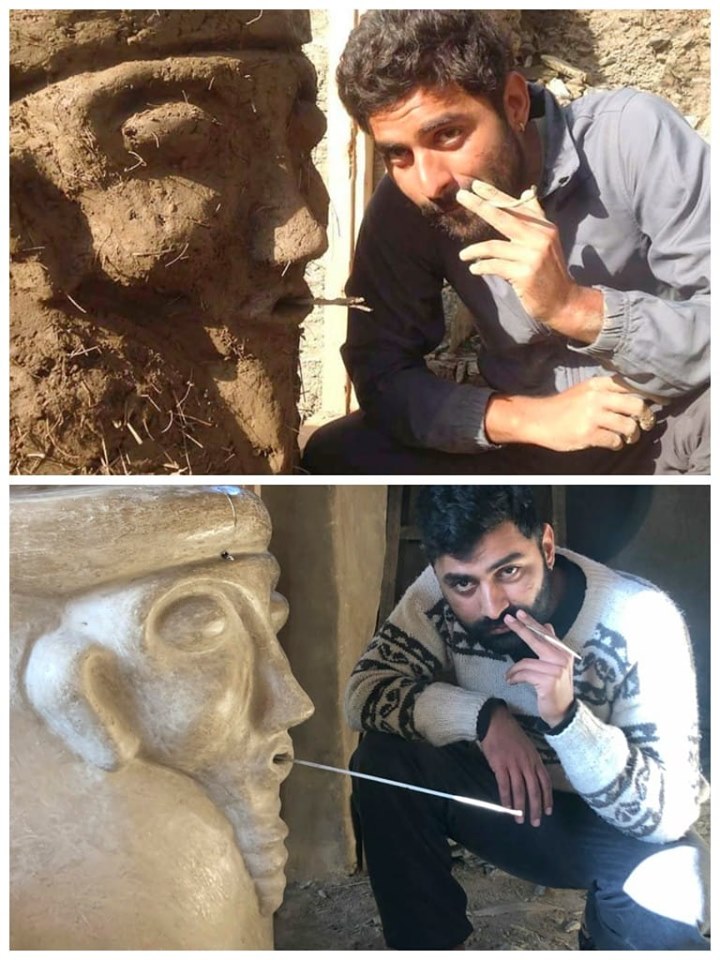 How did they achieve this milky finish? This guy is a real masterpiece. I wondered how Shagun and friends achieved the milky finish. “This finish plaster was a mix of our site soil which is 60% sand, some clay to balance it, cow dung and very little lime. The lime to rest ratio would be 1:6 and then once the plaster was still slightly moist, not completely dry, I burnished with crystals using small circular motions. So lots of elbow grease needed,” says Shagun. As you see, the mixture itself is incredibly simple. It kind of proves why I’m skeptical about adding a million things to your earth plaster. The application technique, along with perseverance and effort, is at least half of the story. 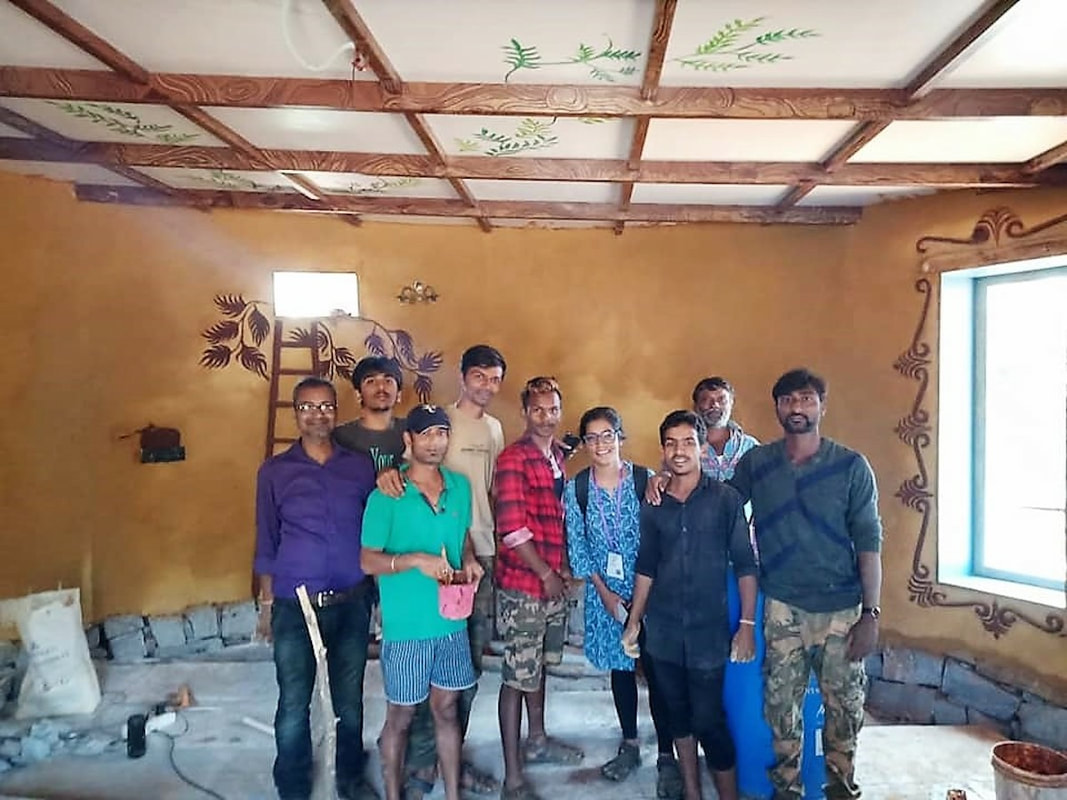 Some of the Geeli Mitti team and volunteers. Ganesh is in the red checked shirt:) Over the course of time, some of the Geeli Mitti team have become real pros. "I'd love to mention the name of one of my oldest team members, Ganesh," says Shagun. "He has worked with me throughout on all the plasters and finishes showcased in the article, and has become quite the plaster wizard now!" If you think Geeli Mitti is content to rest on its laurels here, you’d be wrong. They’ve already got another ground-breaking project organised for the end of May. What’s next? A bamboo geodesic dome! So if you’re in northern India and want to experience the Geeli Mitti natural building phenomenon, I’d sign up for that course quick. More about Geeli Mitti You can find out more about Geeli Mitti from their Facebook page or their website: http://geelimitti.in/ Do check out “The Team” page on Geeli Mitti. I love that the animals are placed at the top of the team, and the cooks are second. Sounds exactly right:) 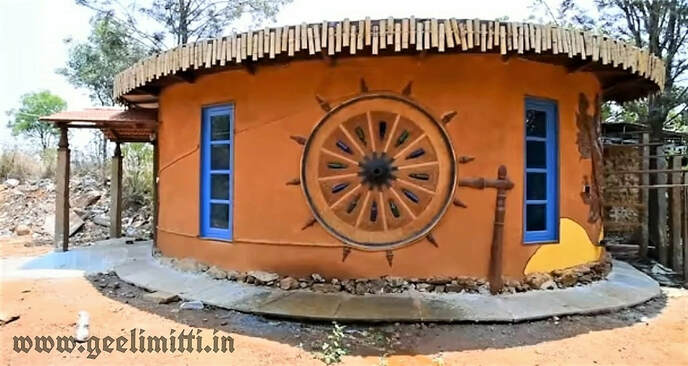 Are you building or planning to build? If this is you, consider joining The Mud Home Facebook Group. It will no doubt save you a bunch of money, as many have already commented. You also have the chance to connect with some amazing natural builders and off-gridders. The numbers for that group will be limited to 100 so that I can give the proper attention to each project. Do you enjoy The Mud Home?
If you find these articles inspiring or useful please consider joining us on Patreon. Your support pays for the running of this website, my virtual help, and my sustenance. A big thank you to all The Mud Sustainers, and everyone chipping in and keeping these posts and articles coming. Arches are a lot like Amal Clooney: Smart, well-put together, and began life in the Levant. Some of the first arches (as far as we know) were constructed around 2000 BC in Mesopotamia, and as anyone who has wandered round an old Roman ruin will tell you, an arched doorway is often the only thing remaining after an earthquake. Arches work because any external pressure pushing inwards or downwards on the arch stones only serves to compress them tighter. But...before you leap up in arch-building excitement, there are a couple of points to etch onto your brain. Before starting an earthbag arch remember... 1. Earthbag arch wedges need to be a bit wedge shaped, and must be jammed in tightly, otherwise the arch principle doesn’t work. 2. As the forces of the arch push down to the ground, the arch will push outward at the base. So, you need some decent ‘abutment’ (aka a good fat earthbag wall on either side of the arch to stop it pushing outwards). 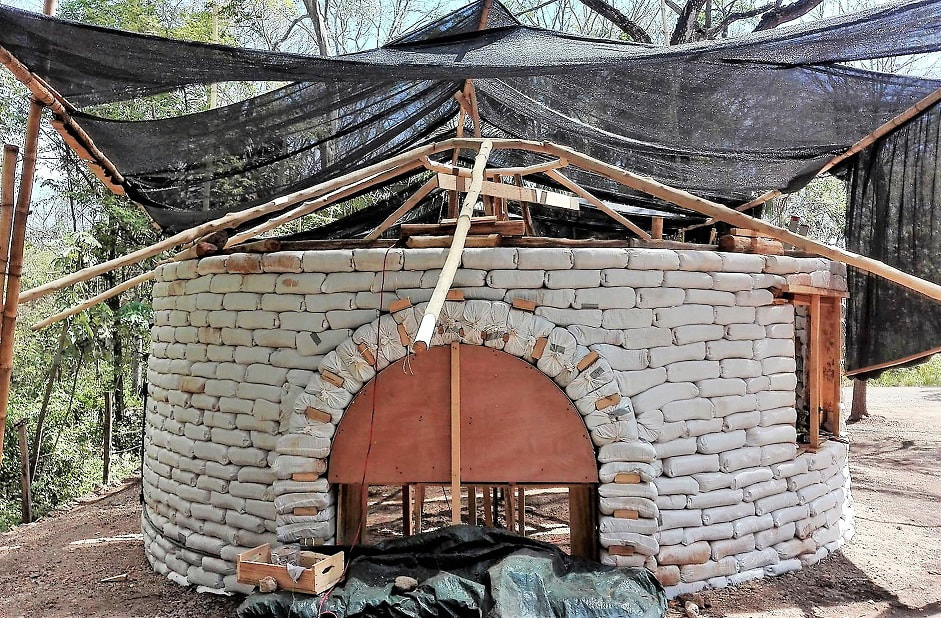 Beautiful earthbag arch created by Murat Dirlik, Sam Creveling and Leora Light in Costa Rica. Here’s how to make an earthbag arch, step by step 1. You need a mould or strong arch frame to lay your bags around. In our small arch, we were incorporating part of an organic tree trunk, so the arch wasn’t perfectly round. On a small arch this won’t matter, but a larger one needs more precision. 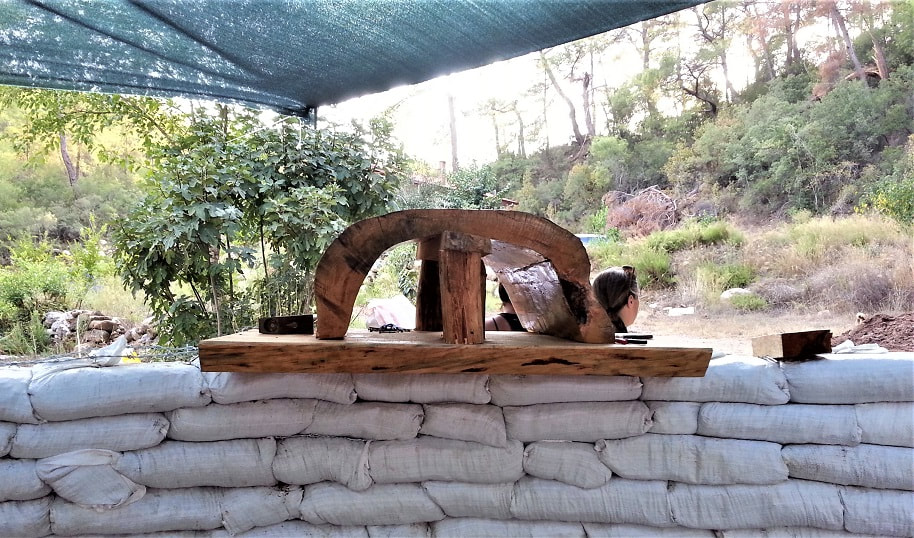 This was our arch mould, but a larger arch needs a tidier semi-circle. 2. Attach a piece of string in the centre of the bottom of the arch. You use this to check the angle of your arch wedges. 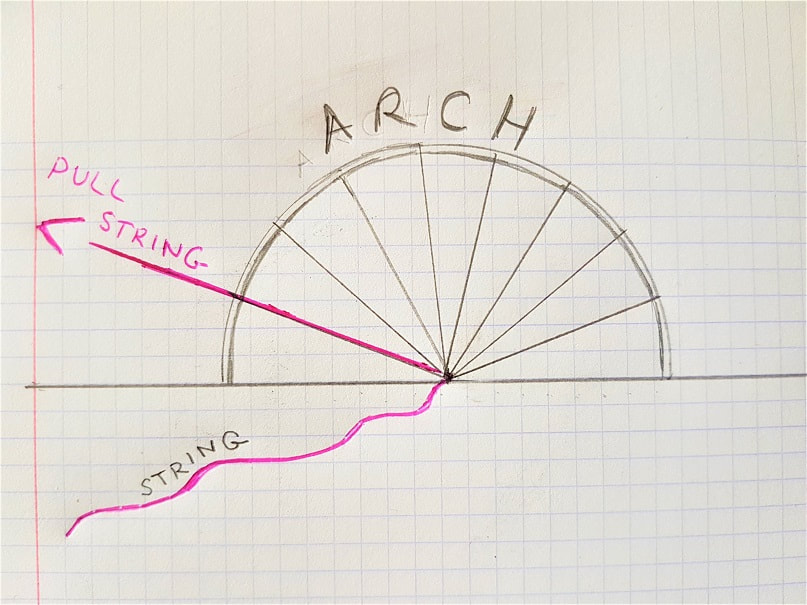 3. Make a wedge mould for your earthbag 'slices'. Stick your empty earthbag in the mould, fill it with clayey dirt, and tamp it firm until you have an earthbag the shape of a slice of brie. 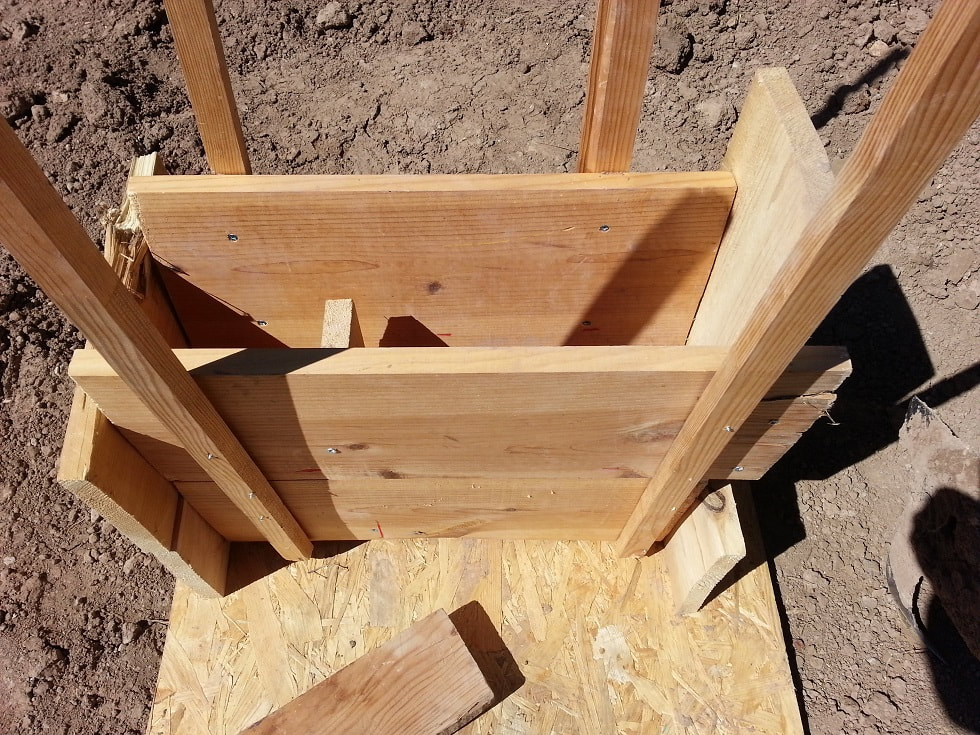 Wedge mould to create brie-shaped earthbags. 4. Arrange your bag wedges around the arch. Use the string to check they're lined up correctly. Remember, if your bags are not wedge-shaped but straight-edged, they’re not going to compress together. As you lay the bags, weave the barbed wire in and out of the wedges (see top photo). Make sure the wedges are tightly jammed together. 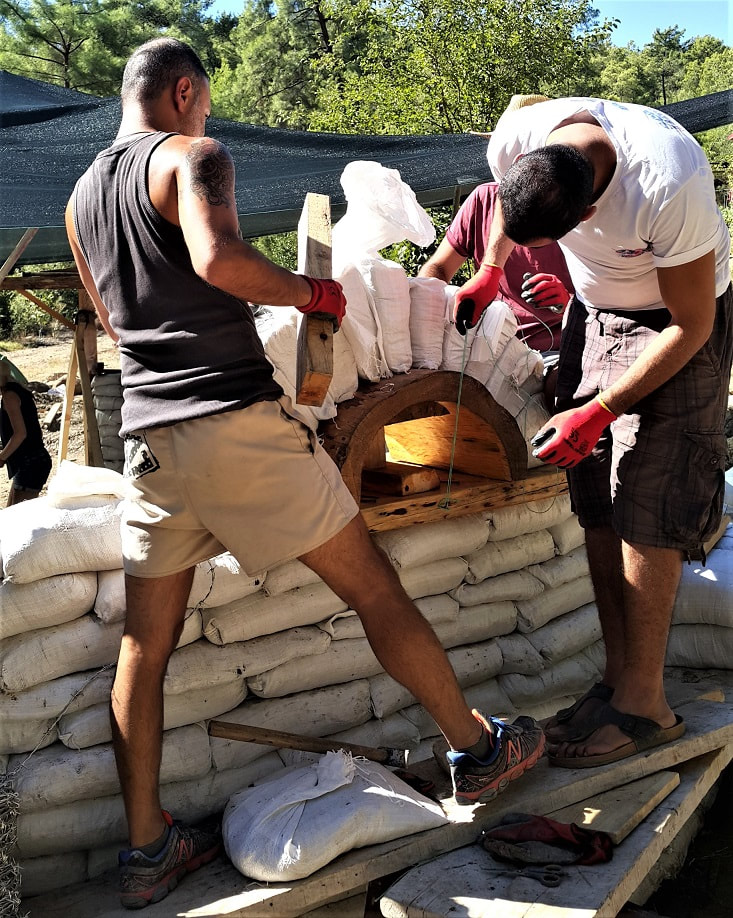 Kemal using the string to check the angle of the wedges. 5. Once all the earthbag wedge pieces have been jammed in, time to drop the keystone in the middle. It may end up being more of a squeeze and shove than a drop, but as long as you've jammed the keystone piece in nice and tight, it will hold. 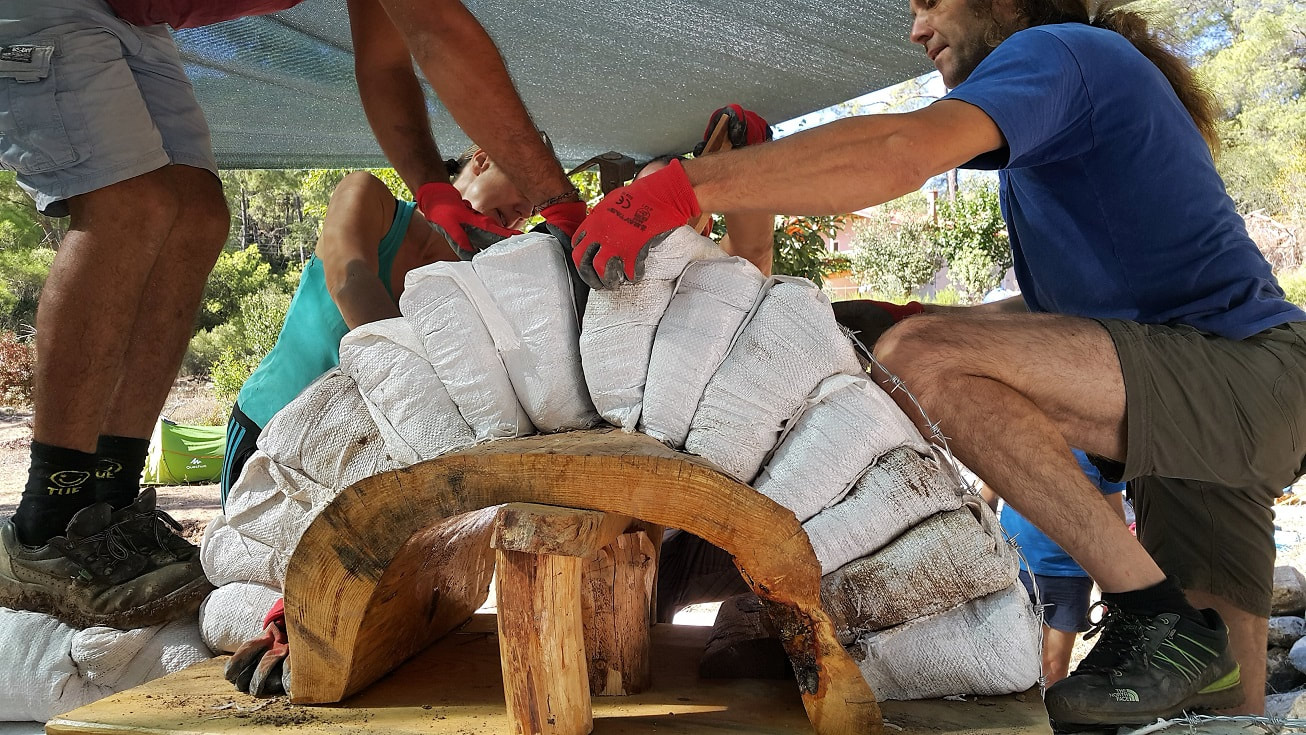 Keystone going in. 6. Run a course or two of barbed wire over the top of the arch, and lay another layer of flat bags over the top of the arch to lock it all in. 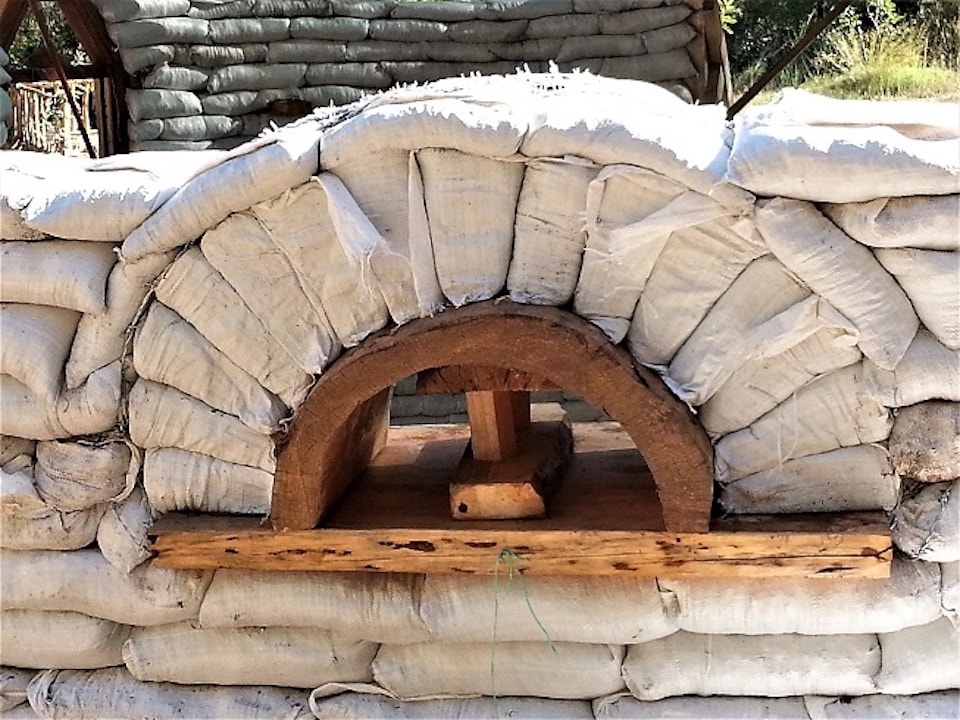 You need a layer of bags over the top to lock it all in. Extra note from the Costa Rican Earthbag Team Our Costa Rican team in The Mud Home FB group made the wide and beautiful earthbag arch in the top photo. Because of the span, I asked Murat if their arch technique had differed from mine in any way. “At the core, our method was the same, but we interwound/integrated a lot more barbed wire and aimed for super symmetry just because of structural demands,” Murat said. He also drove in a bunch of rebar just to make sure the whole thing was pinned together invincibly. 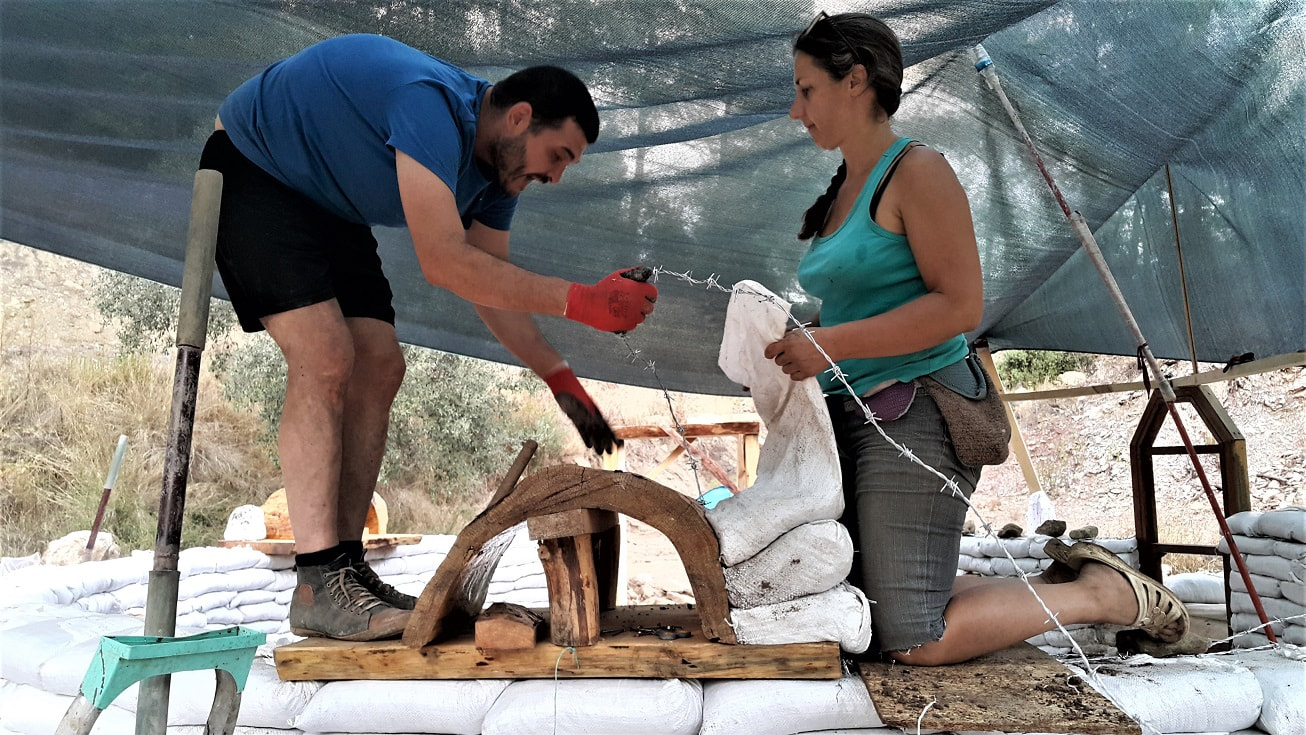 Weaving the barbed wire in and out of the bags. Are you building or planning to build?
If this is you, consider joining The Mud Home Facebook Group. It will no doubt save you a bunch of money, as many have already commented. You also have the chance to connect with some amazing natural builders and off-gridders. The numbers for that group will be limited to 100 so that I can give the proper attention to each project. Do you enjoy The Mud Home? If you find these articles inspiring or useful please consider joining us on Patreon. Your support pays for the running of this website, my virtual help, and my sustenance. A big thank you to all The Mud Sustainers, and everyone chipping in and keeping these posts and articles coming. It’s been natural floor month in the Mud Home Facebook Group, with a number of members attacking their substrates and creating natural beauty by the spade-load. As luck would have it, all of them have chosen different flooring methods, which not only gives me fodder for a great post, but is filling my noodle with ideas. Because it’s just about floor time for my little stone cabanas in Spain. So which one of these five will I choose? 1. Earthen floor 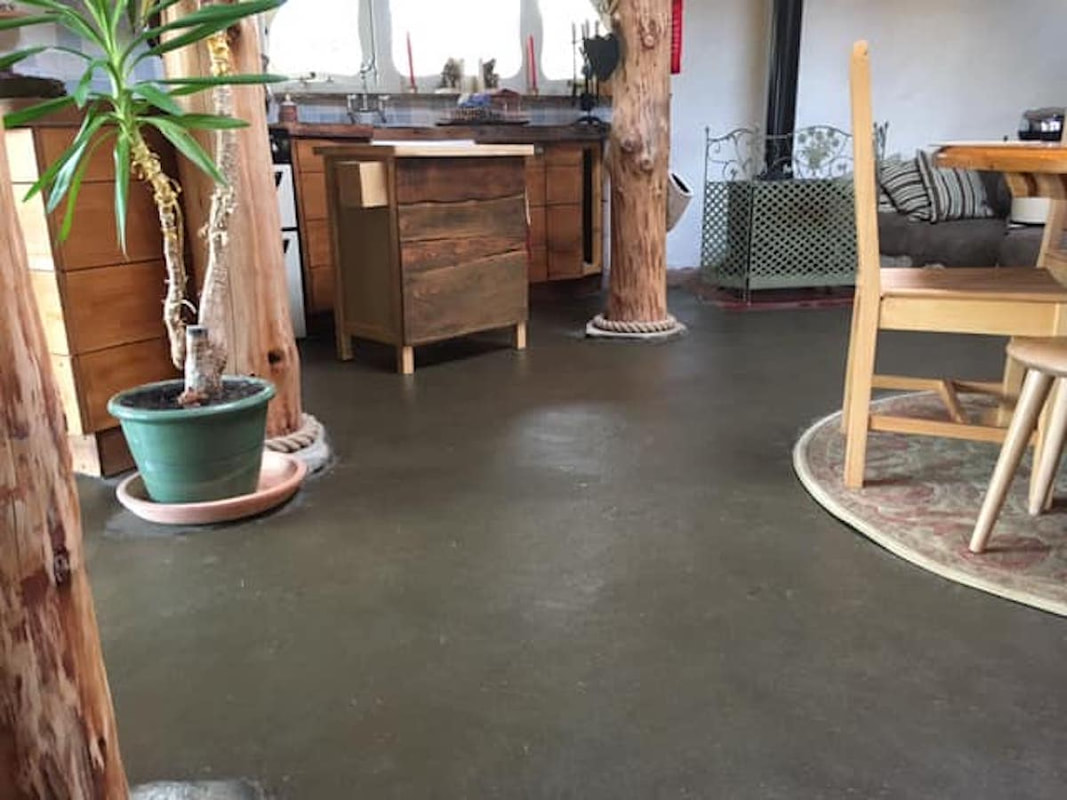 Kim Siu’s hobbit house in Moray, built by Hartwyn Natural Building Here’s a floor to salivate over if ever I saw one. Earthen floors can be absolutely stunning, though they require some know-how. As with most floors, earthen floors are usually laid upon compressed gravel or foam glass beds. Foam glass is popular because it adds insulation too. There is some disagreement as to whether a vapour membrane is necessary to stop moisture wicking up into the floor. If you’re in a dry climate, or with a house that’s high up a slope with plenty of drainage, you may well get away without one, if not probably best to hedge your bets. For the record Kim’s gorgeous floor (shown above) in her hobbit house in Scotland didn’t require one, and it was built to code*. Earthen floors are basically a cob or earth plaster mixture poured, troweled and left to dry. After this they are coated a few times in an oil (most commonly linseed). Kim’s floor above has also been polished with beeswax. You can learn more about how to make them on The Abundant Edge podcast with earthen floor expert Sukita Reay Crimmel. She is the co author of Earthen Floors book, which I can also recommend. Pros: You can create gorgeous looks with an earthen floor. And if insulation is used, they are pretty snug too. Cons: Earthen floors are probably the least hard-wearing of all the natural floor types listed here. If not properly protected, chair legs can gouge holes out. You can feast your eyes on plenty more luscious photos of the Kim Siu's amazing straw bale Hobbit House here: Kim's lovely house was built by Hartwyn Natural Building. 2. Limecrete  Esra adding a limecrete step in The Mud Home For folk needing something more durable, limecrete is used all over the world as a flooring option (much like concrete). When restoring ancient homes in the UK, limecrete floors are pretty much always installed, because they are both breathable and can handle some damp. Again limecrete floors are laid on compressed beds of loose aggregate. For more information on creating your own limecrete look here. Always test on a small area (2 metres squared, for example) before mixing a whole batch, as everyone’s limecrete mixes vary according to the kind of lime used, the climate, and other strange mystical forces that inevitably evade meticulous calculations. This nice post by Richard CL Pillinger shows how to lay a limecrete floor. And here's a video showing how. Which kind of lime should you use for floors? If you’re new to lime you’ll want to check out the Mud Home guide to various lime types. For flooring, many tradespeople prefer NHL type limes because they are more cementitious, and set harder. There are plenty of diehards who use pure lime putty too, though. In some countries like the UK and Australia, ready-made limecrete slabs are also available. Pros: Limecrete breathes. Lime is a natural fungicide and insecticide too, so it’s great for wet climates. Cons: Lime is trickier to work with than stones, bricks or wood. You need to get your mixture right, and allow it to cure slowly but thoroughly. Don't forget lime is caustic. Read the Mud Home guide to using lime safely here. 3. Simple gravel bed with stones/bricks 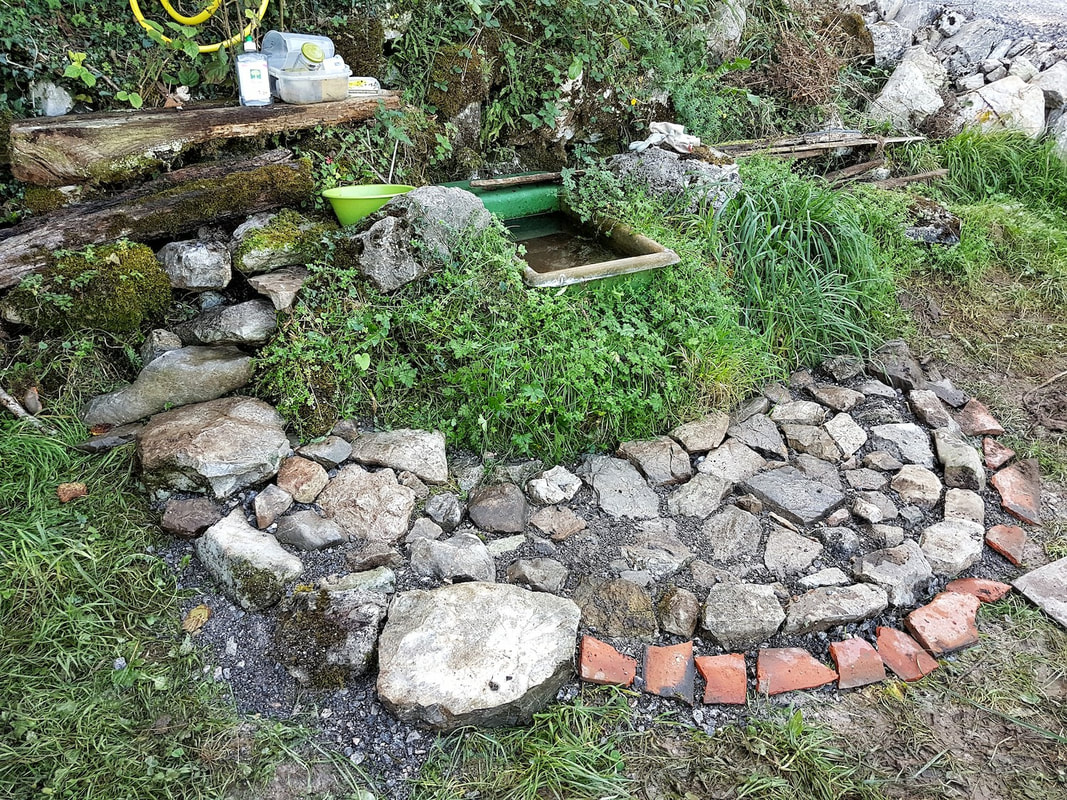 My first attempt around the water trough. I’m becoming a bit of a fan of this method. For outside spaces it’s a no-brainer. So easy. So low-impact. And you can create some very aesthetic results with gravel and slabs too. All you have to do is throw down a bed of gravel or sand (hard core really creates a strong base), and then inlay bricks or slabs or stones into the gravel bed. Once you’ve achieved the pattern you love, fill in the gaps around the stones by throwing more gravel or sand over the top and brushing it into the gaps. This stops your bricks/stones from shifting around and wobbling. Pros: Much more stable than you’d expect. Superb for drainage as it’s completely unsealed and any water simply seeps away. Easy and cheap to make. Cons: Because it’s not sealed you may find grains of sand working their way out. I’m happy to sweep the floor every now and again, but clean freaks may not be. You’ll probably need to refill the sand in the gaps every year or so. Learn more about laying a brick floor here: http://highstreetmarket.blogspot.com/2012/06/diy-antique-brick-pathway.html For more inspiration look on my Pinterest page: UP THE GARDEN PATH 4. Wood 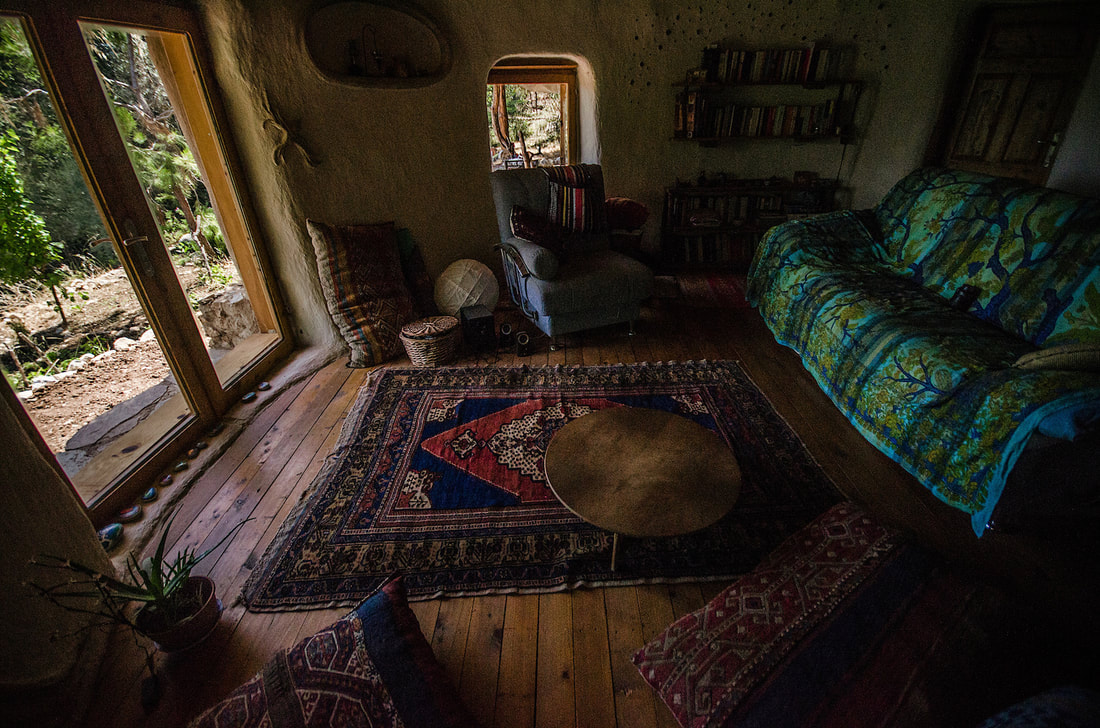 Juniper floor in The Mud Home, Turkey. I love a wooden floor. Always have, always will. They smell and feel so good. No gravel bed needed with a wooden floor. Usually (at ground level) wooden floors are raised slightly off the ground to prevent damp rotting them. They’re actually pretty easy to make, even for newbie builders (I made mine in our roundhouse in Turkey with Celal, and although it wasn’t perfect, I loved it). Pros: Warm on the feet, nice on the eyes, and they smell good too. Wood floors are very hard-wearing, give you a perfectly flat platform, and are relatively easy to make. Cons: Not particularly sustainable in most cases (timber isn’t unless it’s reclaimed). Wood is also notoriously expensive, and will usually result in the greatest outlay in your build. I'll be writing a full post on creating a wooden floor for a round house at a later date, because many folk ask how I did it. 5. Breathable tiles with lime mortar 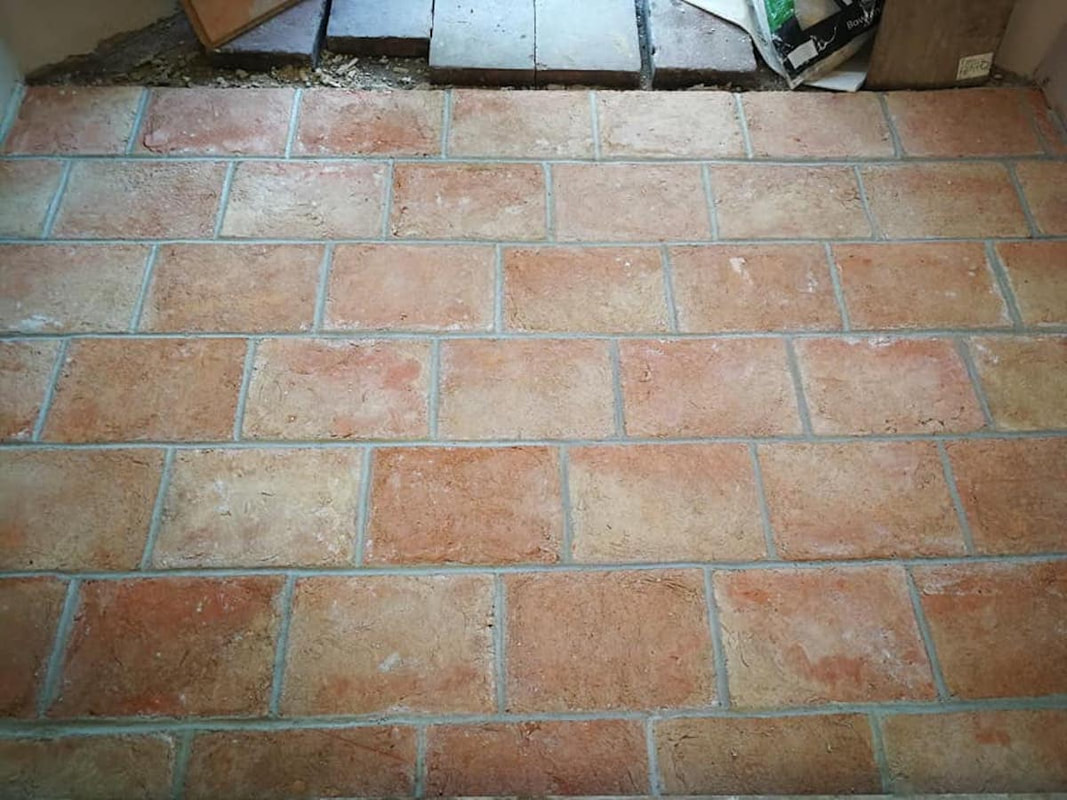 Emma Winfield’s perfect quarry tile floor. Emma Winfield in our FB group created this gorgeous floor using buff-coloured quarry tiles laid into a lime mortar. The result, as you can see, is very professional. Lime mortar is essentially simple to make (usually somewhere in the region of 1 part lime to 3 parts sand) but you need to test you batch well first because everyone's ratios seem to be slightly different. If you want to read more about lime plaster/mortar and crete, read The Mud Home post on it here Pros: Very slick finish and even suitable for mainstream homes (or restoration projects). Cons: You need to get your lime mortar mixture and application method right, otherwise the tiles may not stick. Which Natural Floor Will I Choose?  Which floor for this one then? I love to experiment, and it’s lucky I have three cabanas. Because I shall be using the gravel bed with stone slabs or bricks in one, an earthen floor in another, and probably wood in the big one. But hey, you know me. Time will tell. :)
Do you enjoy The Mud Home? If you find these articles inspiring or useful please consider joining us on Patreon. Your support pays for the running of this website, my virtual help, and my sustenance. A big thank you to all The Mud Sustainers, and everyone chipping in and keeping these posts and articles coming. Far up north, there’s a bard in the woods creating dream worlds for himself out of timber and earthbags. He’s built a cabin, a yurt and a hobbit house in his quest to escape the drudge of the wage economy. Let me introduce the free spirit that is Hugh Morshead.  Hugh begins his first hobbit house. “Ten years ago, I moved into a one-room cabin in the woods. I thought that I would be living a life of voluntary simplicity with one boot in the 19th century and the other in the 21st,” Hugh explained to me. “After my first summer the bank called. The manager met me at the door and asked if she could sit in on the meeting. Across the desk I faced two sets of arched eyebrows. Their concern was my sudden wealth...I paraphrased the money lender in David Copperfield – disposable income equals income minus expenses.” Disposable income equals income minus expenses. Stick that on a billboard, someone! Whenever I read all these ludicrous “How to earn a million bucks” stories, I’m prone to chuckle or sigh depending on my mood. Yeah, earn a million and spend 900,000 in the process, not to mention selling your soul, your health and your peace of mind. Hugh’s philosophy is mine. Reduce your expenses, love the Earth and her creatures, tell stories and create beauty. Now, I’m not going to recount Hugh’s tale, because he’s written that himself and will do a far better job than I. But I’ll whet your appetites with a summary.  Earthbag Walden. Born in Ireland in 1953, and having spent most of his twenties backpacking, I think we can safely say Hugh has always possessed a touch of wanderlust. He emigrated to Canada in 1980 to build equestrian cross-country courses, and for 30 years ran a horse farm with his wife. Then ten years ago they divorced. I always think wherever you are in the world, divorce is poorly treated. There are no proper ceremonies or celebrations, because the staid judgement of society is that a divorce is some kind of failure. I would very much question that idea. Divorces are major successes, they are the victory of the individual soul over the expectations of the herd and the temptations of the comfort zone. They are beginnings, the time to dust off old dreams and live them to the full. Thoreau So, in true Thoreau style, Hugh left his old world and moved into a 150 year old log cabin on a spacious property in the woods in Ontario. “I went on a crazy building spree – sauna, earthbag hobbit house, yurt, greenhouses, gardens, root cellar, sheds, ponds,” he says. Thus began his new life. “I divided the year into three: reading and writing in winter, working and building during the summer and travel by bicycle or on foot in the autumn.” Now if that doesn’t make you consider going it alone, I don’t know what will. :)  Life in the woods. One earthbag house after another Then somewhat later, ‘on a whim’ as he describes it, Hugh built an earthbag house for himself. It cost him just $500 to construct, and was semi-submerged beneath the ground. He lived in it for a year, and described the experience as much of a spiritual journey as a physical one. The thing with mud homes is they are as infectious as smallpox, so naturally earthbag building didn’t end buried in the woods for Hugh. “My neighbour had a similar whim,” he says, “so I built one for her. Then I got a call to go to Australia for a month and build one for indigenous women elders.” I always think building with mud takes you places you never thought you’d go. The dirt opens doors and paves new ways. So off Hugh trotted halfway round the world, from the northern cool of Canada to the Pacific heat of Australia, to build yet another earthbag dwelling for The Sacred Womyn’s Camp near Byron Bay. “It is a collection of tents in the bush...home to Lois Cook, the eldest surviving member of the local aboriginal tribe and designated as Custodian of Country.” That story of Hugh’s experience with the Sacred Womyn’s Camp is a beautiful one that he recounts in his book, which will be available soon.  The yurt roof. Which shelter is best? Having built a variety of sustainable shelters, I asked Hugh which kind of structure he preferred and why. “I believe earthbag building is simply the best form of owner-build home for any environment,” he says. “Yurts are a perfect starter home or guest house, and combined with an earth plaster wall they have great potential – less work, less materials and easily built by one person.” Why do we love earthbag? I’ve often noticed that people are smitten by earthbag. I am too, still. It’s so simple and solid a technique, and so so sustainable, because in the right climate you can actually get away with zero timber. It’s solid, earthquake and hurricane proof, fireproof, bulletproof and soundproof. You can create gorgeous organic shapes with earthbag, too.  Timber frame. Community Spirit As you may have already gleaned, despite his appetite from freedom, Hugh is incredibly socially-minded. He is involved in his community through public speaking, a farmer’s market, and workshops. While the workshops are open to all, the emphasis is to empower women and indigenous people to build their own ultra-low-cost homes. This summer he’s at it again. He will be up to his knees in dirt in a workshop in Canada organized by an indigenous Elder, Becky BigCanoe who lives on Georgia Island on Lake Simcoe in Ontario, Canada. The course will take place on indigenous land and the plan is to build a hobbit house and a yurt over a few weekends in July and August. I’ll be posting details of it in the newsletter when it’s finalised, but heck if I were in Canada, I’d go! Hugh is very helpful and sociable. "I'm always available to answer questions," he says. You can read more about his lifestyle and building projects, or contact him from his blog: http://hughmorshead.blogspot.com/  The yurt frame Do you enjoy The Mud Home?
If you find these articles inspiring or useful please consider joining us on Patreon. Your support pays for the running of this website, my virtual help, and my sustenance. A big thank you to all The Mud Sustainers, and everyone chipping in and keeping these posts and articles coming. |
Many thanks to the Mud Sustainers supporting this site!

Do you find The Mud Home valuable? Please consider supporting the blog on Patreon. For as little as $2 a month (not even a coffee where I'm from), you can join the club.
BENEFITS FOR PATRONS INCLUDE:
Email priority, private Facebook group, review copies of my books, sneak previews of courses and books, Q and As, priority for courses and more. AuthorAtulya K Bingham 
"Beautifully written and inspiring." The Owner Builder Magazine
FREE!
If you want the step by step guide of how I built my house, sign up for the PDF.
WHY NOT? IT'S FREE! Categories
All
All the Mud Home How-to posts have been compiled into a PDF package with 75 articles and over 200 photos. You can still buy it now, and enjoy lifetime access to all the updates.
“Entranced! Be inspired by one who’s lived and breathed dirt.”
Kim Fraser, Get Rugged |
|
|
The Mud Home takes many hours a week to run, and costs a lot to sustain. If you find this site useful or inspiring, please consider supporting it so that it can continue.

Many thanks to all those who've already become Mud Sustainers.
|
 RSS Feed