Want to learn earthen plaster?
|
When you learn how to create gorgeous clay plasters from the earth around you, you begin an amazing journey into natural building.
|
Plus a tea to give any shmuck of a virus a run for its money There is a lot to love about herb gardens. Making one was the first thing I did on my land after connecting the water, because herbs are so flipping easy to grow. Herbs are usually hardier than other vegetables, and far less prone to pest attacks, so you can often just stick the lovelies in and let them go (my kind of gardening). Many herbs are actually pest deterrents. 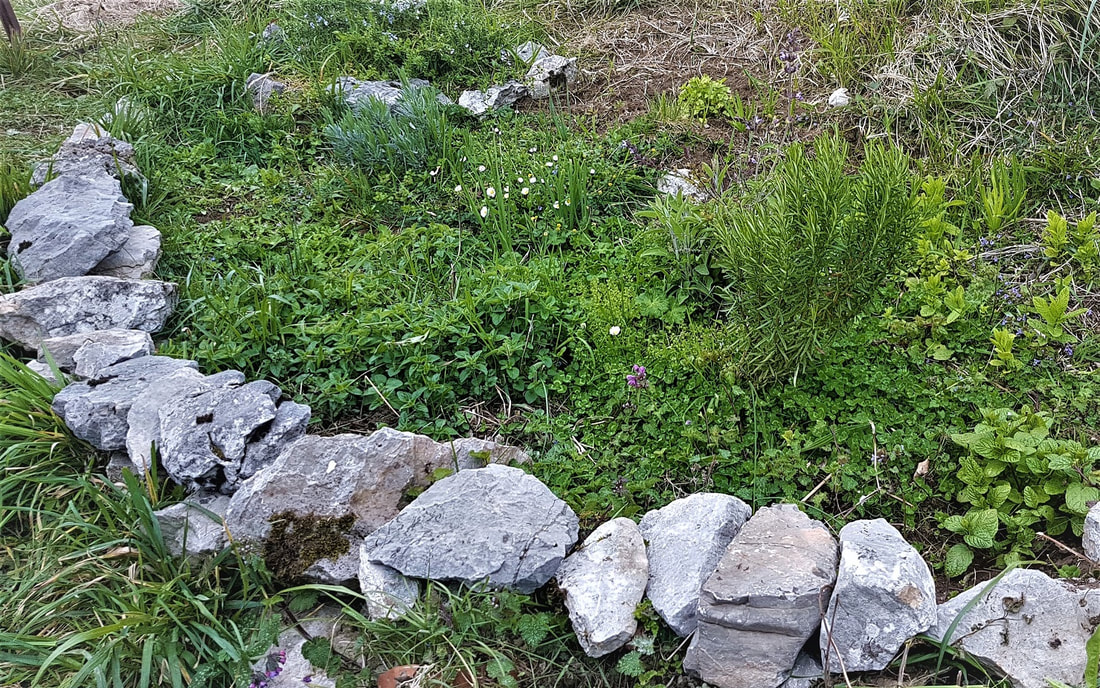 Herbs are delicious of course, but they are also my first (and pretty much only) line of defence against disease. I am allergic to antibiotics, and plenty of other pharmaceuticals. So basically I have to make very sure I don’t end up at the doctor, because if you see a medic’s face when you tell them you have an antibiotic allergy, you soon work out they basically don’t know what to do with you. Now is the time! All in all, if you have even the smallest of spaces, now would be a very good time to make a herb garden. This is especially true in the northern hemisphere, because early spring is exactly the time to get the herbs in. You can either buy them as seedlings (easier) and then plant them in some nice compost-filled soil, or you can buy seeds, and then choose either to grow them in tiny seed trays and replant later, or throw the seeds directly in the ground. Some plants work better one way, others another. Here’s a quick tour of my herb garden, and the herbs in question. Please note: I’m not a doctor, nor have I tested each herb in the lab. In fact I have zero qualifications to tell you about herbs. On the other hand, I have used all the herbs in my garden for almost ten years now, for many of the reasons listed, and find them fabulously effective. They don’t have the horrible side-effects of pharma drugs, nor the outrageous price tag, and leave you fit and healthy and shiny. Obviously I may be a weird mutant, and I make no guarantees for anyone else. 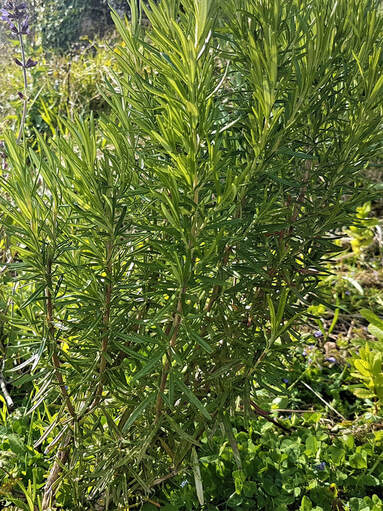 Mediterranean rosemary. 1. Rosemary Heck, if you can’t grow this, you must be in the arctic. Rosemary is one of the hardiest and most prolific herbs. It will grow into a reasonably-sized bush in a couple of years, but will be plenty big enough to harvest in year one. Climate: It can cope with hot/dry (as long as you water) and cool/wet. There are different types though. I have both a Mediterranean rosemary, and another one which is a sprawler that likes colder climates better. 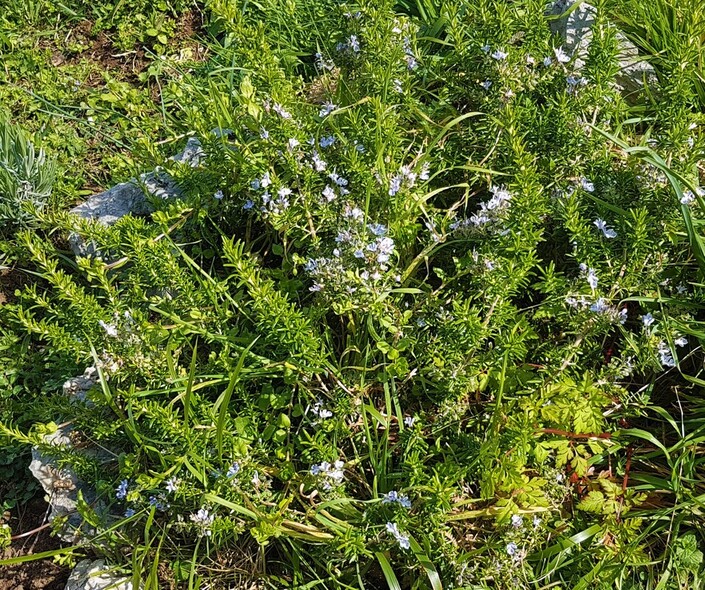 Sprawling rosemary. Medicinal benefits: Rosemary is pretty fab stuff. It’s been around a long time too, at least since 5000 BC. It’s good for memory, and it’s an anti-inflammatory, a pain-reliever, and an immune system booster (I use it for all these, and attest it works for all). It’s also good for circulation, to detoxify the body, and protect to it from bacterial infections. Apparently it also delays ageing and heals skin conditions. I’ve also used it as a conditioner in my hair (just boil it up in water to create a rosemary tea, and throw it on your hair after you wash it. It leaves your hair just luverly and silky:)) Growing: I’ve never grown rosemary from seed. It works better to take cuttings and plant them, or buy a small one in a pot and plant that. It will grow pretty fast and barge anything else out the way, so give it space. 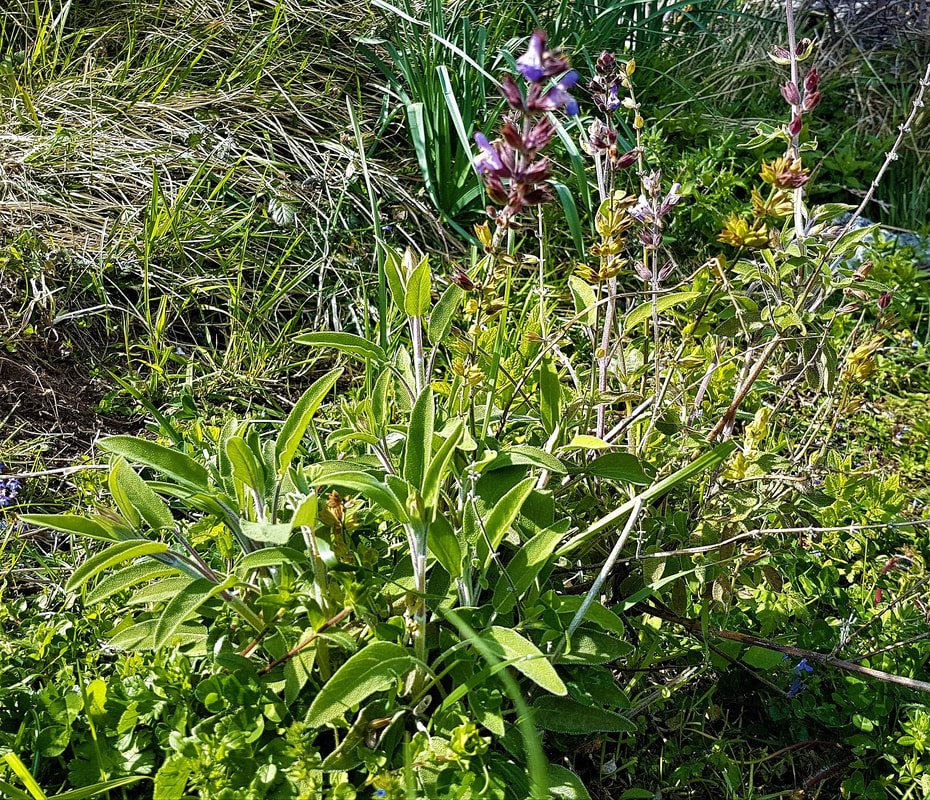 Sage. 2. Sage This is the sister of rosemary, with many of the same benefits. Climate: Usually likes a hot dry climate, but mine is growing very happily up here at 650 metres in the cool/cold and wet. Medicinal Benefits Like rosemary, it’s good for brain function, an anti-inflammatory, and an immune system booster. It also regulates digestion, is good for the skin and hair like rosemary, strengthens the bones, and helps prevent diabetes. In Turkey it is well-known as being a herb for women’s health, and is known worldwide for its balancing effect during the menopause. Growing: Like rosemary, I bought a small potted sage for one euro and stuck it straight in the garden. It’s doing well. Sage is not as prolific as rosemary, but fairly easy to grow as long as it doesn’t get too cold or too dry. 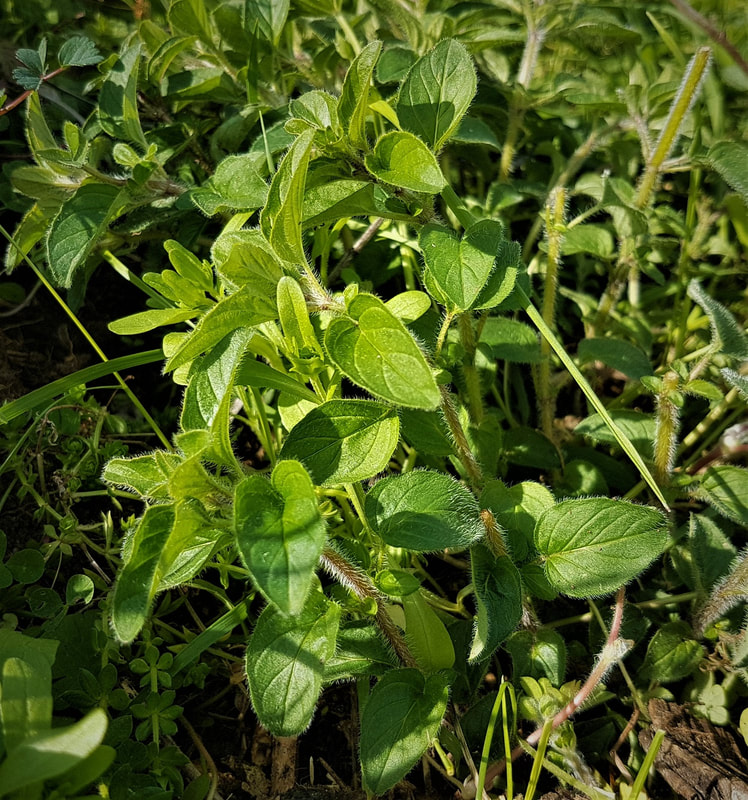 Oregano. 3. Oregano Oregano is the third and final herb in my immune-system-boosting triumvirate of herbal witchcraft, and I love the flavour of it. Climate: There are a bunch of different kinds of oreganos for different climates. I had a smaller-leaved version that grew very easily in hot, dry, southern Turkey. Here in cool, wet northern Spain my oregano is rounder and greener. Medicinal Benefits: It’s an anti-inflammatory, an antioxidant, an antibacterial, and an immune system booster. It also regulates digestion, and is good for the heart. It may help boost energy too. Growing: Oregano is pretty easy to grow from seed. The one in my garden was a pot plant I bought for speed, but I have oregano seeds in my veggie patch too, as they help ward off some pests. As with most of this stuff, plant in late winter/early spring, and it will start pushing up in a month or two. It dies back in winter. If you want it to grow more, cut it right back in autumn, and it will simply burst back in spring. It really benefits from a good prune. 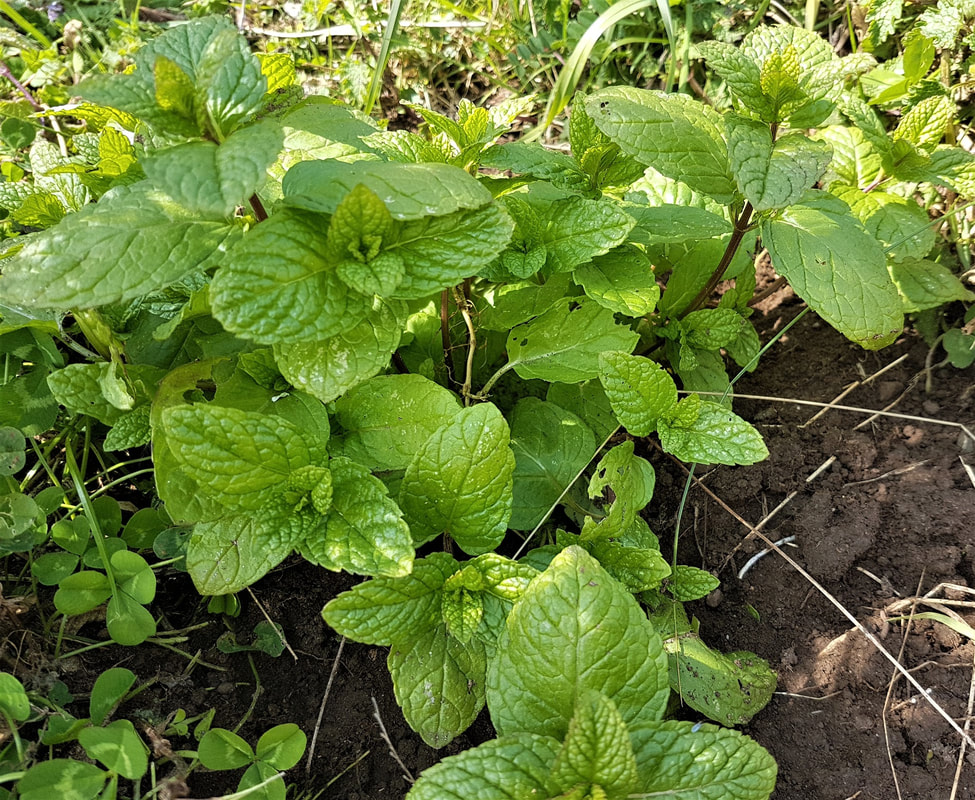 Mint. 4. Mint Arguably the easiest, fastest, possibly most invasive herb out there, but because I love mint so much, it has no chance to take over my garden. I literally eat it into submission. Climate: Loves the damp and not too hot. Medicinal Benefits: Alleviates respiratory issues, asthma, and hay fever. Aids digestions and is good for nausea. Apparently it helps headaches (I never get them, so can’t comment here) and fights depression and fatigue. It’s also great as a mouthwash or in homemade toothpaste, because it’s antibacterial and leaves a fresh, clean smell. Growing: Many consider mint an invasive plant, so if you’re not going to use a lot, give it plenty of space, or keep it separate from the rest of your garden. It doesn’t enjoy a sun roasting, and loves moisture. So in a hot, dry climate, grow it in a shady place; in a cooler, wetter climate, it will prefer a sunny place. Like rosemary, you can grow it from cuttings (it grows fast in springtime) or buy a small potted version, and watch it go! 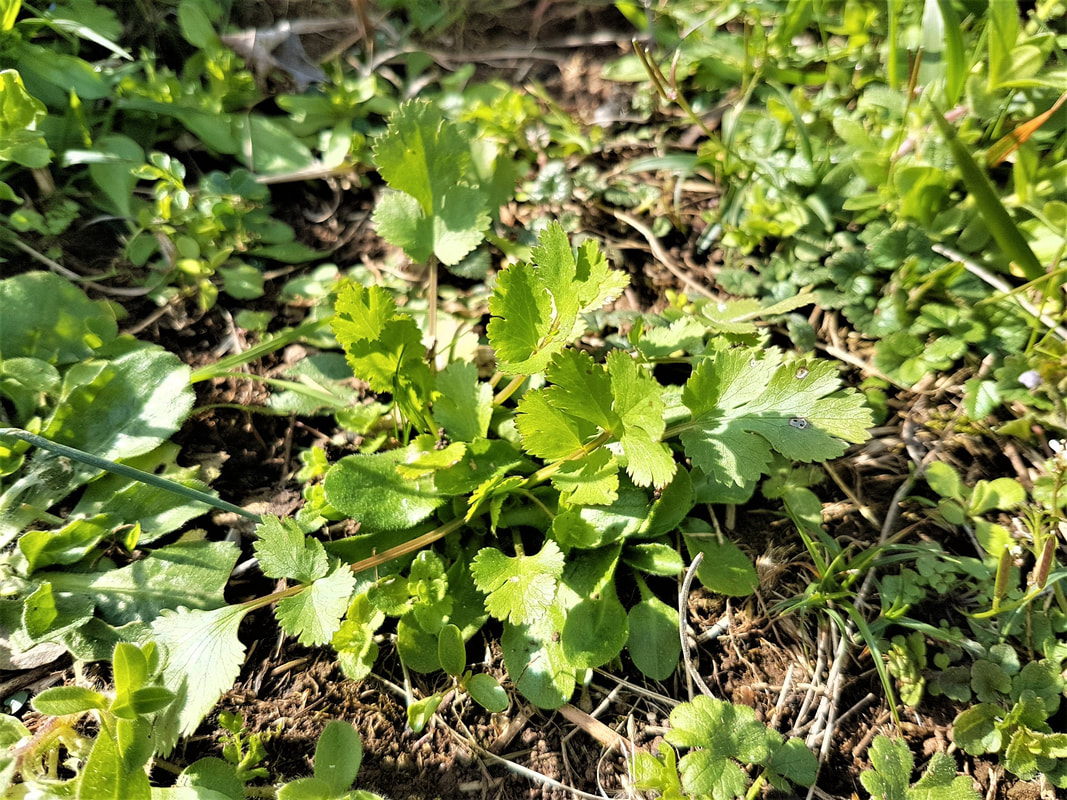 Coriander. 5. Coriander/Cilantro Some love it, some hate it. I’m in the coriander love camp. But the haters have their own Facebook group, should you wish to express your loathing to other like minds (bad language warning for folk who don’t like that kinda thing). Who knew a herb could cause so much controversy? Climate: Coriander hates the heat, which may come as a surprise as people equate it with Indian cooking. It was impossible to grow in southern Turkey. But here in cool, wet northern Spain it’s sooo happy. Medicinal benefits: Coriander helps lower cholesterol levels and regulates blood pressure, It’s rich in calcium, so good for the bones, and it’s also good for anaemia and indigestion. Apparently it also helps manage diabetes by increasing insulin secretion. It’s another anti-inflammatory and relieves skin disorders. Growing: I always grow coriander from seed. Some I put in straight in the ground, and others I put into to seed trays. If you sow directly into your plant bed, make sure other plants and weeds don’t choke it in the early weeks. 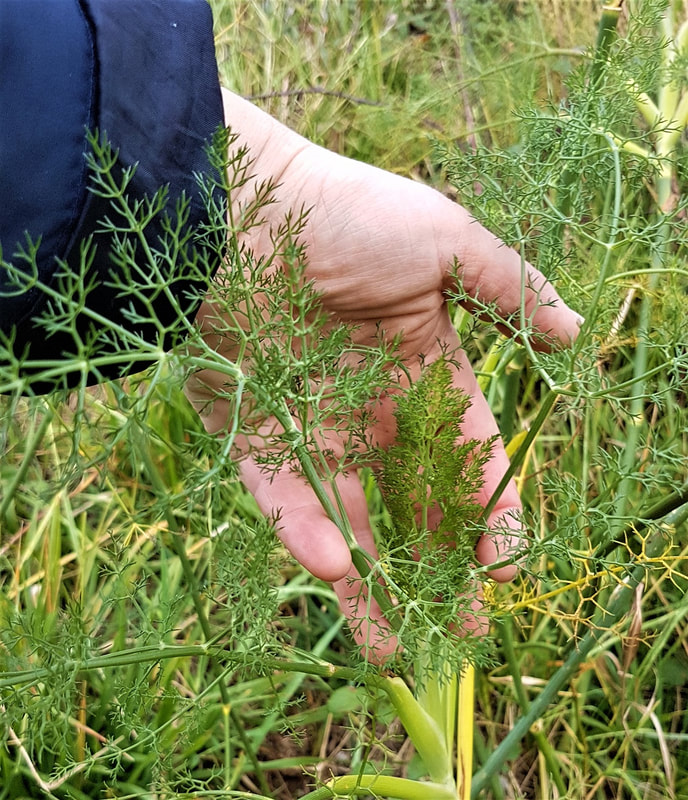 Fennel. 6. Fennel My fennel is only just poking its head through the dirt. It’s a delicious herb though, and absolutely packed full of vitamins. I use it on eggs, in salads, and of course as a tea. You can find two kinds of fennel. One is the bulb form, which is absolutely yummy as a vegetable. The other is without the bulb and grows in fine, feathery stems that you can harvest as a herb. Climate: Tends to like a temperate climate. Grows wild on the Spain’s Atlantic coast. Medicinal benefits: One of fennel’s main benefits is for the digestive system. It’s good for wind (flatulence), and can relieve trapped gas and even colic. It’s also good for constipation and diarrhoea. Another of its well-known uses is for PMS, menstrual disorders, and menopause relief. Like mint, it can be used as a mouth freshener or in toothpaste. It’s stuffed full of antioxidants too, so ingesting it helps reduce eye inflammations, irritation, or fatigue. Good, huh? Growing: Easy to grow from seed. I just threw a bunch in among my onions and off it went. 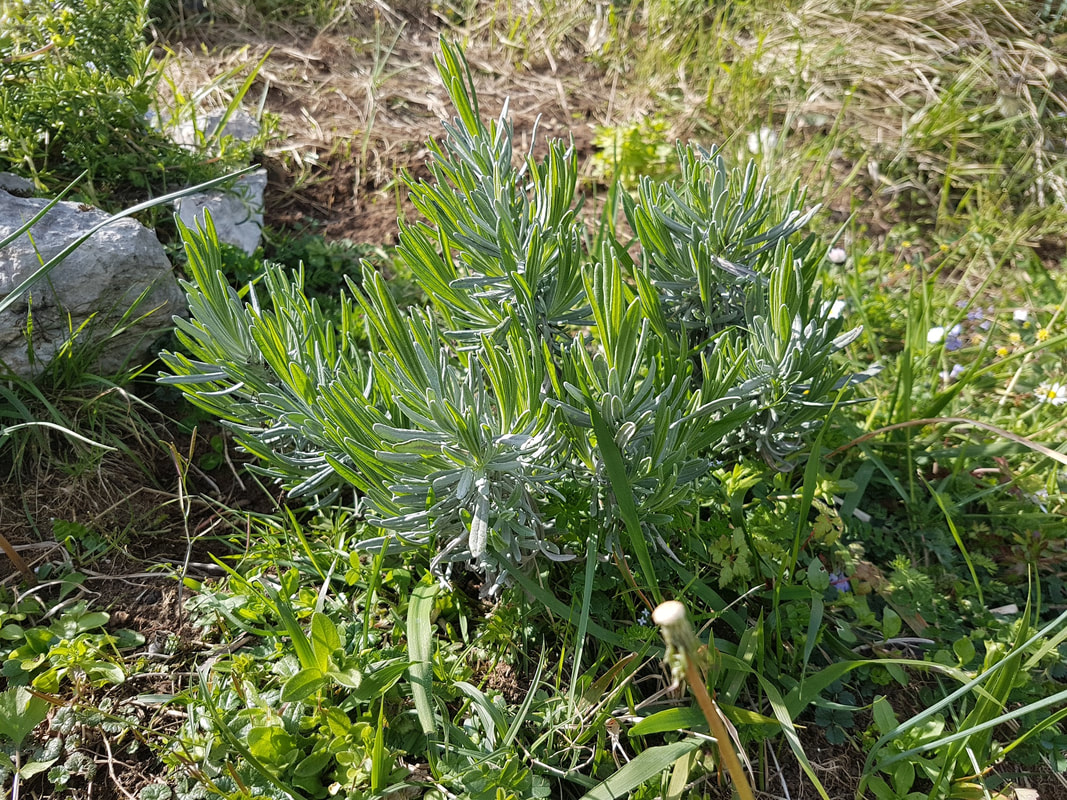 Lavender. 7. Lavender There are a lot of different kinds of lavender, and as a herb it’s so beautiful and good to smell. Climate: I grew it both in hot, dry southern Turkey, and here in cool, wet northern Spain. It seems to cope with our snow, but we rarely suffer frost here. Lavender prefers a bit of warmth and sunshine though, as it’s definitely slower to grow up here at 650 metres than it was on the Med. I bought a small pot plant, and just stuffed it in my herb garden in a sunny spot. Medicinal benefits: Lavender has been used for thousands of years for insomnia and other sleep disorders. Just steep it in hot water and drink it. Like rosemary and sage, it’s a wonderful hair tonic. Again make a tea, let it cool, and pour it over your hair after washing. Apparently it helps hair loss too. It’s great for the heart, reduces blood pressure, and also relieves stress. Here are more details about the tea. https://www.organicfacts.net/health-benefits/herbs-and-spices/lavender-tea.html Growing: It’s very low-maintenance, like rosemary, and likes to be pruned. It prefers lighter clay-free soils, and doesn’t like being waterlogged. 8. Parsley Climate: Parsley likes water, and doesn’t want to dry out, so it prefers a damp climate, especially tropical. But as long as you can water it, it will grow in other climates too. In Mediterranean Turkey it was a winter crop. In northern Europe it’s a summer crop. Medicinal Benefits: Parsley is packed full of a variety of antioxidants, and functions as a kidney cleanser. It also reduces water retention, boosts the metabolism, apparently helps manage diabetes, and is good for rheumatoid arthritis too. If you chew it, it’s a great mouth freshener. Growing: I threw some seeds straight into the ground in my veggie patch, and planted some pre-bought seedlings in my herb garden. 9. Other herbs I love Other herbs I will add to the witch patch very soon include thyme and lemon grass. I love basil, but unfortunately it won’t grow here. It abhors too much cold and wet. My Mud Witch Virus-Thwacker Tea There are stacks of teas you can drink to boost your immune system if you start to feel under the weather. My favourite is a mixture of sage, rosemary, and oregano. I just pick a stalk of each, throw them in a cup, and add hot water. Boom! If you really want to give an illness a run for its money, add a squirt of propolis into the tea too. Extra note: I find, for most herbal teas to have a decent effect, you need to drink a fair bit of them*. So if I’m feeling low, I just keep drinking a this tea as if it were water. This cleans the entire system out pretty fast. *Do check herbs don't have any side-effects if taken in excess. 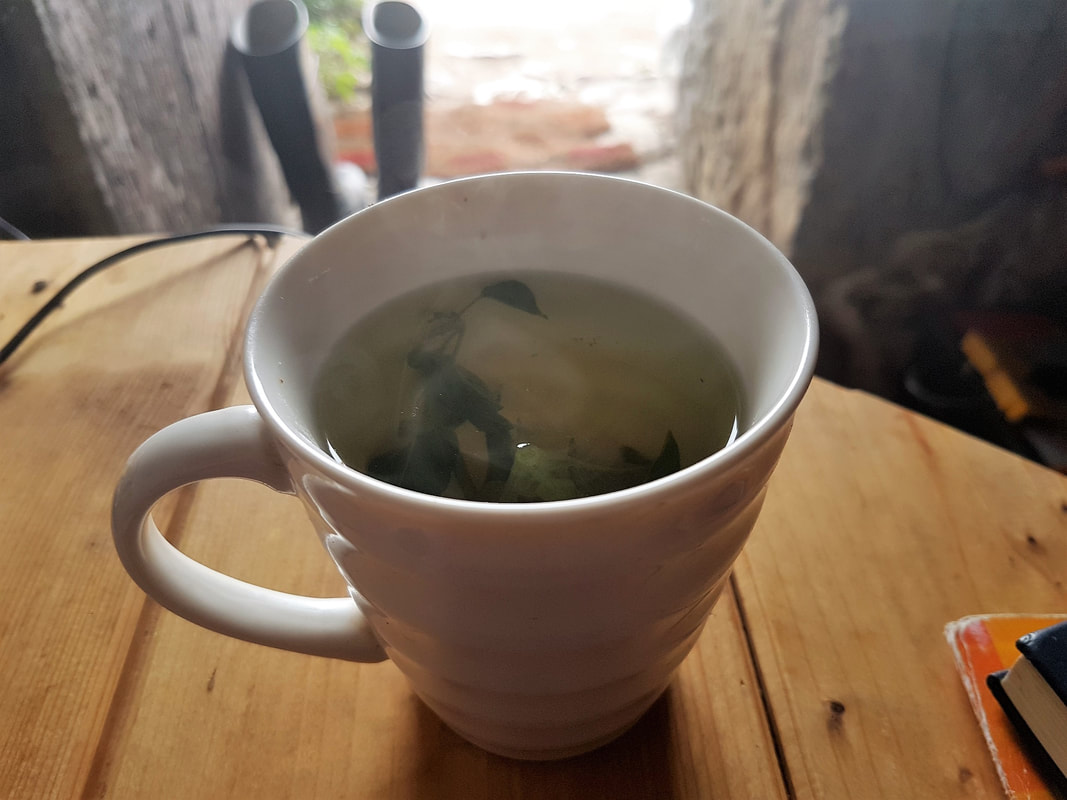 Resources:
This website describes pretty much every herb you can imagine, and their medicinal benefits. https://www.organicfacts.net/health-benefits/herbs-and-spices Do you enjoy The Mud Home? If you find these articles inspiring or useful please consider joining us on Patreon. Your support pays for the running of this website, my virtual help, and my sustenance. A big thank you to all The Mud Sustainers, and everyone chipping in and keeping these posts and articles coming.
6 Comments
Do you want a 12 Volt/24 Volt/48 Volt System? I’ve just got power. And it’s sweeeet! What's more, this system functions better than my old system in Turkey, despite being privy to a lot less sunshine. This is because I’ve learned a thing or two about solar power in the meantime. A large tranche of this knowledge comes from my nearest neighbour Brian, who happens to be an engineer, and has one of the most efficient small solar systems I’ve seen. Yeah, I lucked out yet again, I know:) My vecinos have three 250 watt solar panels. Their solar system runs a full-sized fridge freezer, washing machine, toaster, kettle, massive flat screen TV with surround sound, the well pump, lights, blender, hairdryer, vacuum cleaner, and powers another small guest cabin with small water heater… Yup, it’s pretty flipping amazing.  These three panels get a lot done! Needless to say, when I came to install my own solar system, I had a long, long chat with Brian first. What’s the secret to such a slick system? It’s a 24-volt set up, not your standard 12 volts. Huh? What does that mean? Now, if you’re an electrician, or some engineer type who knows all this stuff, you can zone out right now. Heck! Why are you even here? This, as with all my posts, is an overview for the majority of us bumbling mortals who can just about wire a plug, but get a bit lost after that. The difference between 12V/24V and 48V Systems Previously unbeknown to me, there are three types of independent solar power systems: 12V, 24V, and 48V. Most people automatically set up a 12V system because both the batteries and panels are (nearly always) 12V, so it seems like a no-brainer. 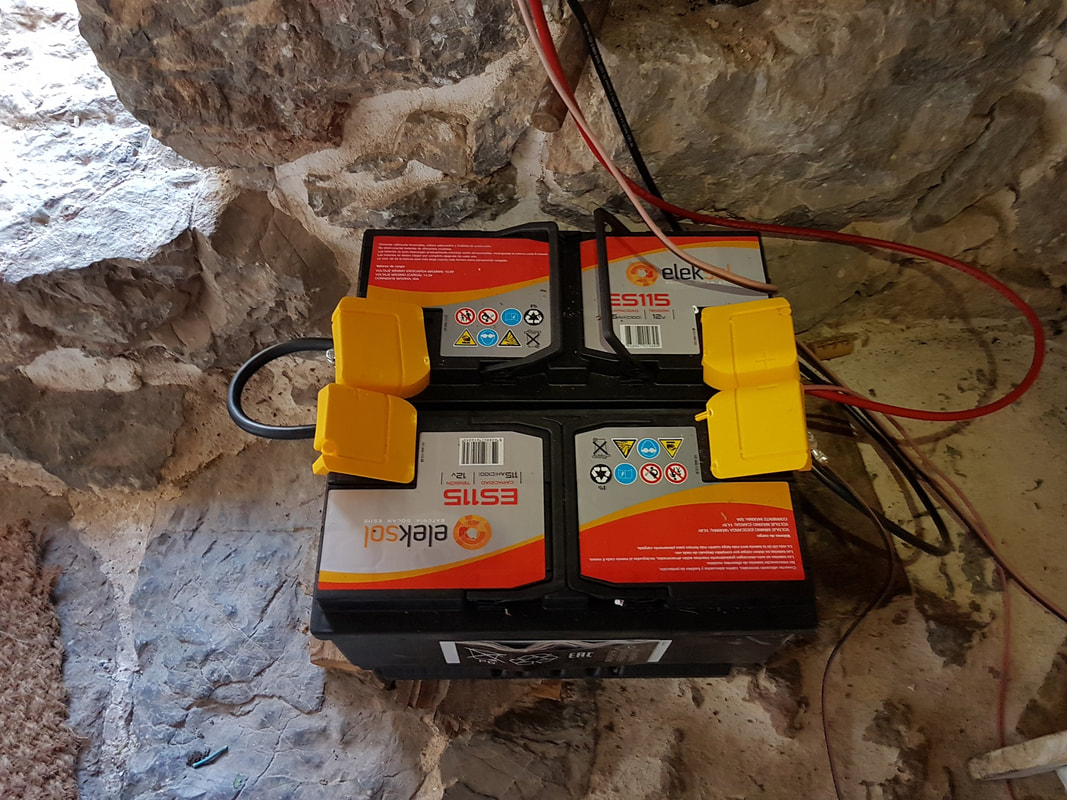 My 12V batteries wired in series for a 24V system. In truth, 12 volts often isn’t the best way to go. It’s not hard to wire a couple of panels or batteries up in series to create a 24V system instead, so don’t let that put you off. (Just get an electrician to do it for you, if you don’t know what wiring in series means). Think of it this way: A 12V system is like driving an old 2CV. Yes, it will get you from A to B, and if you only need to drive to the supermarket and back, it’s fine. But if you’re hitting the motorway, or planning a Pan-American road trip while towing a caravan, it’s going to get pretty uncomfortable. 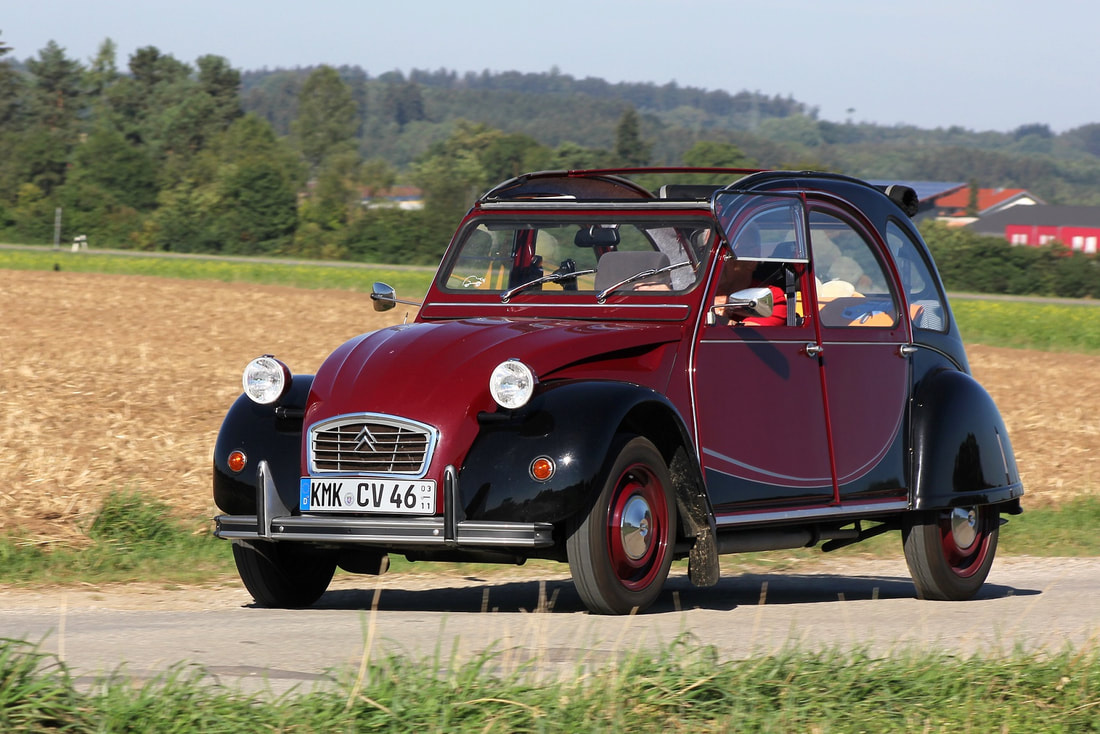 The 12-volt system can be a bit of a jolting ride. Photo by Lothar Spurzem (https://commons.wikimedia.org/wiki/User:Spurzem) A 24V system is like driving a Honda Civic. For most of us, this is plenty good enough. You can cruise comfortably and economically with your family on the motorway without worrying about a burn-out. You will be a little more prudent with your power usage than you would on-grid, but you should be able to run most appliances well on a 24-volt system.  For most of us, a Honda Civic gets us comfortably where we need to go. A 48V system is like driving a Range Rover. This is for businesses or loaded individuals who want to splurge on power like it’s going out of fashion (which in a way, it is). I’m not going to waste time outlining 48-volt systems, because if you’ve got enough money for this you’re wealthy enough to pay a consultant:) Here’s a rough outline of what a 12V and 24V system would look like, plus the types of appliances you can run well on each. 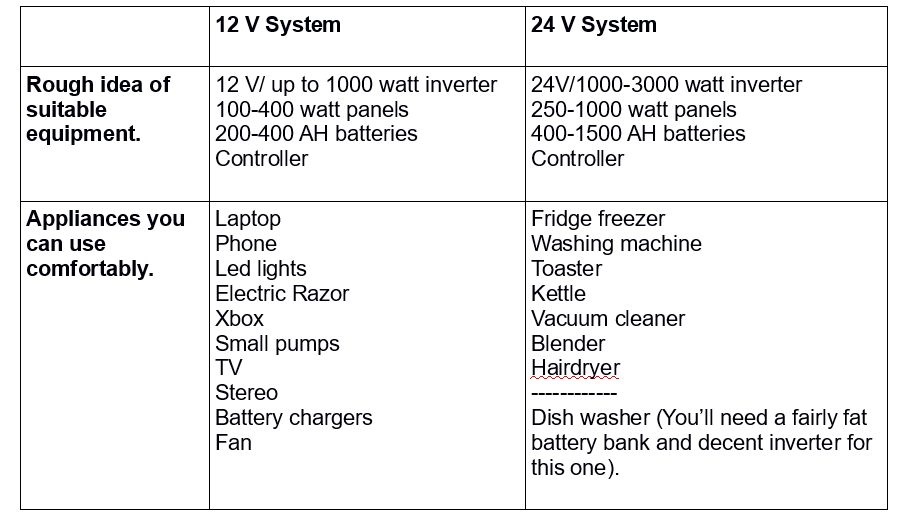 Bear in mind, it’s not just the voltage. You need enough battery power to run your system when the sun’s not shining, and you need enough wattage margin in the inverter, too (see my beginners’ guide to solar power if this doesn’t make sense). NOTE: You can run a fridge or washing machine on 12 volts. It’s totally possible. But take it from me, you’ll soon be ragging your inverter and emptying your batteries. If you have 300 days of sun a year, you may manage. If you don’t, it gets much more annoying, and ultimately expensive, because you will have to replace your batteries, inverter, or both before too long. Advantages of 24V systems: 1. The system is more efficient. You lose less power all around. 2. Reduced fire risk. 3. Better inverter efficiency converting to 240 volts. The inverter doesn’t have to work as hard to keep the AC output constant. 5. Larger usable voltage window for the batteries (in practice this means you have more power to play with). If you are a numbers- and wires-lover just itching to geek out on this stuff, head to these sites to satiate your curiosity: http://solarhomestead.com/best-battery-bank-voltage/ https://pangeabuilders.com/what-is-the-advantage-of-a-24v-system-over-a-12v-system/ My System At present I’m only using small appliances, so I could feasibly get away with a 12V system, but... here’s the thing: I know I’m going to upgrade in the future, because I want a fridge and possibly a washing machine. So, what I did was buy a 24V inverter, and created a 24-volt system, even though I only have 230 AH of battery power, and two 60-watt solar panels. 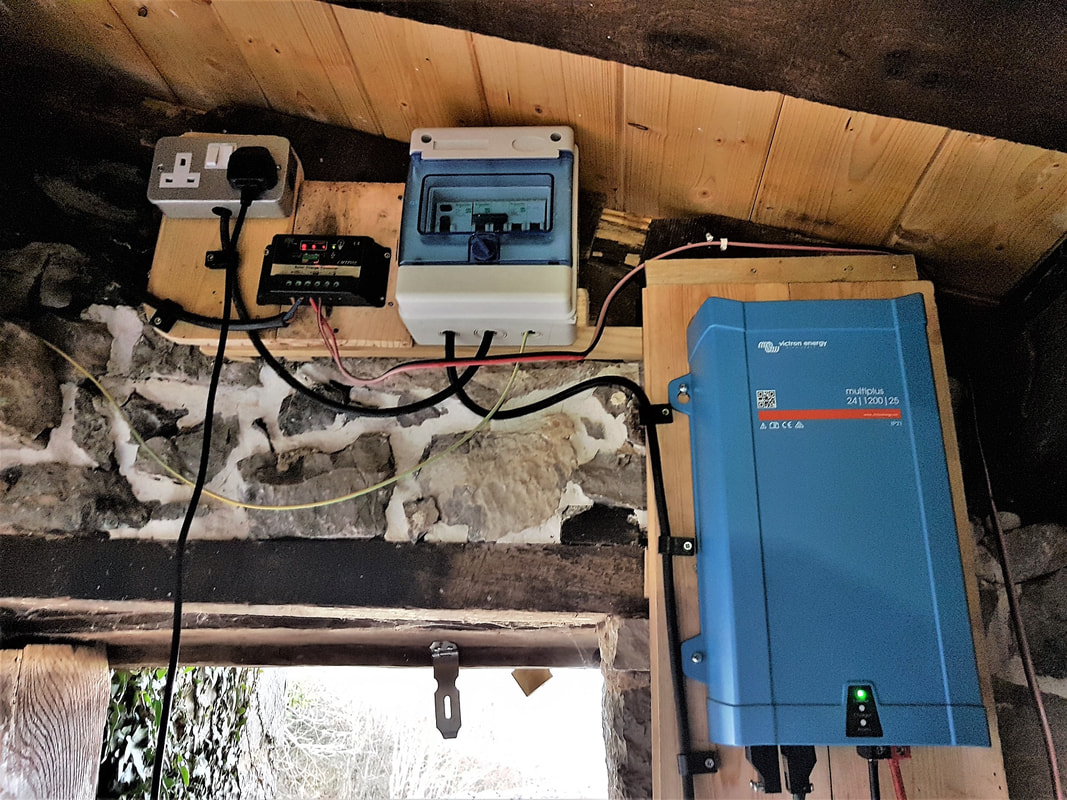 My small system with a big inverter, ready for when I add batteries and panels in the future. Do I notice a difference with 24V? Heck yes. A lot. In Turkey I had a 12V system with a good 400 AH of batteries, in a country with 300 days of hardcore sunshine a year. So there was no lack of solar clout. But if we went three days without sun, I was out of power. I also burned my 600-watt inverter out after about three years (which is to do with an inadequate inverter as much as the system voltage). Here in northern Spain we have 300 days of rain a year! I have only two 115 AH batteries. But I’m yet to run out of power. Even on a rainy day I get enough to charge my laptop. I’m observing that the batteries charge faster because there’s less power loss between the panels and the batteries. I notice the batteries lose power more slowly too. So to be honest, I’m a bit sold on 24 volts and would probably prefer a system like this even if I was only running the small stuff. 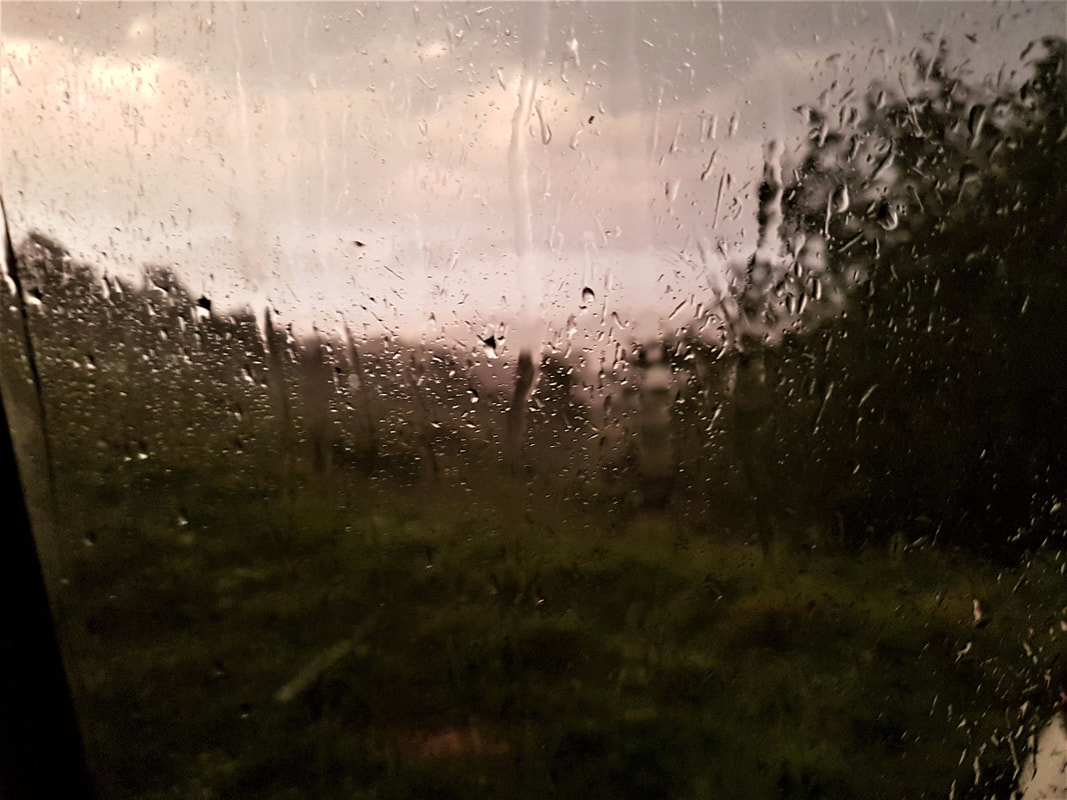 The rain doesn’t stay mainly on the plain in Spain, it was a total lie. But I’m still in power. Many thanks to Brian for explaining this lot to me while simultaneously showing me how to make soda bread (I learned a lot that day). The car analogy is all his, though I admit I swapped the brands, because I like 2CVs better than Minis.
Do you enjoy The Mud Home? If you find these articles inspiring or useful please consider joining us on Patreon. Your support pays for the running of this website, my virtual help, and my sustenance. A big thank you to all The Mud Sustainers, and everyone chipping in and keeping these posts and articles coming. There are days when I think I’ve got about ten years left of building before I’m too old. Then I remember our unbelievable earthbagger Jehane Rucquoi and consider that I might actually have another 35 years in me:) Jehane is still chucking up the earthbag domes at 85 years young. Yes you read that right, eighty plus five. 3 Moons is gradually evolving. Jehane’s been tenaciously chipping away at her dream for many years now, and it’s finally bloomed into something fascinating. So what’s been going on at the brave new 3 Moons off-grid earthbag world in Nevada of late? And how has it transformed since Jehane first joined our special FB group back in 2017?  Last year at 3 Moons. Plenty of People One thing is clear: 3 Moons is buzzing with volunteers from all over the world. If you want to get a taste of mud building and off-grid living, this is a very good chance to do so. Jehane is an easy-going free spirit and an artist, so people are able to explore their talents and interests at her place in a way that is often difficult in a more controlled environment. Plenty of folk come and go and often return to leave their mark on this intrepid project.  People power. The Well and Power 3 Moons is located in the desert, which is pretty challenging for an off-grid project. Water really is everything. Without it you can't wash, and growing food is tough. But last year, a well was dug (phew) and the water will be pumped up with solar power this year. This will radically change the food growing possibilities for 3 Moons. This project is rustic, entirely off-grid project, with just a couple of panels for phones and lights. I have to say, as long as you don’t work online it really is valuable to cut out the electromagnetic field in your life, and experience the world a little more how our ancestors did. The Domes Wow, those domes are pushing up faster than toadstools in the Arizona desert (probably a lot faster, because fungus doesn’t do too well in the hot and dry). Earthbag domes really are Jehane’s forte. She studied with the inventor of earthbag himself, Nader Khalili, so if you want to learn about dome building, head on down to Nevada this spring and check them out. Jehane uses tubes to build rather than individual sacks, and generally seems to get a dome up a year. Here they all are, in all their dirtbag glory: The Traveler Dome This is the largest and most ambitious of the domes so far. It has a superb upper deck for stargazing and a small side bedroom for sleeping. I love that deck, and think it’s an ingenious way of solving the age-old dome issue, namely how to protect it from rain. 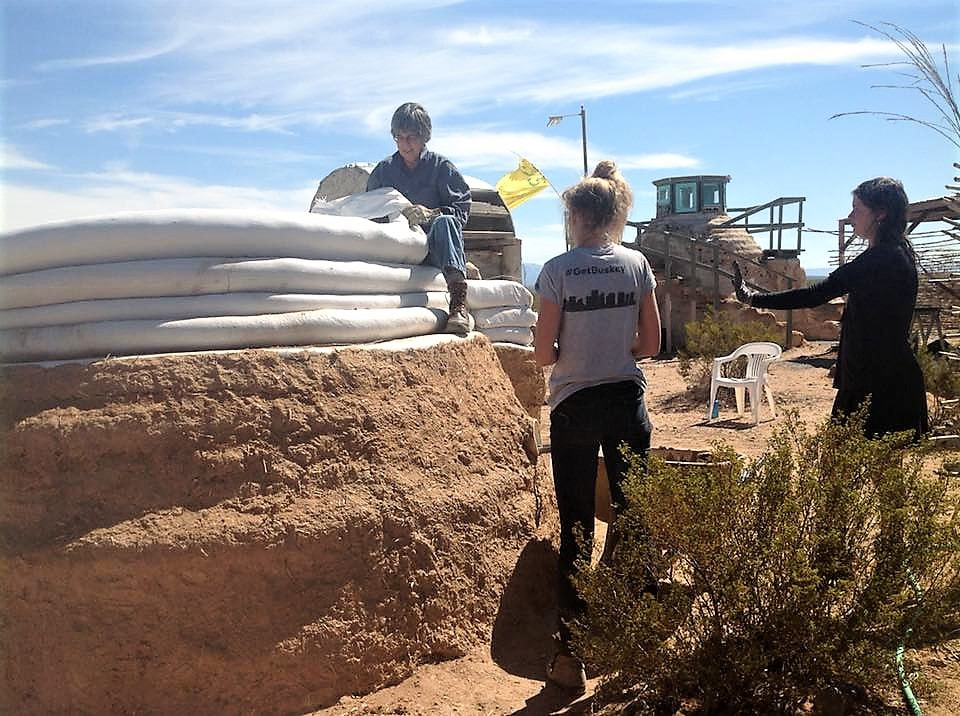 Dome building. The Teapot Dome This new tiny dome built last year contains a rocket stove which often houses a steaming teapot. This makes it perfect as a tea break shelter from the desert wind. 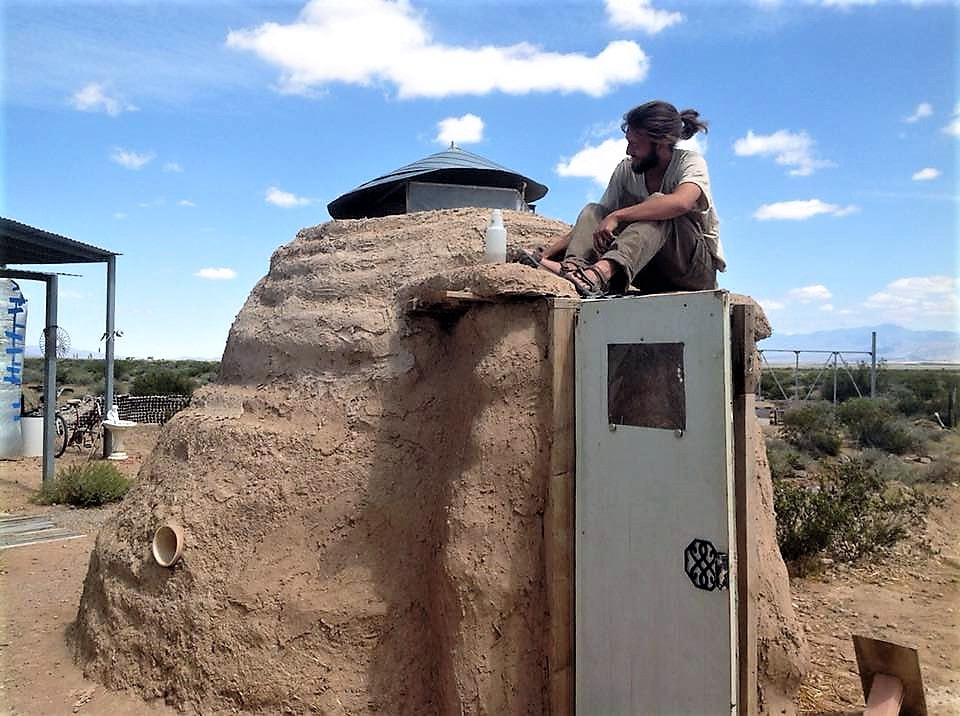 The teapot dome. The Chaparral Dome Last year the rubble trench foundations were laid, plus some of the walls. This dome is still half finished, and will be completed this season (2020). It will also house a mezzanine for sleeping (who doesn’t love a mezzanine?) All of Jehane’s domes are built without a drop of concrete, with rubble trench foundations, dirt-filled tubes tamped solid, and bonded with layers of barbed wire. They are coated in earth/lime renders. Jehane has also used papercrete in some of her plasters, which is another interesting feature, plus plenty of recycled materials. Papercrete has a high R value and is thus great for insulation. 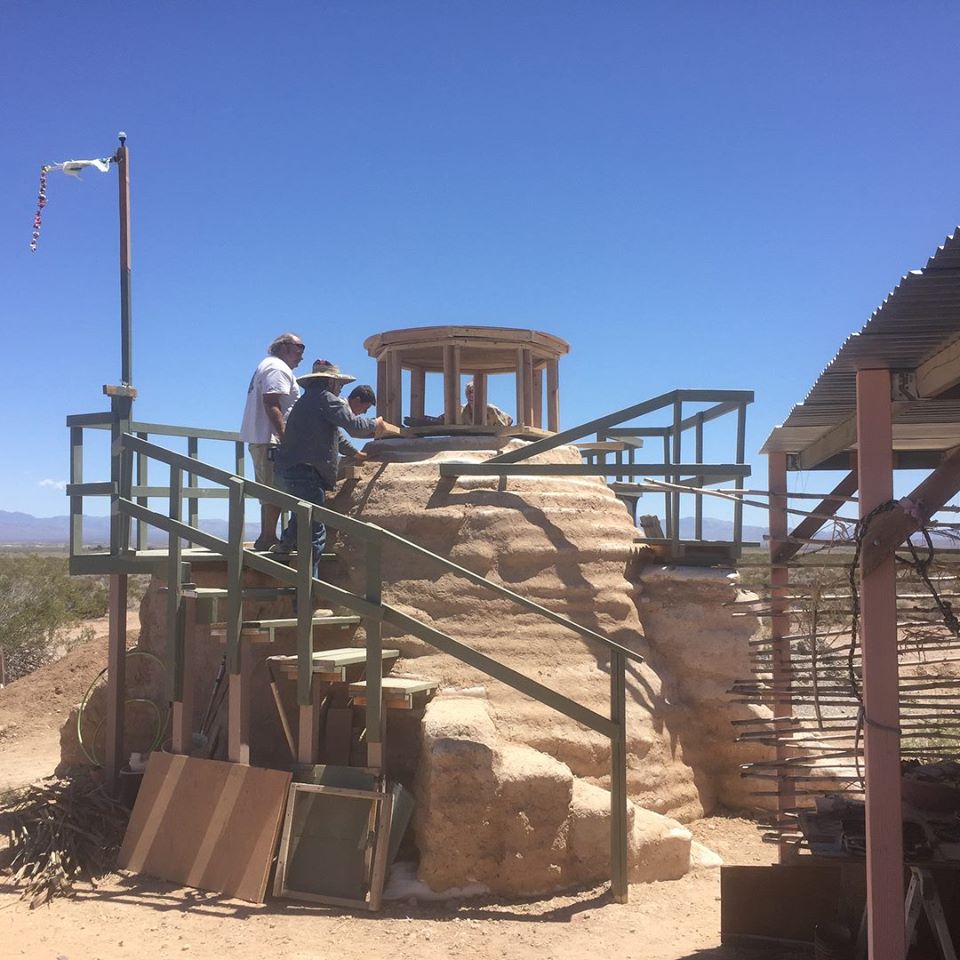 The traveller dome. The Bottle Wall One of the most enduring projects is the bottle wall, which just keeps on growing and growing. Every year someone adds a bit more. For more pictures and details, have a look on Jehane’s blog. https://3moonsprojectblog.com/2019/08/12/3moons-project-for-2019-last-season/ Bookings are now being taken for people wishing to visit this year, so don't hesitate to contact Jehane if you want a taste of the Arizona dirt with plenty of earthbagging. EMAIL: jehanetogo@gmail.com If you'd like to know more about Three Moons, you can see it on: YOUTUBE THEIR WEBSITE Contact Jehane on FB Do bear in mind, Jehane is off-grid and not in any way a techie, so it may take a little time to get a response. Staying at 3 Moons – What you need to know: 3 Moons is a very low-impact, off-grid world, powered with a small solar system, and using a rocket stove for cooking in the outside kitchen and heating the shed. Cars, vans, and campers are welcome at 3 Moons. Do heed the climate; freezing nights in March and hot days in July! For those who stay and work, there are two small beds in the earthbag shed, and two queen-size beds north and south of the trailer, under the sun shed. Meals are basic, often sun-oven cooked. Stores and eateries are 18 miles away. Where is 3 Moons? 3 Moons Project is located in a remote desert area (dirt roads) in Death Valley, Charleston View, California. It’s 22 miles east of Tecopa, and 50 miles west of Las Vegas, Nevada. 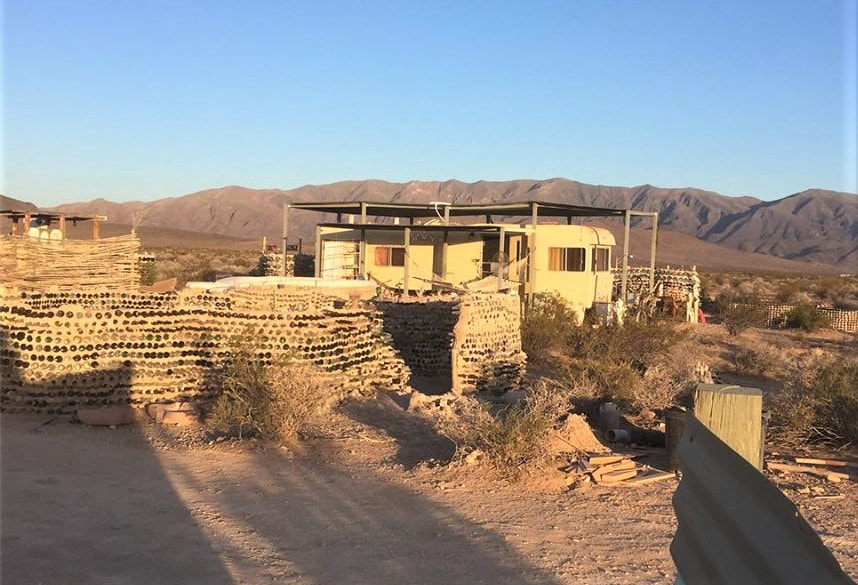 The bottle wall. Do you enjoy The Mud Home?
If you find these articles inspiring or useful please consider joining us on Patreon. Your support pays for the running of this website, my virtual help, and my sustenance. A big thank you to all The Mud Sustainers, and everyone chipping in and keeping these posts and articles coming. There are two ways to build earthbag structures. You can either create a round self-buttressing structure using bags tethered with barbed wire and no wood at all (usually cheaper and easier), or you can make a post-and-beam structure and fill in the walls. Oftentimes the reason people make post-and-beam structures is for square earthbag houses, or to pass building regulations. But here’s something a little different: Kristen Krash of the inspiring regenerative project Sueno de Vida in Ecuador shared a fabulous explanation with us in The Mud Home Facebook Group of how she made her unusual earthbag and bamboo kitchen. I say unusual because this is the first time I’ve personally seen earthbag on a bamboo post-and-beam structure, so of course I had some questions. 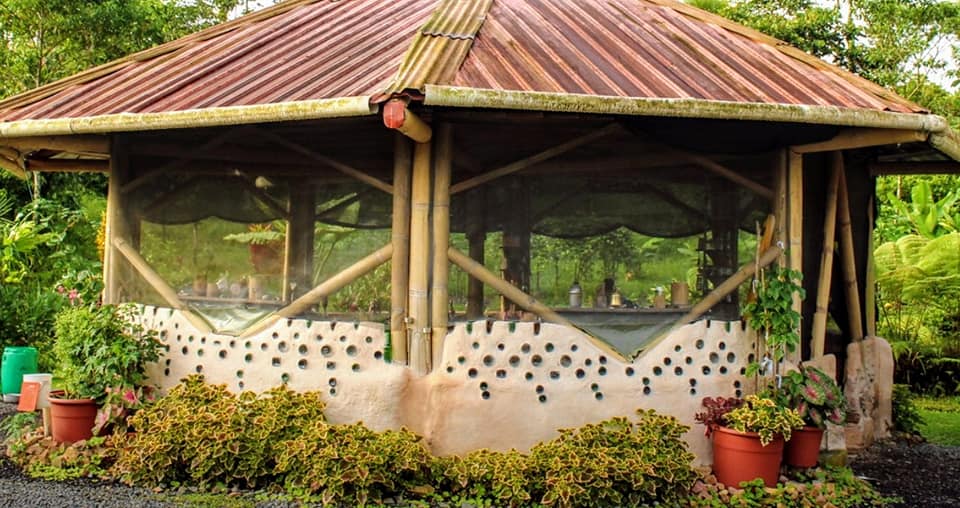 Earthbag and bamboo, a glorious combo. How did you make the bamboo post-and-beam frame? “Ah, the bamboo is actually anchored onto columns that go 50cm into the ground,” explained Kristen. Kristen and Juan buried limecrete columns into the rubble trench below. The columns were made using a gravel, lime, and cement mixture poured into wooden moulds, with long rebar set into the mixture while it was still wet. Kristen reuses everything, so once the mixture was set they stripped off the wood from the moulds, cleaned and sanded it, and used it to make shelves.  The bamboo roof. “The bamboo columns that hold the vigas that support the roof (you can see the "fish mouth"-shaped cuts in the bamboo that hold it together like puzzle pieces) are anchored onto the rebar. So the roof is actually directly connected to the rubble trench through the bamboo/rebar combo, which integrates the structure and gives it a lot of flexibility in an earthquake. It shakes and shimmies but doesn't fall,” Kristen told us. How did they anchor the earthbags to the bamboo? “The earthbags in our case are not continuous. They are simply sections of infill. The space between each bamboo/column is about two metres. That's five one-hundred-pound sacks in each row. Five rows high, that's a 2,500-lb wall. Properly staggered like bricks, decently plumb, and connected with barbed wire, they aren't going anywhere,” Kristen explains. But the way they kept some kind of integrity in the structure was with the barbed wire. That is continuous. They laid it in between the bags and just kept going with it around the outside of the columns to make a continuous circle. “We've had four mid-range earthquakes and the bags also shimmy a bit but they don't slide or move,” Kristen says. “Of course I wouldn't recommend this method if you were building up really high with your walls or expected them to bear the weight of a roof. But we knew our walls would only extend up about 1.5 m and the bamboo/column combo would hold the roof.” 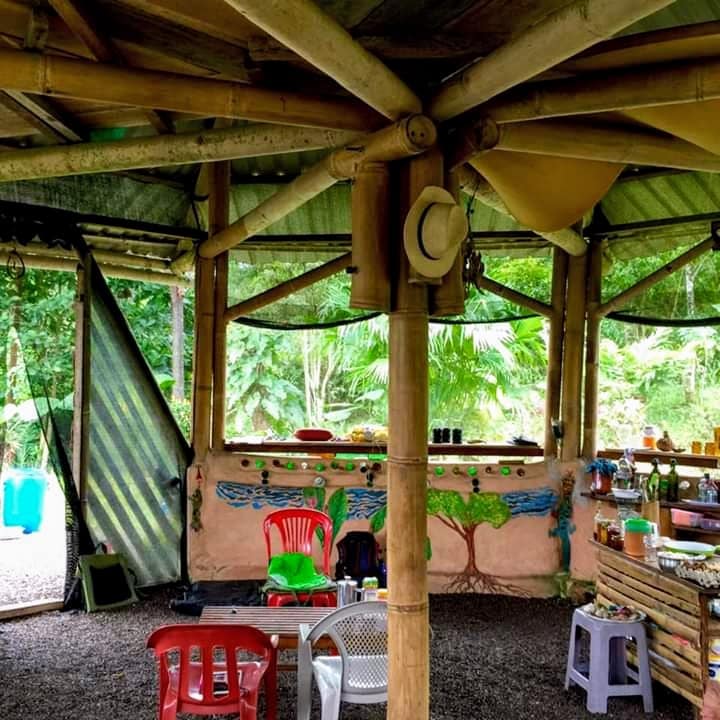 Earthbags were used as infill. What about the plaster? Kristen plastered over the columns on both the interior and exterior to cover the wire and make it all look smooth, as well as so to prevent critters from taking up residence in the crevice between the bag and column. She used a plaster mix with 2 parts sand, 1 part clay, ¾ of a part lime, and plenty of fibres. 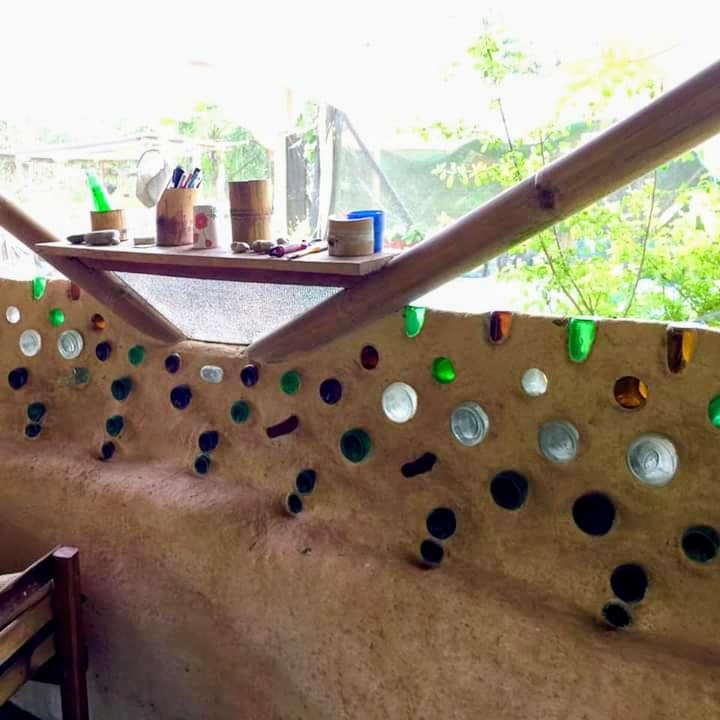 Creative earth plaster with lime. This is such a funky little kitchen, and Juan and Kristen build this stuff on an insanely low budget, off-grid, in the middle of nowhere with no megastores or Amazon deliveries. It’s hardcore. One of my favourite features is the diamond windows and the mosquito nets. If you’re in a mozzie-filled area, there really is no better way to protect yourself than a well-screened room. As Chris in the group asked, “where did you get all that insect screen?” In Turkey, we could get it from a normal fabric shop. They had massive rolls of the stuff and the tailor would make mozzie nets to order so you could make them huge. But in Ecuador? “We got them in nurseries. It’s what they use to shade more delicate plants. It’s called saran,” Kristen said. 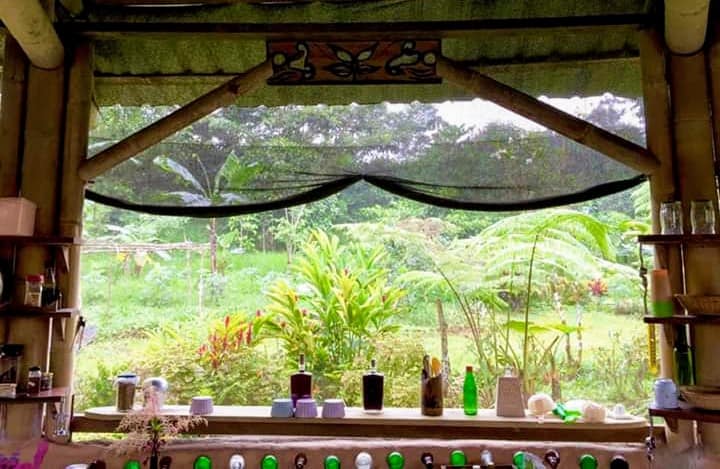 Mozzie nets. Juan and Kristen have planted thousands of trees now and are regenerating their little space. If you’d like to learn more about their project have a look at their website: https://www.suenodevida.org/ You can also support them on Patreon if you’d like to do your bit for the forests of South America. https://www.patreon.com/suenodevida 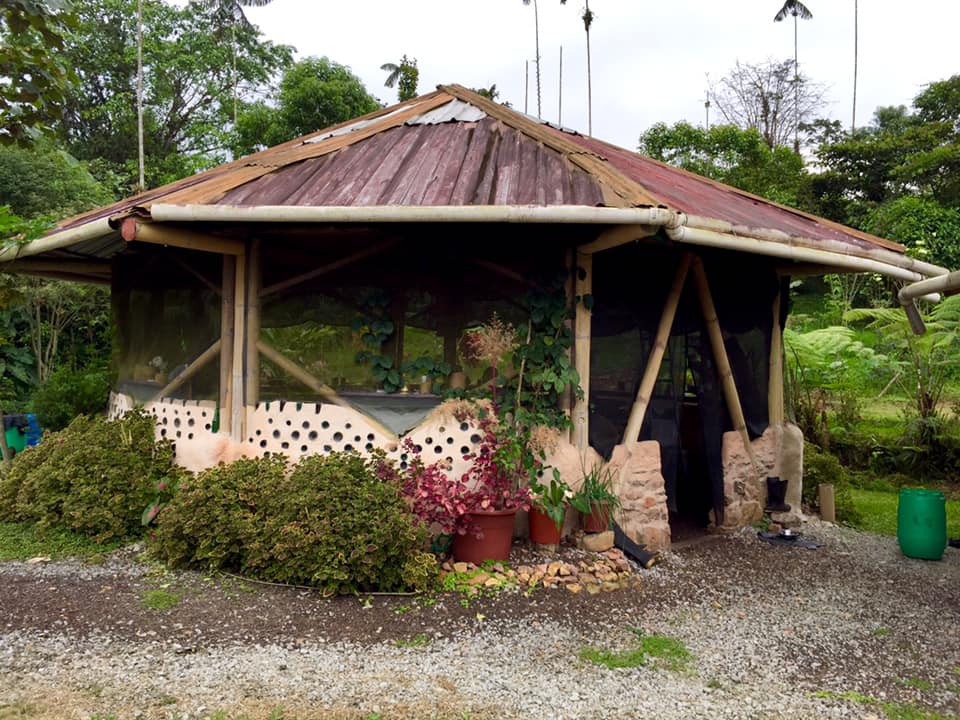 Starting Your Own Project? The Mud Home’s small, private, and very supportive Facebook group is a safe space for new mud builders and off-gridders. It’s also the most inexpensive way to get assistance from me. It’s filling up, though. The number of members will be capped at 100 so I can give everyone the proper help they need. So if you want to be part of it, don't leave it too long. Do you enjoy The Mud Home?
If you find these articles inspiring or useful please consider joining us on Patreon. Your support pays for the running of this website, my virtual help, and my sustenance. A big thank you to all The Mud Sustainers, and everyone chipping in and keeping these posts and articles coming. As you probably know, I’ve renovated two tiny stone huts this summer. They began the year as abandoned, poop-filled, caves. Now? Aha... The transformations were surprisingly inexpensive too, because a) I did all the work myself, and b) I'm predominantly using two very inexpensive materials: clay and lime. But can you use either in any situation? And why did I choose lime in some places, and clay in others?  Before.  After. As far as the cost goes, both are inexpensive. Earthen plaster is almost free to make. The only cost is the sand, which is about 4 euros for a 25kg bag. Lime costs marginally more (6 euros for a 25kg bag, and that goes a long, long way). Both have other pros and cons. Having worked with the two extensively now, in both hot, dry Turkey and cool, wet northern Spain, I’ve learned when to use which, and why. 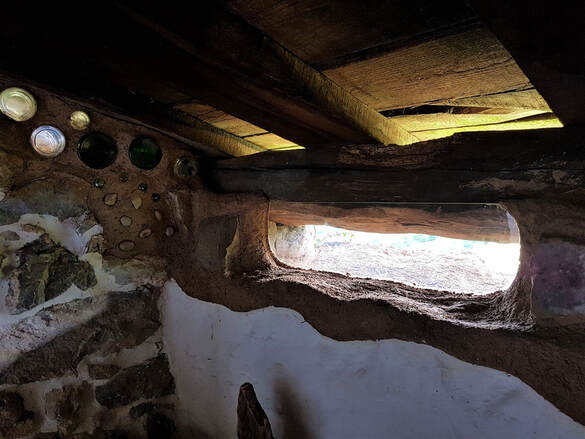 Earth plaster window frame. When to use lime If you have a lot of damp to mitigate, mould issues, or some burrowing termite-type trouble, then lime is unbeatable. Even the resourceful, genius of mice teeth hesitate before lime render. Lime is potentially harder than clay plaster, but interestingly, it’s not necessarily stronger. Lime also works better (in my opinion) if you have a pre-existing stone structure and need to refill the mortar. It’s hard to get a decent earth plaster mixture in and out of a mortar gun. Lime Pros: 1. Lime can handle plenty of damp. 2. It’s an insecticide. Lime deters termites and fire ants. 3. It’s a fantastic fungicide. 4. If you have damp issues, lime is the way. Lime Cons: 1. Not as easy to sculpt (though you can etch it into shape). 2. It’s caustic, so less of a joy to use than clay (but still much nicer than Portland cement). 3. Lime isn’t hugely load-bearing (I wouldn’t make a supporting wall out of limecrete, for example). 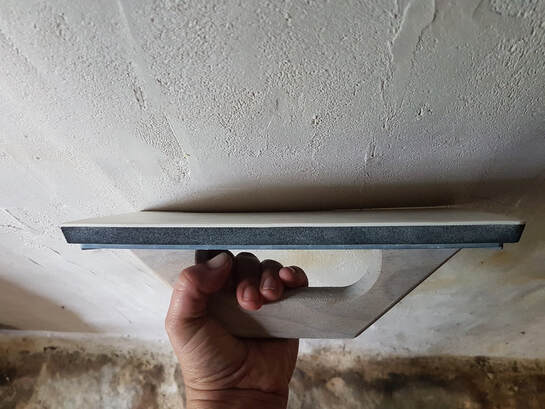 Lime render. When to use clay Clay plaster is much, much better for sculpting. It has a wonderful elastic quality that holds its shape beautifully, and once dry is ridiculously tough. I had one heck of a job bashing down a bit of my cob spice rack, for example. (Video) Earthen plasters are also wonderful to work with. Everyone feels happy when they build with mud. Earthen plasters feel warmer too, and although earth is not an insulator, it's still better than Portland cement or stone (Cob has an R value of around 0.5 per inch compared to 0.08 for poured concrete). If you make your plaster very straw-heavy, that R value can increase. Yes, I know half the natural building world will disagree with me, because they are all obsessed with the fact that earth has thermal mass. But in my experience, it ain’t quite that simple. I’m not the only one who has noticed that earth-plastered walls are way warmer than stone or concrete ones. especially in the damp. Mud is magic. Clay Pros: 1. Lovely to work with. 2 Cob has structural strength. 3. Clay plasters are warmer to the hand, eye, and soul. Clay Cons: 1. Clay doesn’t love the damp, and can sometimes go mouldy. 2. Clay and earthen plasters usually take longer to dry out than lime in wet climates (though some have had the opposite experience). 3. Clay expands and contracts when it gets wet or dry, which can cause issues. 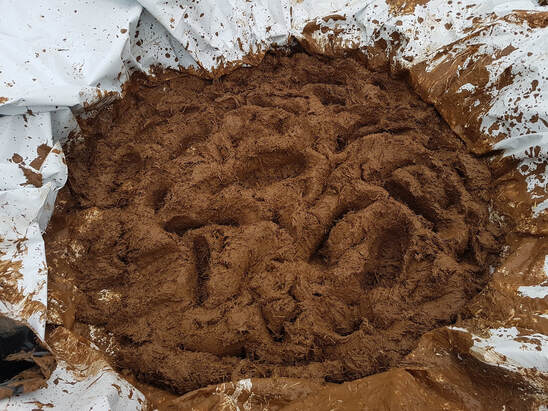 So what did I do in my huts then? 1. My bedroom hut is semi-submerged in the ground. In fact, one side is built out of the rock of the land itself! I could see there would be damp in one corner, so I used lime render and lime paints in those areas. 2. I used clay plaster on all the other areas because it felt warmer. I used clay plaster for sculpting sills and shelves, inlaying mirrors, and embedding windows. 3. I used limecrete on one floor because again, the flagstones were directly on the ground and prone to damp. 4. I used lime mortar between the stones, but earthen mortar to build a wall from scratch. 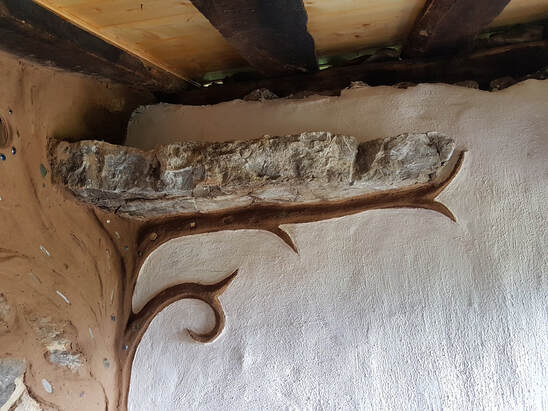 Lime and clay performing together. So there you have it. We live in an adversarial world where things are idiotically pitted against one another. But it’s not lime versus clay. As with most things in life, the two actually perform beautifully when they’re doing a cha-cha. Remember lime is caustic Lime is a natural substance, but it is caustic and can burn. Make sure you are protected properly before using it. Read the health and safety guide to find out more. Links My flagship digital earth plaster course http://www.themudhome.com/earthplastercourse The Mud Home Amazing World of Lime Course https://the-mud-home-courses.teachable.com/p/the-all-about-lime-course Do you enjoy The Mud Home?
If you find these articles inspiring or useful please consider joining us on Patreon. Your support pays for the running of this website, my virtual help, and my sustenance. A big thank you to all The Mud Sustainers, and everyone chipping in and keeping these posts and articles coming. As you may or may not know, I still don’t have a bathroom. Winter is well and truly here. The rain has been falling nonstop and the temperatures likewise. Happily I have a few friends who generously open their hearts and homes to me in times of trouble. This time they also opened their bathroom. And what a bathroom it is! 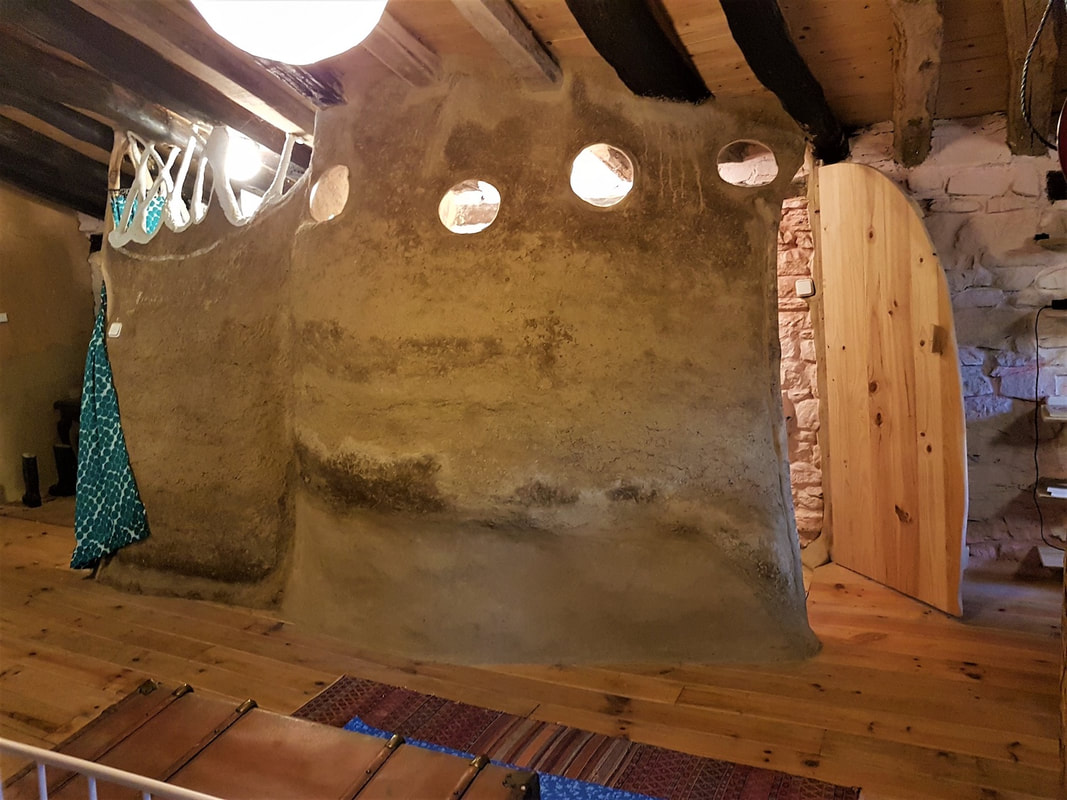 A bathroom like no other. You may remember the stone, mud and horse haven created by Sophie and Hakan in Spain. Sophie has long been building with mud, and is by now a very experienced (and bold) mud artist. We’ve been fortunate enough to follow her cob bathroom’s progression for the past year in our lovely Mud Facebook Group. Everything about it is completely original, from the way it was made, to the shape, and definitely where she installed it. Because normally when we talk about adding unusual bathrooms, they’re being constructed outside. 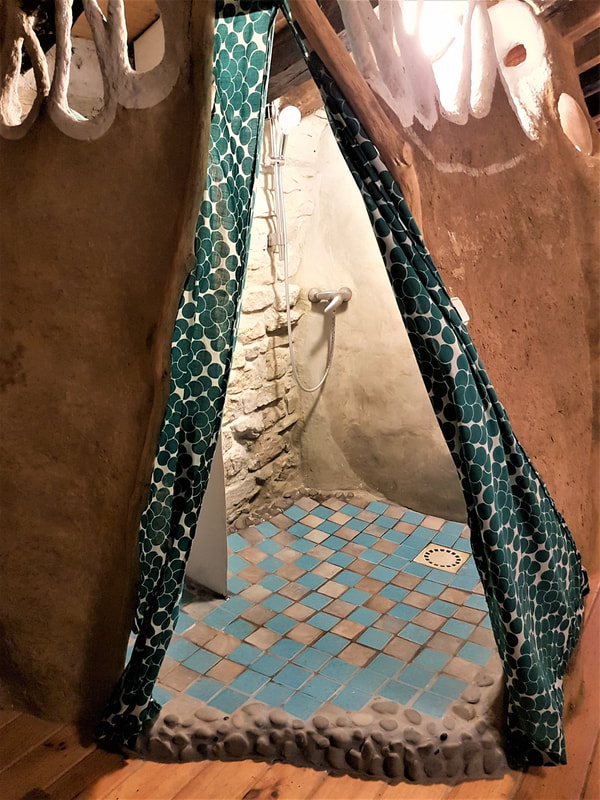 Building a cob bathroom inside your house! How did she make it? Originally there was a stairwell where the bathroom is now, and Sophie had experimented with a cob banister there. So first, Hakan and Sophie ditched the stairs, and boarded up the hole. Sophie then used the banister as the beginning of the wall for the toilet area. 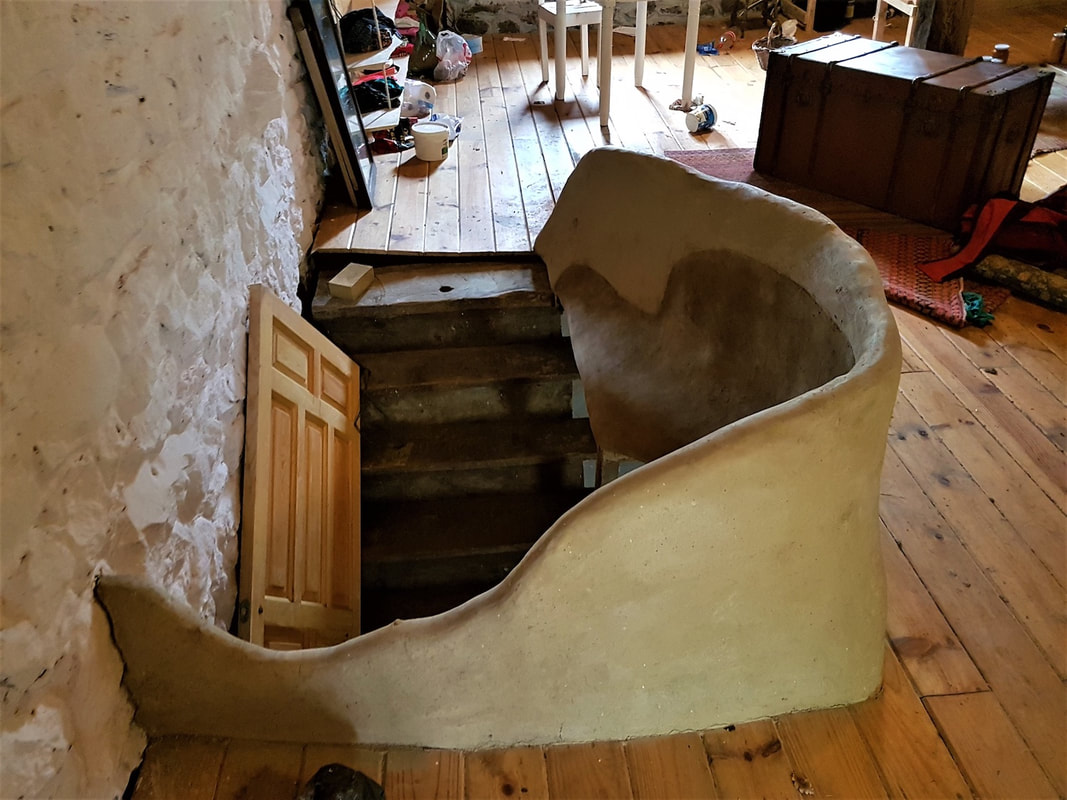 Stairwell and banister. Next Sophie did something quite unusual. She decided to continue building using a method which was halfway between wattle-and-daub, and pure cob. Normally with wattle-and-daub you create a lath out of willow or hazel, and then plaster over it. What Sophie used were dried fern stalks. These are just sturdy enough to hold the cob in place as it dries, but flexible enough to create a more free-form shape. 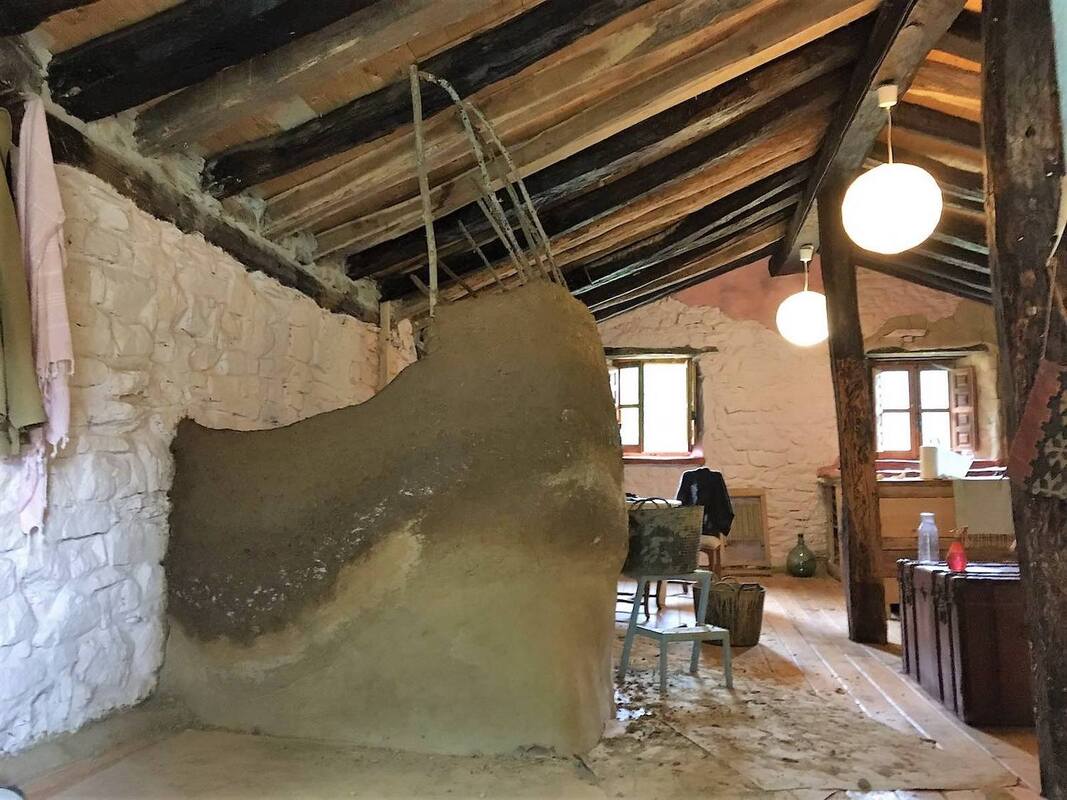 Fern stalks creating a gentle frame. Issues? This method worked fine until she reached the top of the bathroom. Sophie had a dream of curving the walls in, like a cave. This is quite a tough angle for cob, because the wet clay, straw, and sand mixture is heavy and can pull inwards or fall off. Indeed this happened a few times, but in the spirit of any decent creator, Sophie simply kept at. Ultimately, it was a case of applying the cob little by little, until it dried enough to hold its shape. 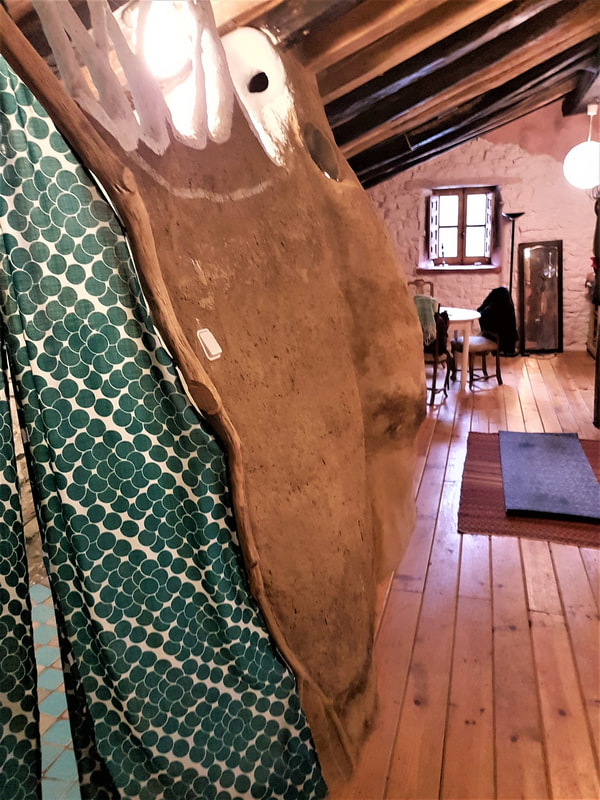 Holding its shape. How to screw in attachments? Once the gorgeous cave-like structure was solid and dry, Sophie and Hakan turned to the interior. One ventricle of the cave is where the toilet and sink were installed. I asked Hakan how he attached things like water pipes. “Normally you have some pieces of wood, or a wooden frame embedded in the cob, and that gives you something to screw attachments to.”  Toilet and sink installed. The challenge of the shower room The shower posed more of an issue. Because this was an interior bathroom, and they were basically constructing upon a wooden floor, Sophie and Hakan thought plenty about how they would waterproof the shower tray. They attempted tadelakt on the floor in the first instance, but it failed. So eventually they found a non-permeable ‘eco’-grout and used it to cement these tiles in place. The result is stunning, as you can see. The walls, however, are all lime rendered on the interior, and I can personally attest that it worked wonderfully, keeping the water out of the cob while retaining permeability*.  Shower room. Special Features There are a number of lovely, original features in this bathroom. The door frames are divine, made from foraged wood and tapered to create these wonderful cave openings. Hakan handmade the toilet door to fit neatly into one side. On the other side is a shower curtain. Now, I’m not normally a fan of shower curtains, but this one works so beautifully I became quite enamoured with it. Sophie had posted in our group a while back about her battles with the curtain rail, which she and Hakan eventually made by bending an iron rail. But the result is a beautiful wooden arch in which the curtain sits (but doesn’t bother you while you shower).  Bending an iron rail to fit around the top of the door frame and hold the curtain. I also adored the glass windows (made from glass plates Sophie found at the local pound/dollar store). They illuminated the toilet space and formed eyelets onto the roof joists. How much did it cost? Sophie and Hakan’s builds are always dirt cheap, mostly because they do nearly everything themselves. The cost of the shower room was about 150 euros, and the toilet was 250 Euros (most of that went on the sink, taps and toilet). Remember that mud and foraging are free.  Windows made from glass plates. Things to take away from this build: 1. While there are plenty of tried-and-true techniques out there, there are potentially many other ways to use mud to build. If you’re of the pioneering mindset and don’t mind things going wrong, it’s wonderful to experiment. 2. Cob needs to be applied in thinner layers when the force of gravity is against it. You can still create gravity-defying shapes, but you need to work slowly, allowing each layer to dry before adding the next. 3. Lime plaster can indeed work on the inside of cob to create a solid, semi-waterproof coating. This success may be climate-dependent, as in a drier or changeable climates where the mud is liable to expand and shrink, the plaster could potentially crack. But Sophie’s was perfect. 4. Sometimes you have to compromise and use an unnatural material. I must admit, for my part I’m more bothered about sustainability than natural purism, so if you have to use a tiny bit of cement or plastic somewhere to waterproof something, so be it. The eco-grout Sophie used for the tiles was Fugabella, which while not entirely natural, is a more sustainable range of low carbon, part-recycled cements.  Related links:
How to make earth plaster http://www.themudhome.com/earth-plaster.html Natural or sustainable building? http://www.themudhome.com/mudbuilding/natural-sustainable-or-quality-building http://www.themudhome.com/mudbuilding/how-to-build-naturally-and-sustainably-no-they-arent-the-same-thing The Eco-spec on Fugabella http://products.kerakoll.com/gestione/immagini/img_prodotti/Fugabella%20Tech%20Guide%20EN.pdf About Sophie and Hakan *** Sophie and Hakan met in the middle of the Atlantic ocean, but that's another story:) They lead a life of adventure and are also both professional photographers. You can see more of their work and inspiring lifestyle on Facebook. (Sophie on FB) (Hakan on FB). Their gorgeous outdoors-inspired photography is available on Stocksy @https://www.stocksy.com/hakanandsophie Do you enjoy The Mud Home? If you find these articles inspiring or useful please consider joining us on Patreon. Your support pays for the running of this website, my virtual help, and my sustenance. A big thank you to all The Mud Sustainers, and everyone chipping in and keeping these posts and articles coming. In a world where we are continually bombarded with negativity and despair, don’t be fooled into thinking it’s just the way humans are. Most of us are amazing in our own ways, and most of our good deeds and beautiful achievements are never mentioned or shared. This week, with Di and Bis’ courageous renovation project in Spain, I’ve got a story of both inspiration and compassion, not to mention dogs.  The Beast. From Turkey to Spain with Seven Dogs in a Van I know Dianne and Bismil from my years in Turkey, where these two animal lovers have a long history of adopting stray and abandoned dogs. Last year Dianne and Bismil took an enormous leap of faith. They decided to leave their beautiful self-built home on the Turkish Riviera and move with their seven rescue dogs, none of which are small (indeed one Turkish Akbaş weighs more than I do). The country they planned to relocate to was Spain. Now, it’s pretty stressful transporting animals across borders, and I’ve often commented it would be easier to bring a warhead into some countries than a dog. But Dianne and Bismil were undeterred. First they bought a Mercedes van, kitted it out, and decided to drive all seven dogs the 4200 kilometres from Turkey, through Bulgaria, Serbia, Croatia, Slovenia, Italy, France and into Spain. That might be adventure enough for most people. At the same time, they also purchased a massive but dilapidated farmhouse in Spain to repair for them and their dogs. On top of all that, when they sold their house in Turkey, the Turkish Lira had crashed. So let’s just say they are doing this on a budget. Feeling hot under the collar yet? 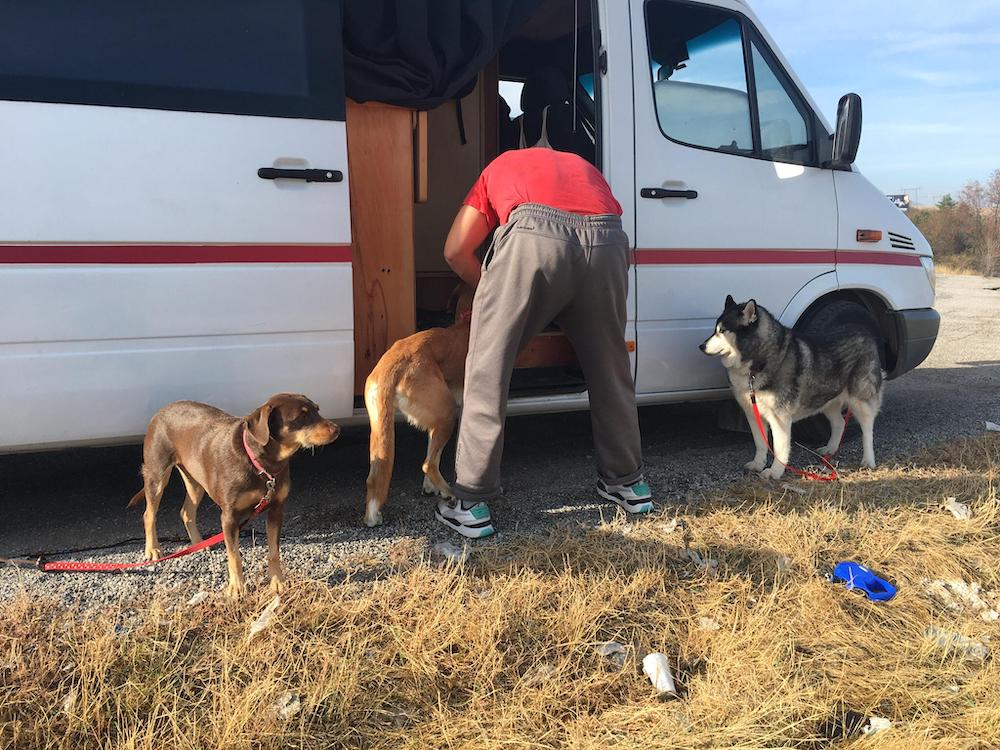 Getting ready for the road. Left to right: Sufi, Biena, Bismil, Kaya An Odyssey, or Two It gets worse. Or better, depending on whether you’re the storyteller or the protagonists. Because Dianne and Bismil had so many dogs, they couldn’t fit them all in the van in one trip. So once they arrived in Spain with half the pack...wait for it...Bismil had to turn around and drive the 4200 kilometres back to Turkey to pick up the other half of the dog family! And let me tell you, when you’re driving a van with Turkish plates in and out of Europe, you’d better be prepared to have the thing frequently pulled apart at the borders, as well. While Bismil was crossing a continent on a dog rescue mission, Dianne held the fort, conquered Spanish bureaucracy (no mean feat), and began renovating. When I visited her last winter, the property was in one heck of a state. We sat hugging mugs of tea in the shell of her kitchen, which she’d already begun to attack. “It’s a monster,” she said to me, shaking her head. “I’m not in love with it; it’s like an arranged marriage. I had to find something fast to house the dogs.” 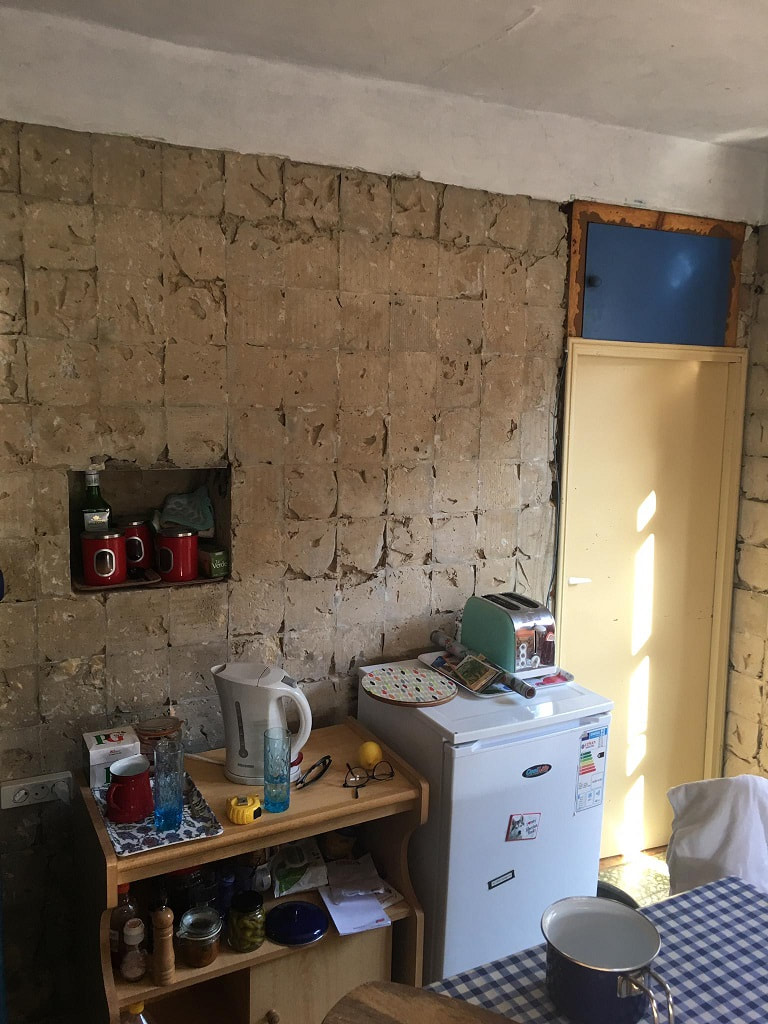 The kitchen last year. But I know Dianne. Some people have vision, and can see how to turn beasts into drop-dead-gorgeous aristocrats. Some people have the touch of the witch. 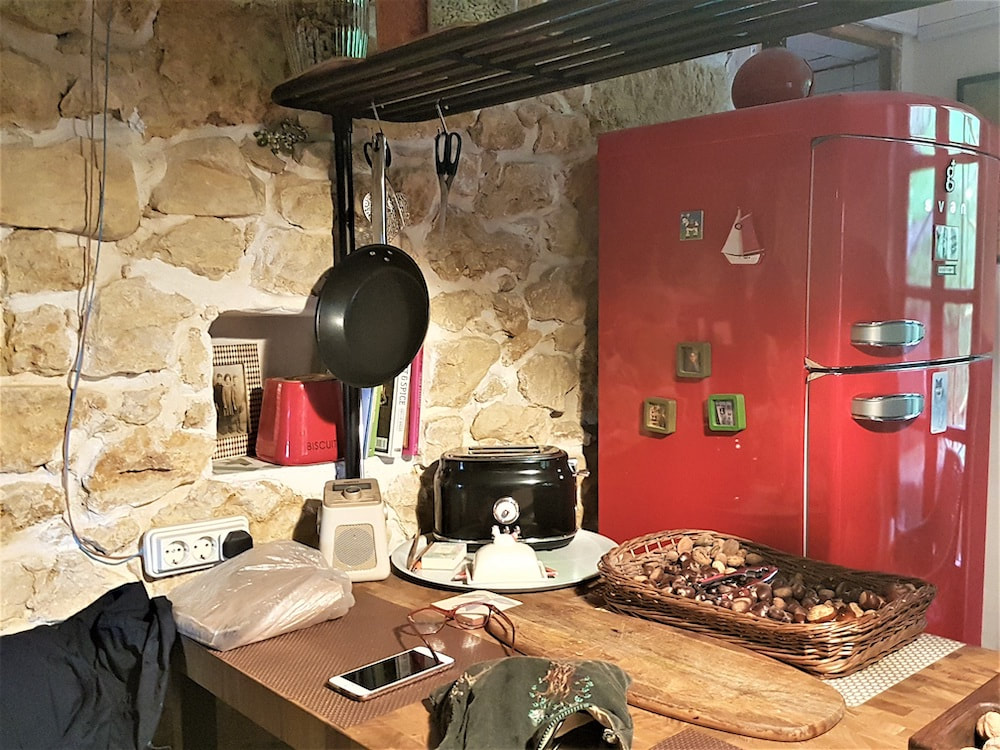 Exactly the same position a year later! Both Dianne and Bismil have worked their butts off this year, with seven hounds to feed and walk as well. But what they have got right, which so many people get wrong, is that they have moved step by step, room to room, rather than attempting to transform the whole beast at once. Moving in this way means you have the satisfaction of seeing one area completely finished. It gives you a beautiful space to sit in and enjoy while you carry on with the next job. Needless to say, when I returned this year, I was pretty gobsmacked. The kitchen is unrecognisable. The roof is being completely overhauled. The whole place is taking shape. 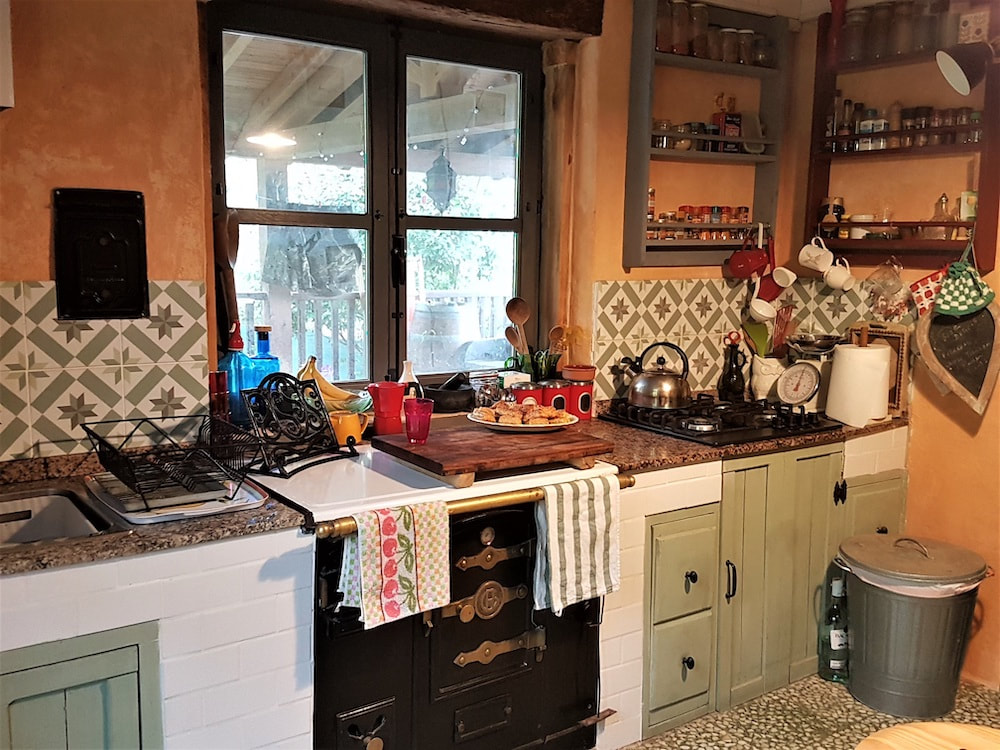 Taking shape. A Naturally Recycled Renovation What’s particularly impressive about Dianne’s approach is her commitment to recycling and using natural materials. She’s a real whiz at upcycling old furniture, and there’s no old bit of scrap she can’t wave her wand at and turn into something special. 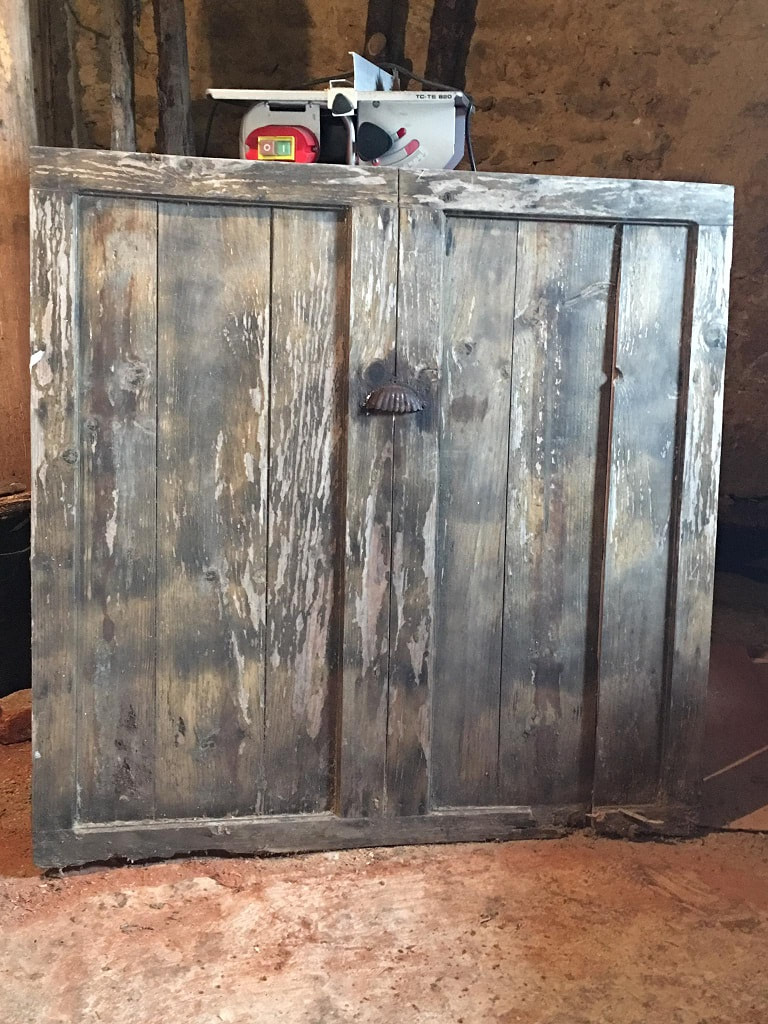 The cupboard used to look like this. 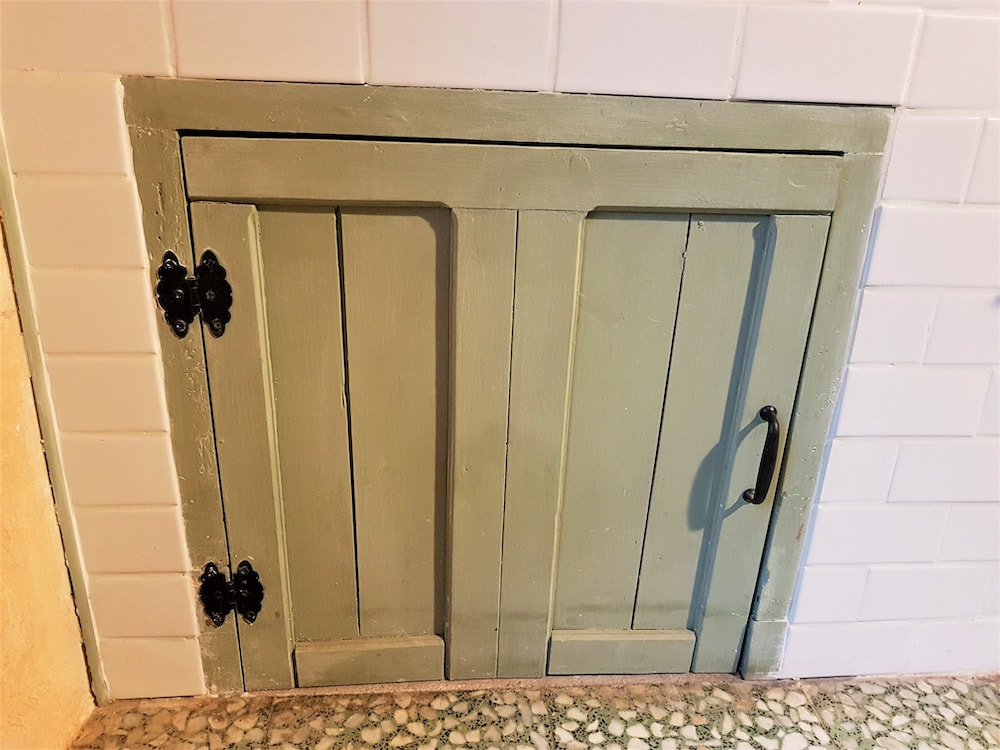 Now it looks like this. Lime mortar, render and crete She has completely transformed the walls with lime and natural paints, too. She used lime throughout the house to create a series of beautiful mortars, renders, and limecretes to preserve the old stones, eradicate mould, and allow the house to “breathe”. The result, as you can see, is both authentic and warm.  Dianne's limecrete step Dianne’s Limecrete For the steps and sills, Dianne created a special limecrete. She used one part lime, one part brick dust, one part sand, and a handful of straw to form these hard-wearing and beautiful surfaces. The brick dust acts as a pozzolan, which makes the lime more cementitious, while the straw fibres help knit the crete together and add a more rustic feel. You can read more about limecretes like this here.  The Walls The walls were totally overhauled and it’s made an enormous difference to the entire vibe. Dianne and Bismil pulled off all the old concrete render, dug out the mortar, and lovingly cleaned the stones up. Then they mixed a lime mortar from sand and lime, and re-mortared the walls. The result, as you can see, is stunning. It creates a completely different atmosphere. In other places they applied a lime render and painted it with a special milk paint. I love the look; it’s both authentic and cosy.  The kitchen before.  The kitchen after. What’s next? The only thing left in the kitchen is the pantry. Dianne plans to make a wattle-and-daub cubbyhole in the utility room for storing her groceries. Once that is done, she will build a bottle wall with earth plaster to separate the bathroom from the hall. A TV room is also appearing by knocking out one wall and adding a door. Yes, the beast is being tamed, and looking more attractive by the minute. But I wonder, is there a fairytale ending anywhere for the arranged marriage? Will Dianne fall for her monster in the end? 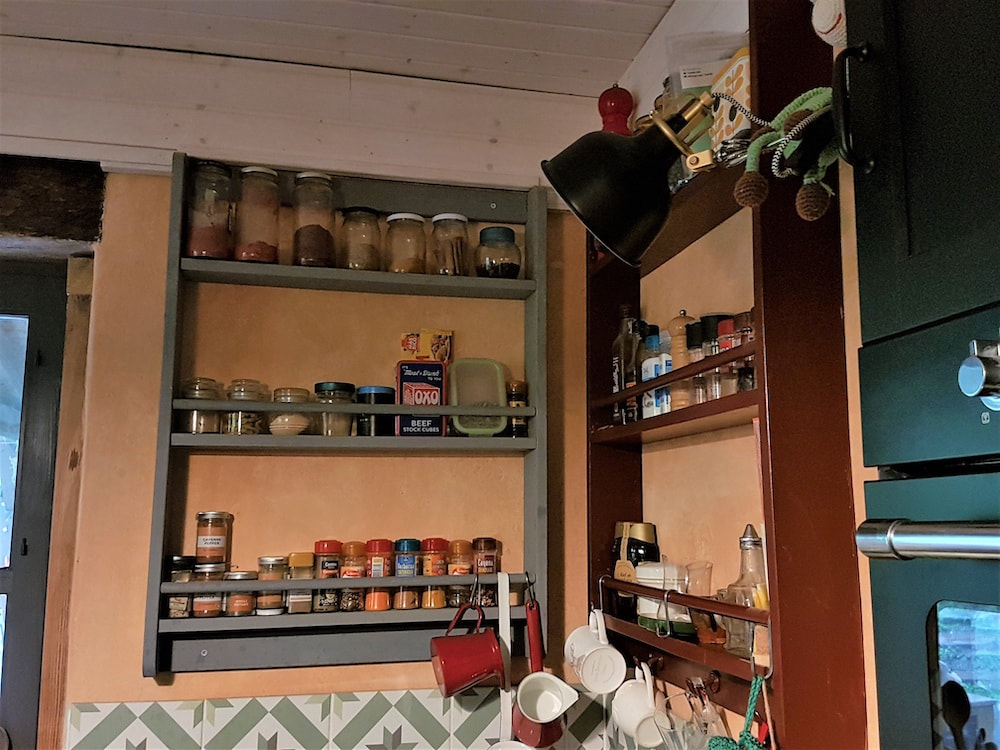 Upcycled spice racks,sanded and painted, upon a lime rendered wall. 6 Important Things to Take Away from this Build: 1. It’s easy to get overwhelmed, panic and try to do everything at once when you take on a building project. Instead, be like Di and Bis – work out which space you need to sort out the most, and complete it. Totally. Then move onto the next. Step by step. 2. Don’t leave areas half-finished before starting a new task. It leaves you (and everyone you live with) in chaos, and you end up feeling like you’re getting nowhere. 3. In renovation, more than half the work is undoing the mistakes of those who went before you. Factor this in when estimating how long it will take. 4. Lime really is the way in old buildings. It creates a much warmer, drier vibe in a place. It’s also pretty impossible for mould to grow on lime render or in lime mortar. 5. You don’t need to build a house from scratch to enjoy natural building. Natural renders and plasters can transform even the most uninspiring box into something healthy, beautiful, and special. 6. If all else fails and you don’t know how to make your place more homely, get a dog (or seven). They are guaranteed to warm up kitchens, hearts, and cold feet. 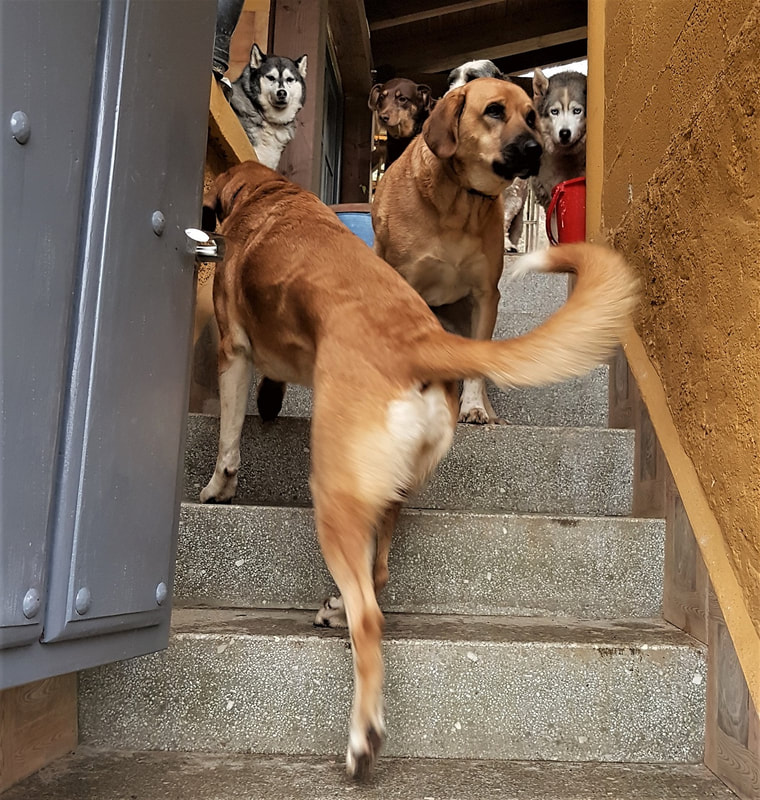 From left to right: Ayla (the husky), Biena, Sufi, Monkey, Maxi, Kaya. (Rumi the massive Akbas is out of sight). Related Links and Info Do you enjoy The Mud Home?
If you find these articles inspiring or useful please consider joining us on Patreon. Your support pays for the running of this website, my virtual help, and my sustenance. A big thank you to all The Mud Sustainers, and everyone chipping in and keeping these posts and articles coming. Water is one of the top priorities when you’re building an off-grid world (for the full list see here). Having suffered plenty of experience in doing it the wrong way, I was a little obsessed about water this second time around. I’ve made sure in my new off-grid world that water is in abundance. I can tell you now, the difference it has made to my workload and general comfort levels is huge. So here’s a list of the top five ways you can obtain water in your off-grid world, with (as always) some very common issues to watch out for, plus one thing you absolutely must factor in to your off-grid water system right from the outset.  I’m making sure I have backup. Wells Wells are pretty common in off-grid scenarios. Humans have been digging wells for a long time, after all. If they are decent wells with plenty of water all year round, it’s all well and good. Even if you don’t have your own well, you can potentially bore down and create one. But, before you shell out a small fortune for a borer, do consider some of the pitfalls of wells. The reality: I’ve seen a heap of problems with wells. The troubles begin (but don’t end) when, as they are wont to, wells dry up. Even here in very rainy northern Spain, I see a lot of people running low on water if the season is dry. So… as always when it comes to water systems. Unless you are 101% sure you have plenty of water all year, make sure you have a backup. This is probably the number one rule with off-grid water. Rely on one source at your peril. I have three potential sources now, and that makes me feel very good indeed:) The other issue with wells and water systems in general is of course pumps (protracted groan). I often hear people say, “Oh we’ll just pump it up.” That phrase is delightfully short and simple, and belies none of the actual aggravation pumps can cause. More on pumps at the bottom. 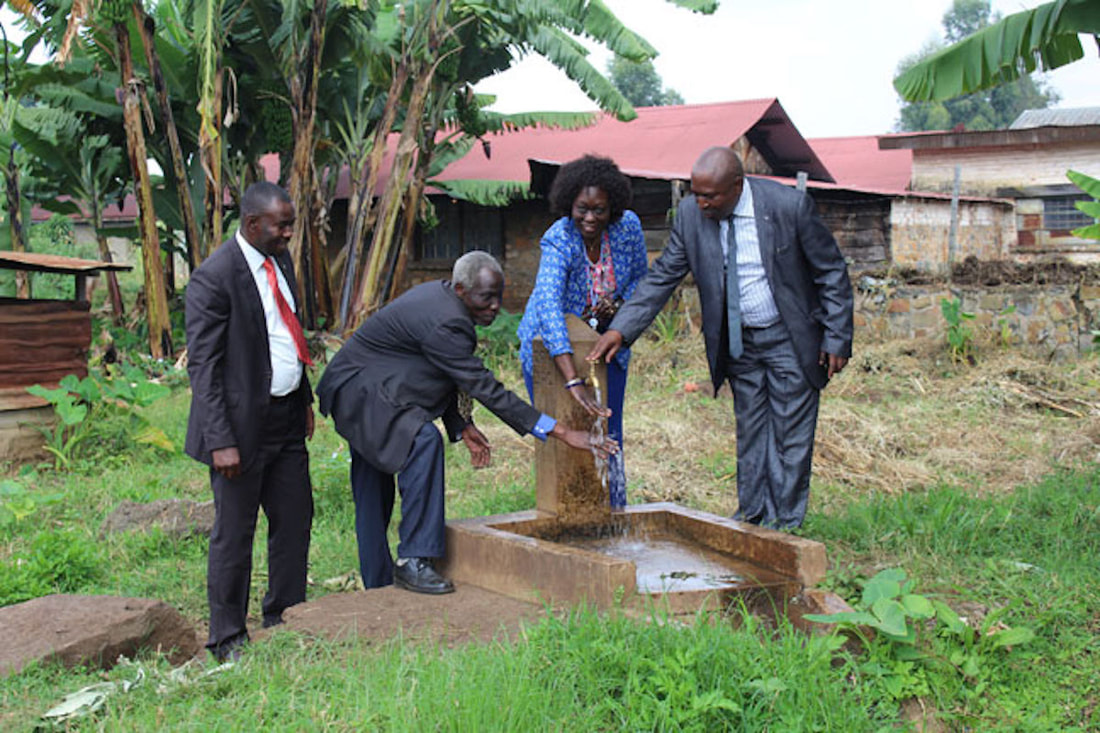 Inauguration of the NSL Lwiro Water Project – image by MONUSCO Photos. Rainwater Harvesting I think this is the water system of the future. Almost everywhere in the world, even in dry areas, there is rainfall at some point in the year. If you can harvest that water and store it well, you can change your world. The best rainwater harvesting system I have ever seen was in Tamera, Portugal. It was a massive water-retention lake designed by Sepp Holzer. You can read more about that here. But the key difference between Sepp’s permie rainwater systems versus classic rainwater harvesting pools, is that Sepp uses clay to line the base of the lake, rather than concrete or any other impermeable man-made membrane. This is fundamental in dry climates because it allows a little natural seepage into the ground, thus rehydrating the entire area around the lake and balancing your local water table. Ultimately it transforms the actual climate, attracting more rain. But not everyone is in a super-dry climate, nor does everyone have enough land for such a project. In which case, the most common (and effective) way of harvesting rainwater is from your roof. It is then collected in a big tank for later use. The reality: The main issue with rainwater harvesting is storage space, because depending on how many months are dry and how big your garden is, you may find yourself needing a tank the size of a house. I think for small off-grid worlds, rainwater works superbly as a backup. The water is also beautifully soft, which makes your skin and hair all soft and shiny (if you like that kind of thing:) You can read more about rainwater harvesting, and about Sepp Holzers’s inspiring work here. These two Abundant Edge podcasts also give excellent advice on rainwater harvesting. https://www.abundantedge.com/abundantedge/zach-weiss https://www.abundantedge.com/abundantedge/rob-avis  Tamera’s amazing water retention lake has even changed its micro-climate. Springs If you have a spring on your land, then I doubt you are reading this post. It’s the source I favour most, especially if it’s pure mountain water that you can also drink. Like wells or course, springs can dry up. But if it’s an open spring above your living quarters, then you may well be spared the pumping. I’ve seen lucky folk with spring water pipes pouring next to their houses. So if you’re looking for land and find one with a spring in it, go for it! Brooks and Rivers Again, if you’re looking for land and find a plot next to a river or with a brook in it, it’s probably a good choice. If it’s above your land it’s easier to drive the water down without a pump, but you have potentially more chance of flooding. If it’s below your land you’ve got to pump it up. Ram pumps are very interesting solutions to this problem though. More on them at the bottom. The reality: Both brooks and rivers can dry up, so make sure you check their status at the end of the dry season. Also, in many regions rivers are communal, or much worse, corporation property. Or there may be limits to what you can do with them. This is why I favour springs. Generally, if you have a small spring in your land, the government or the mega-corporation has nothing to say.  Dew harvesting/dew ponds This is essentially a very old but fast-developing water solution. Essentially all you need is a temperature reaching dew point/mist, and a tarp. In the old days, dew ponds were for cattle. A hole was dug, an insulator like straw was put down, and then puddled clay for waterproofing. See more details about the old dew ponds here. You can make your own dew pond by digging a wide basin or pool, lining it with straw for insulation, and then covering it with a tarp. In the evening and morning, dew will collect in the tarp in a small pond. People have adapted this system for their roofs too, collecting the dew much like rainwater. The reality: This is way, way easier in a cooler, damper climate than in a hot, arid one. In southern Turkey there was basically no dew point reached at all for about four months of the year, so good luck harvesting dew there. It’s still possible, but you need a much larger, higher-tech system. However, if your climate is temperate, oceanic, rainforest, or cool, dew harvesting can be a nice easy backup source of water. Video of how to make a dew pond: https://www.youtube.com/watch?v=66tAHmRd5FE  Pumps As alluded to earlier, I hate pumps. My neighbour in Turkey was killed by one, which has done nothing to cure my aversion. Pumps often go wrong, and personally, being an independent type of lass, I dislike that my water supply suddenly becomes dependent on power. Electric pumps (which could be solar) are okay for lightweight jobs, but don’t forget that mixing water and electricity is a high-risk venture (this is what killed my neighbour). Also, if you have a steep incline, electricity isn’t going to cut the mustard. You will need a petrol pump instead. These are noisy, expensive, and of course require fuel. Ram pumps There is only one pump system I like, and that’s the hydraulic ram pump. Old school, that’s me. Ram pumps use gravity and pressure as their power source, rather than petrol or electricity. Basically you have a pipe with a number of valves in it, and the pressure of the flow (in say a river) pushes the water up a certain way into the pipe and through a valve, which closes behind it. When the next lot of water gets pushed up the pipe, it pushes the first lot through the next valve. And so on, until you’ve pumped water up your hill. Ram pumps have a lovely click to them as the valves open and close, too. The only disadvantage is that ram pumps can’t usually drag water up very steep inclines. You can read more about the wonderful ram pump here. Here’s a video on how to make one: https://www.youtube.com/watch?v=enBEMgDR3-A  Hydraulic ram by John Cole / CC BY-SA 2.0 Drinking Water? Yes, you need drinking water, but not nearly as much as you think. There’s far too much paranoia regarding water, usually spread by people who have zero experience of life in the wild, and who are spewing second-hand stories they’ve seen on the telly. Remember: Depending on your annual rainfall and the size of your veggie patch/orchard, anywhere between 50% to 90% of your water usage is for your garden. On top of that, the vast majority of your personal water usage is for washing clothes and showering, so it doesn’t need to be pure, either. Then comes the washing up, which unless you’ve got good reason to believe there is giardia or cholera lurking in your supply, and you’re eating off wet plates, can also be washed in non-drinking water. The amount of water you actually ingest is minimal. I have no drinking water in my taps and collect it instead from a pure spring nearby. I usually use between 2-3 litres a day. What you need most is water, full stop. Provided it’s not downstream from a chemical plant, you are probably fine using it for most things except drinking and eating. Most people going off-grid are moving to remote places, which are automatically less polluted anyway. That is, after all, the whole point, right? 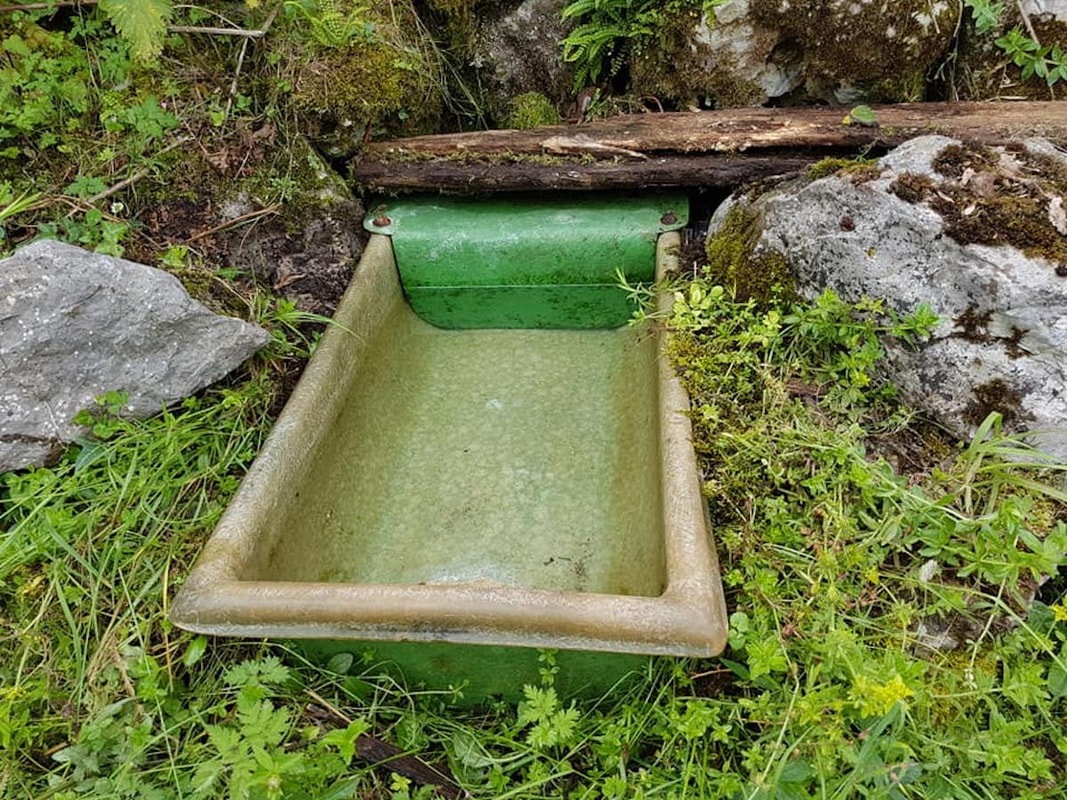 My water source number one: the cow trough:) This trough is connected to a pipe that runs to a big well spring up the mountain, and automatically refills. Do you enjoy The Mud Home?
If you find these articles inspiring or useful please consider joining us on Patreon. Your support pays for the running of this website, my virtual help, and my sustenance. A big thank you to all The Mud Sustainers, and everyone chipping in and keeping these posts and articles coming. Lime is one of the most underused, yet versatile, enduring and elegant building materials out there. It's amazing stuff, and does almost everything Portland cement does but better. Yup, I said better. Lime allows structures to breathe in a way Portland cement never can, significantly reducing the opportunities for damp in your building. It's softer and more malleable, and cures more slowly giving you time to work it beautifully before it sets. This softness is important in mortar work – especially in old buildings. Portland cement is too hard and non-porous, so it ultimately begins to 'eat away' at the stones. It's been banned by the English Heritage Society for this very reason. Lime is a fungicide and an insecticide, and in most places very inexpensive. Unless you're building a multi-story car park, lime is the way. Lime generates roughly 25% of the carbon that Portland cement does in production,and then slowly reabsorbs that carbon as it cures. Seeing as Portland cement is currently the second largest emitter of CO2 into the atmosphere after fossil fuels, we could do with using a lot more lime and a lot less Portland. Here are 8 gorgeous things you can make with lime: 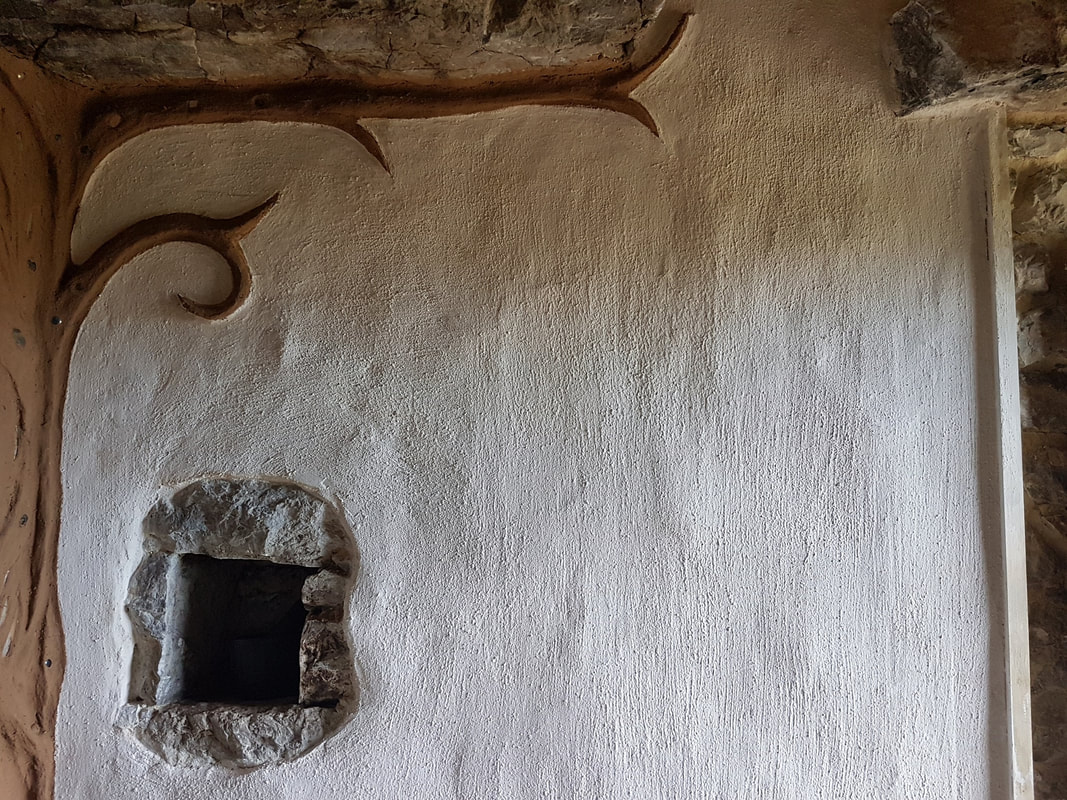 Lime render in my kitchen. 1. Render Lime creates beautiful, breathable renders. It’s so much more suited to this job than Portland cement as it allows the house to air properly, creating a very different, drier atmosphere within. It’s anti-mold properties are also a boon if you are in a damp climate. Because it takes longer to set, you have time to work it into something of beauty. 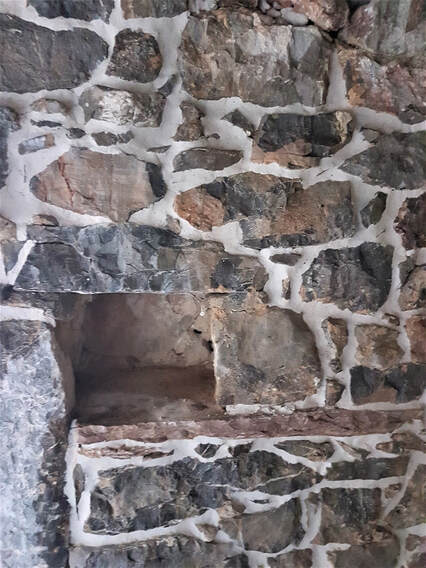 My lime mortar in my kitchen 2. Mortar If you have an old building, then lime mortar is a must really. Because it’s softer than the stone or brickwork, it doesn’t gradually eat away at them like Portland cement does. 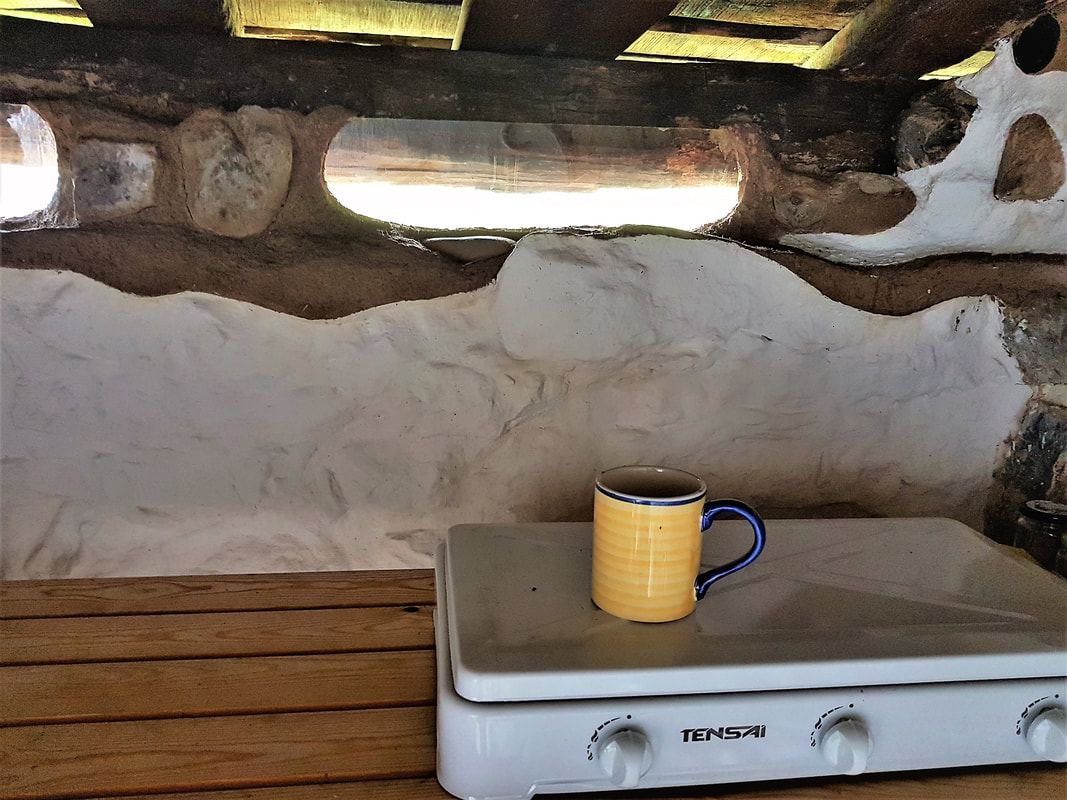 Lime wash on brick or stone work creates a super textured finish. 3. Paint I love lime paint (or lime wash) because it’s so absurdly easy to use. Most commercial paints come stuffed with chemicals, and create either an oily or plastic finish that doesn’t breathe. 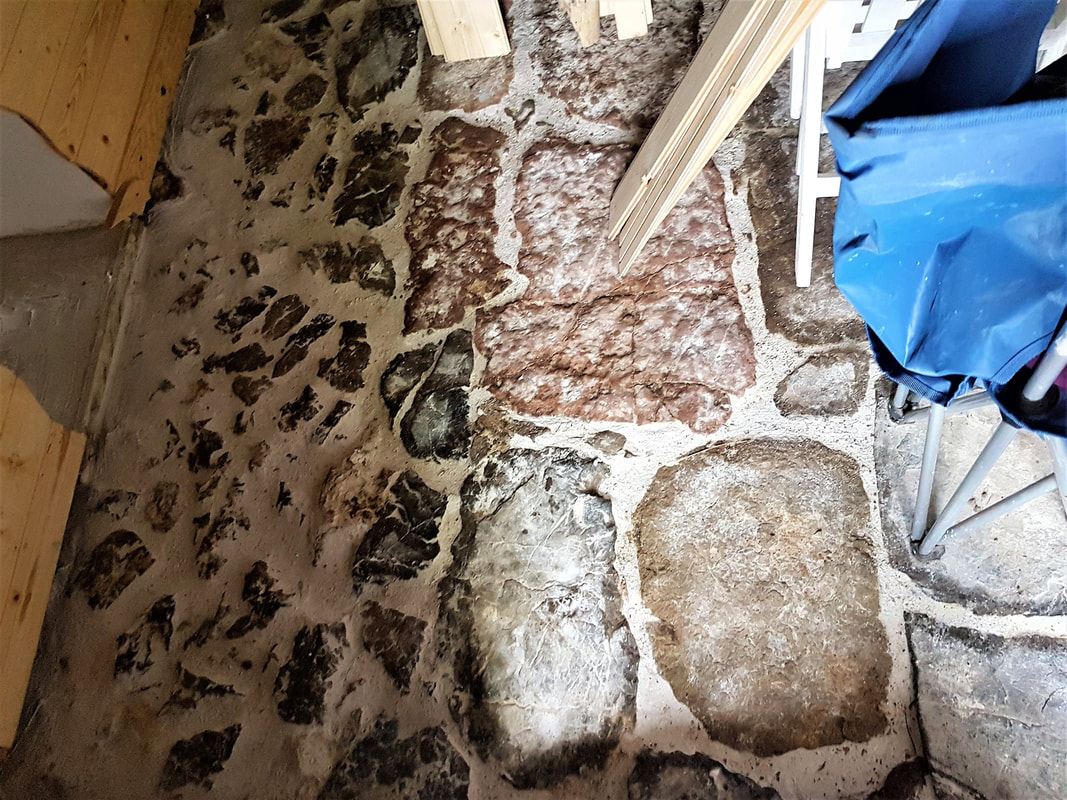 Flagstones grouted using lime in my kitchen. 4. Grout Yes, you can use lime to grout tiles or flagstones (see above). 5. Flooring You can create limecrete from lime, which is durable and works perfectly well as a flooring. In ancient houses it’s the floor material of choice because once again, it doesn’t mess about with the self-airing characteristics of old buildings and allow damp to rise. 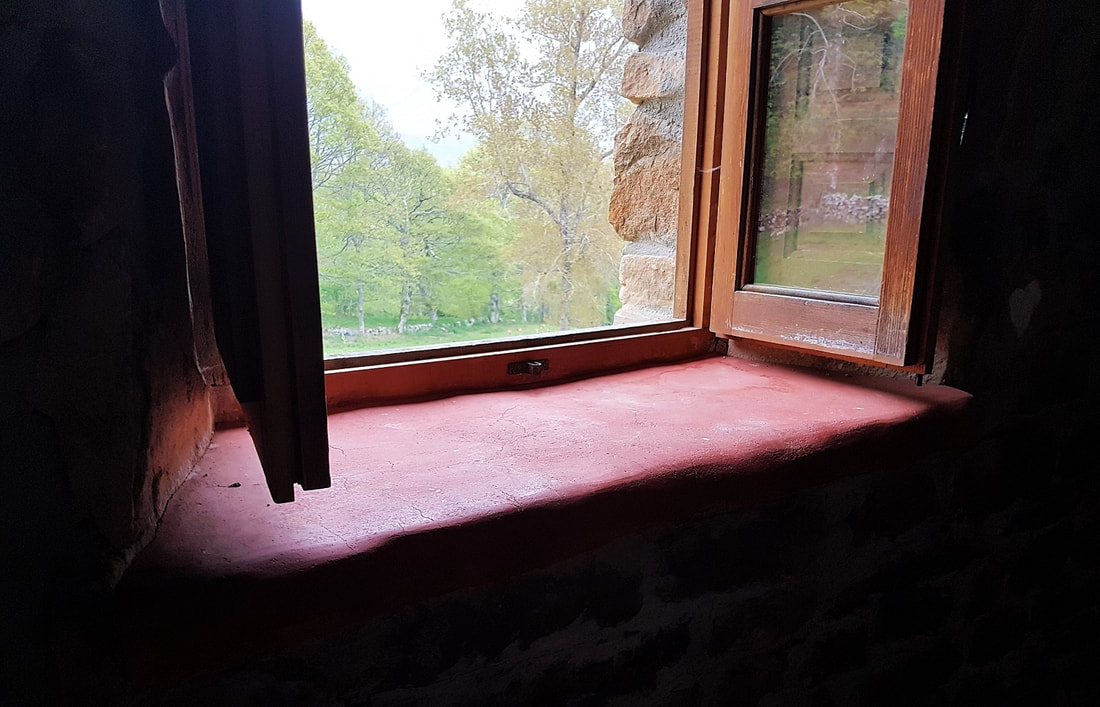 Sophie Hunter’s beautiful limecrete sill. 6. Sills and Worktops With limecrete you can form beautiful sills, worktops, or steps. Lime takes longer to cure than Portland cement (about three weeks for adequate solidification) but is perfectly durable, and continues to harden over time. 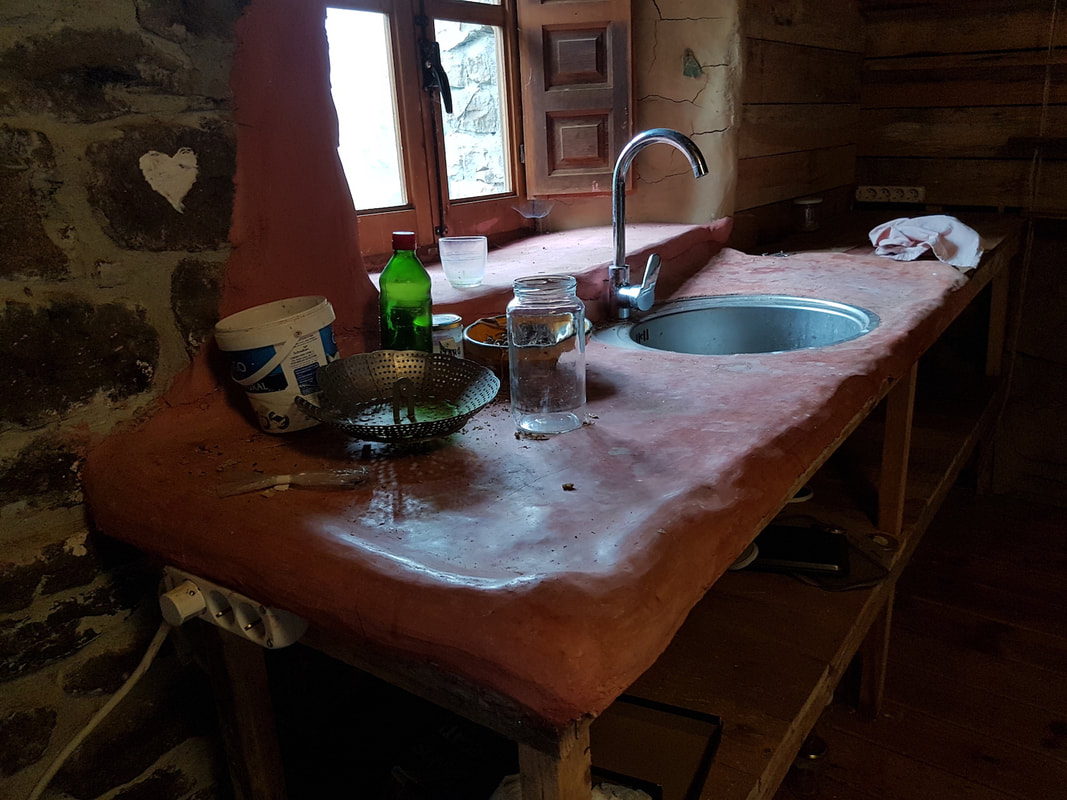 Sophie Hunter’s worktop. 7. Bubble Houses You can mix lime, sand, and straw (or hemp) and make all kinds of structures with it. Have a look at this gorgeous bubble house in France by Kerterre (the video is in French). 8. The Taj Mahal Okay I’m kidding, kind of. The Taj Mahal was rendered in a special kind of lime plaster called ‘araish’. It’s made by mixing burned clay with slaked lime, jaggery, and fenugreek seeds. It's held up pretty well, as you can see:) 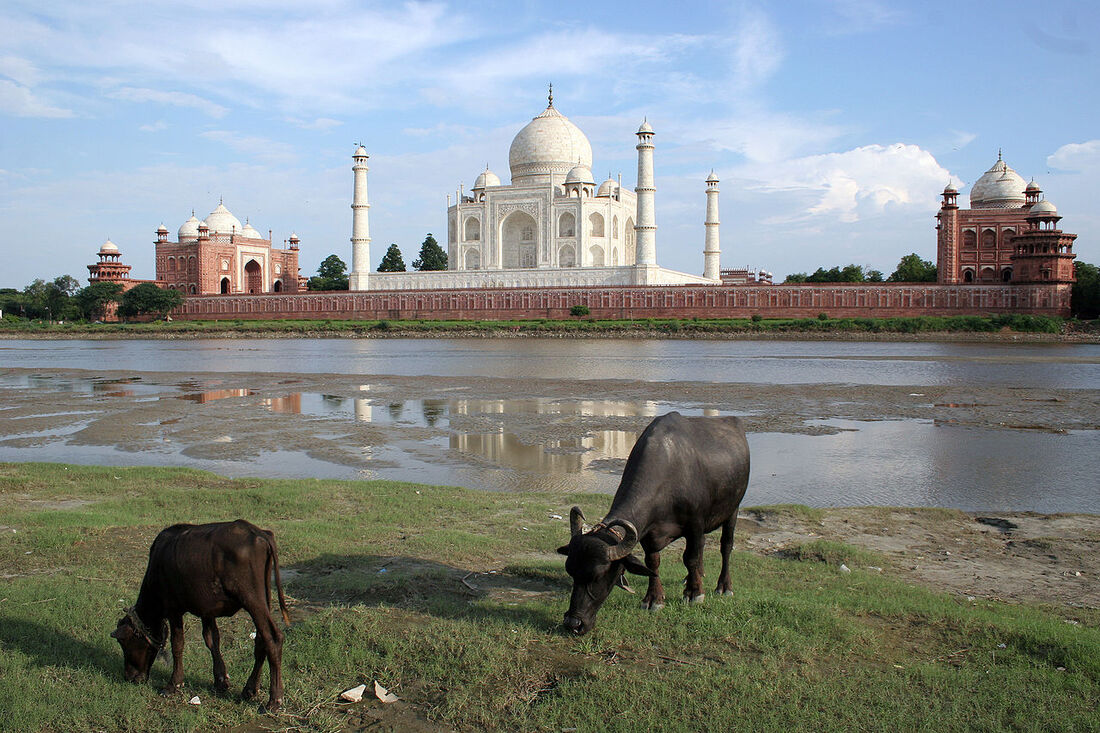 Taj Mahal photo by David Castor. Want to know how to use this stuff? If you want to explore the Amazing World of Lime further, and learn how to use the white wonder, I have a popular course on it. It includes videos, slideshow lectures, and PDFs, and is completely downloadable. I always update and add sections to my courses over time. Once you’ve enrolled in the course you’ll have access to all future updates. The course includes:
Health and Safety
Lime is natural and non toxic, but it is caustic, so you need to wear the right protective gear when using it. Here's the full health and safety guide for lime. Do you enjoy The Mud Home? If you find these articles inspiring or useful please consider joining us on Patreon. Your support pays for the running of this website, my virtual help, and my sustenance. A big thank you to all The Mud Sustainers, and everyone chipping in and keeping these posts and articles coming. Probably one of the most attractive features of an off-grid lifestyle is that it’s so inexpensive, leaving the dreaded day job behind becomes very viable. You have no power or water bills. You don’t (hopefully) pay rent. You are not spending idiotic amounts of cash on travelling to work, or on a corporate wardrobe. And most importantly of all, I think, is that the mere act of being outside in nature is in and of itself very fulfilling, so you are not wasting money on myriad distractions. I still say building with mud is one of my cheapest hobbies. 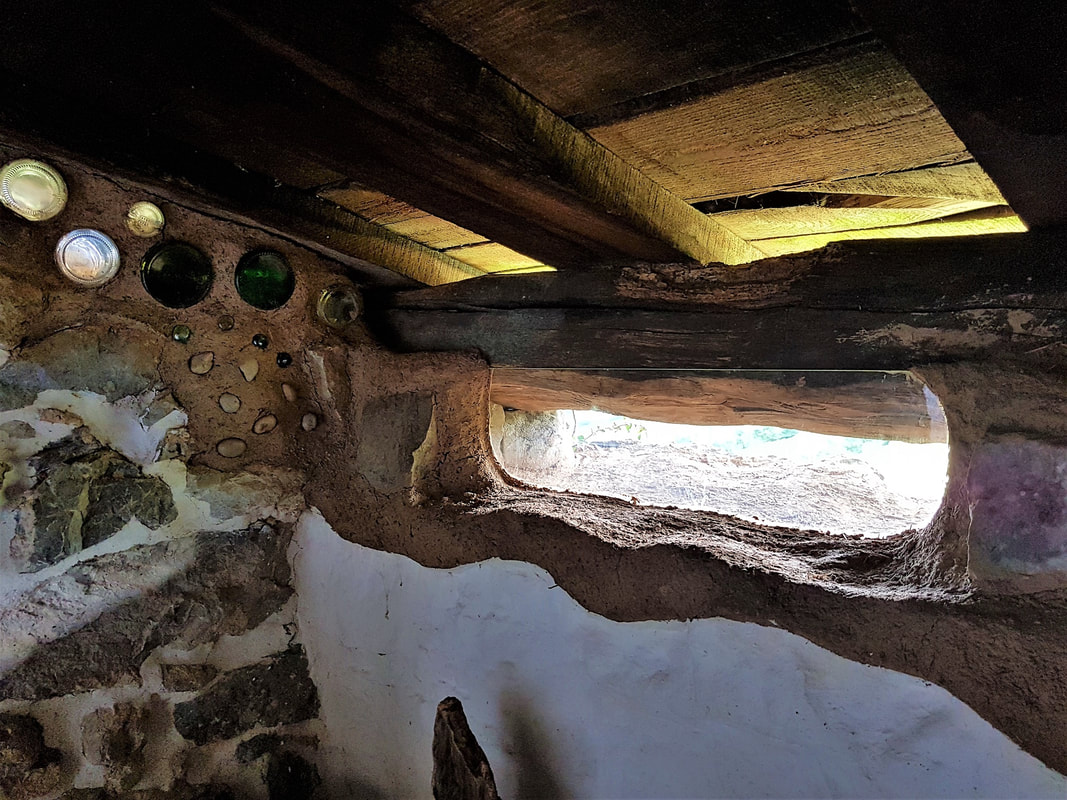 Mud is still one of my cheapest hobbies. After a while you start growing your own food, which shaves a lot off your food bill too. I worked out that even in my paltry first-year herb garden, I saved about fifty euros on herbs alone in just twelve weeks! My friend said she’s saved thirty euros on tomatoes alone this summer. We’re single. If you’re a family, then growing your own vegetables is a big money saver. Even so, as I learned to my chagrin back on Mud Mountain in Turkey, unless you are prepared to cut yourself off entirely from humanity, not have internet, or be a parasitic scrounger, you do need a few bucks to live off. In Turkey I was getting by (fairly uncomfortably) on about 150 dollars a month. Here in Spain it’s more like 350 euros. A good half of my outgoings are on petrol and communications (wifi/phone, etc.), and I won’t lie, I still harbour a dream of cutting those out one day. And then there are the times things ‘go wrong’, the inverter blows up, or your water pipes freeze, and you have to repair your infrastructure. 350 euros isn’t much… unless you haven’t got it. So I asked around in our Special Mud Home Facebook Group as to how the other off-gridders and system-escapees earn their crust. How to make a living off-grid: 1. Teaching natural building and homesteading workshops This is one of the most common ways people keep the money clock ticking. The learning curve for people building small off-grid worlds is immense, so once you’ve built your own little world it usually by default attracts others who want to learn. Pros: Depending on your location it’s very viable. In Europe and the US, a lot of people want to learn this stuff. Cons: You need a decent infrastructure in place to be able to host workshops. Then there’s the food issue (bane of my life). Who’s doing the catering for ten people, who no doubt have all manner of ludicrous dietary requirements? In my experience (and many others concur), workshops are exhausting. You’re not going to be running them every week.  Workshops can be fairly knackering (though also pretty fun). 2. Renting out your yurt/tent/campervan on Airbnb You’d be amazed what you can rent out, so don’t limit yourself by thinking that your mud hut is too basic for Airbnb. Even a square of land in a beautiful place can potentially be rented out to campers. There is a hunger for beauty and nature and simplicity. Pros: A nice little earner without a huge amount of effort. Cons: Depending on your location, there may be legal or tax implications with this. It’s tricky to keep rented properties under the radar, and I’ve heard a few cases in various countries of local guesthouse owners complaining, and then fines being issued. 3. Selling your own produce/handiwork A lot of folk are doing this in my area of Spain, because there are some tax advantages to being a stall holder:) Whether there is a local demand for fresh, organic home produce depends on your location. In Turkey, because everyone already made everything themselves, it was harder to sell your own creations. But in many, many countries, home produce is viable. Jam goes for five euros a jar in my local market, which is a pretty high markup I reckon:) What to sell? Jam, honey, organic veggies, chutneys, herbs, herbal remedies, soaps and natural cleaning products, bread, cakes, pasties, cheeses, butter, handmade jewellery, foraged food. “I’m a big forage geek. Wild gourmet mushrooms sell high in the right season and restaurants ‘eat them up’,” said Wynter Spring in our Facebook Group. Where to sell it? In your local market, restaurants, create a ‘pick your own’ and let people do the hard work for you, or sell online. Pros: Easy to stay under the radar and earn ‘cash-in-hand’. Cons: Potentially labour-intensive. You need to be sure you have a market for your stuff.  I used to survive (almost) on selling my painted stones. 4. Online teacher If you are a native speaker of English you are lucky. You have ample opportunities to teach your mother tongue online. Spanish, French, and Mandarin Chinese are other popular languages to learn. But people are teaching almost anything online these days. Pros: It’s flexible and sometimes pleasant to chat to different people if you’re getting cabin fever up there in your off-grid world. Cons: You need a decent internet/power system. Teaching takes more time, energy and skill than people think. You have to prepare classes (usually), have decent social skills, and shedloads of patience. 5. Editing/Translating/Copywriting A number of people edit journals and articles. Or if you speak more than one language, you can also flex your translation muscles. Pros: Flexible. This is non-physical work (which can be important when you are off-grid, as you can get physically very tired). Cons: Little room for creativity, so potentially quite tedious. 6. Retreats and Travel These are similar to workshops in their need for effort, but retreats and homestays usually require better infrastructure and more comfortable lodgings. You can run spiritual, ecological, ‘writers and artists’ retreats or responsible cultural holidays like Poonam below: “I have a little responsible rural travel project in the Indian Himalayas, where I have trained and hired underprivileged women, mainly widows and victims of domestic violence - www.fernweh-travel.com . Plus we have a homestay looked after by women too www.peachesandpears.net,” says Poonam, (also a member of our Facebook Group - it's nice in there:) Pros: You will probably meet some interesting like-minded folk. Some are like angels bringing fresh air and ideas into your world. Cons: You may meet royal pains in the backside as well:) For some, the end of the world = no chia seeds, composting toilets, too much quiet/noise, beds too hard/soft/big/small etc)...it goes on and on.  Someone learning local skills courtesy of the Fernweh Travel team. 7. Social media manager/online assistant You need to be fairly tech savvy and dextrous with a number of social media platforms to pull off being a virtual assistant. These skills can be learned though. A VA may have to upload blog posts, edit, sort out inboxes, post on social media, organise travel arrangements, do online research, write or collate newsletters, and more. Pros: Flexible and not too time-consuming if you have the skill set required. Cons: I think the most challenging part is getting yourself out there in the beginning so that people can hire you. There are a number of sites where online freelancers tout their wares. Here is a sample of some of the biggest: https://www.upwork.com/ https://www.freelancer.com/ https://www.workingnomads.co/jobs https://www.craigslist.org/about/sites 8. Start Your Own Online Business I think by now I could write a book on this, which is ironic, because not once in this off-grid adventure have I consciously tried to create a business. What I did want to do was create a platform, which by default is what you need to do if you want to stand a chance of succeeding in the smoke and mirrors world of online business. Online businesses can involve selling products. But I’d say selling things is only one side of online entrepreneurship. You could be creating online courses, such as I do for the Mud Home, or offering services such as therapy sessions, or creating online communities. “Over the past 10 years I've built my business as a master doll sculptor so that I would be able to one day explore my off-grid passion,” says Rhonda, who unlike me and many others was smart and got her ducks in a row before she left the system:) You can see her creations at https://creamsodabjd.com/. Kirsty Henderson has called herself an accidental cartographer. She’s got a great blog post about how she fell into the online business of selling maps. http://www.portugalfromscratch.com/earning/so-how-am-i-funding-this-crazy-adventure/#more-63 Pros: Creative and exciting. It’s great to be your own boss. Cons: There’s a lot of rubbish touted about earning millions online. Don’t believe a word of it. An online business is not a get-rich-quick option, but hey, that’s presumably not what you’re doing it for;) Still, for the sake of realism I reckon it usually takes a good two years to learn the ropes and get a decent online platform going (unless you’ve got a stack of money to throw at advertising). 9. Building/designing projects for others When you have a built a few natural homes and are on the level that Shagun Singh is, you can design or build for others. “I started taking designing and building projects very selectively. These are mostly social with no charge but a few commercial ones too to support finances,” says the amazing woman behind Geeli Mitti in India. Pros: Potentially lucrative. Could improve your standing in the natural building world. Cons: Potentially exhausting and frustrating. You have to navigate other people’s vast and often unrealistic expectations. 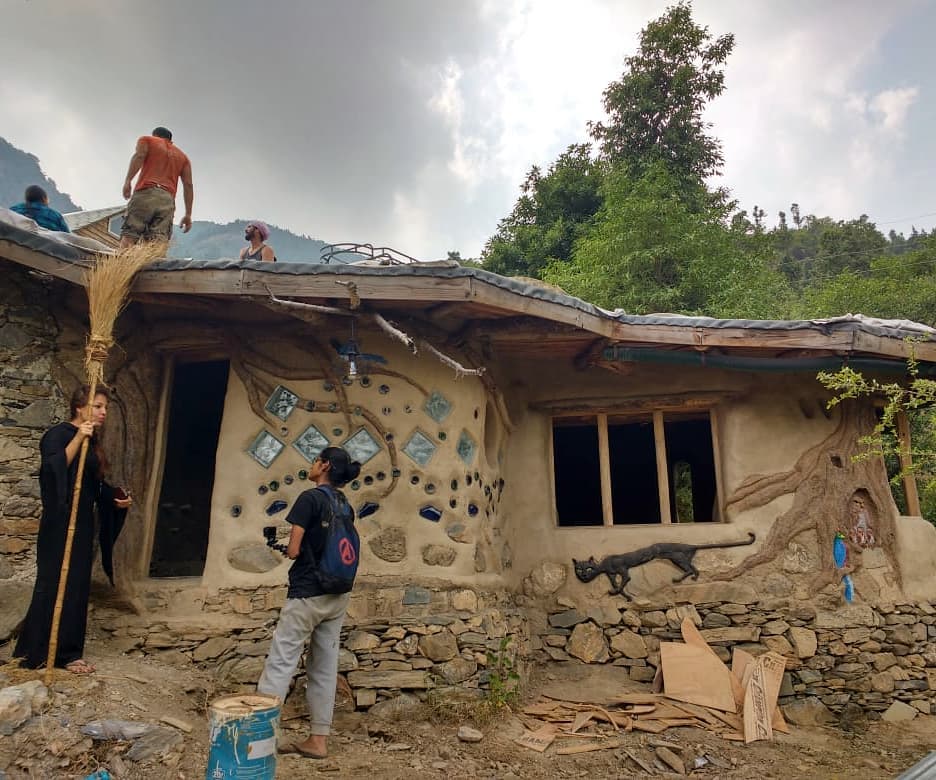 Shagun Singh and friends casting mud spells at Geeli Mitti. 10. Consultancy If you are an expert with hands-on experience in any field, you can offer advice to anyone who’ll pay you by becoming a consultant. There are permaculture design consultants, natural building consultants, online business consultants… heck, even dog psychology and hairstyle consultants. This may be part of your online business, but not necessarily. Pros: Potentially interesting work because you have a deeper level of input into someone’s project without the burden of actually making it happen. Cons: Make sure you have decent internet. Your main challenge will be to find customers. Links and Further Reading for Online Entrepreneurship https://www.fulltimenomad.com/virtual-assistant-jobs/ http://www.portugalfromscratch.com/category/earning/ Do you enjoy The Mud Home? If you find these articles inspiring or useful please consider joining us on Patreon. Your support pays for the running of this website, my virtual help, and my sustenance. A big thank you to all The Mud Sustainers, and everyone chipping in and keeping these posts and articles coming. 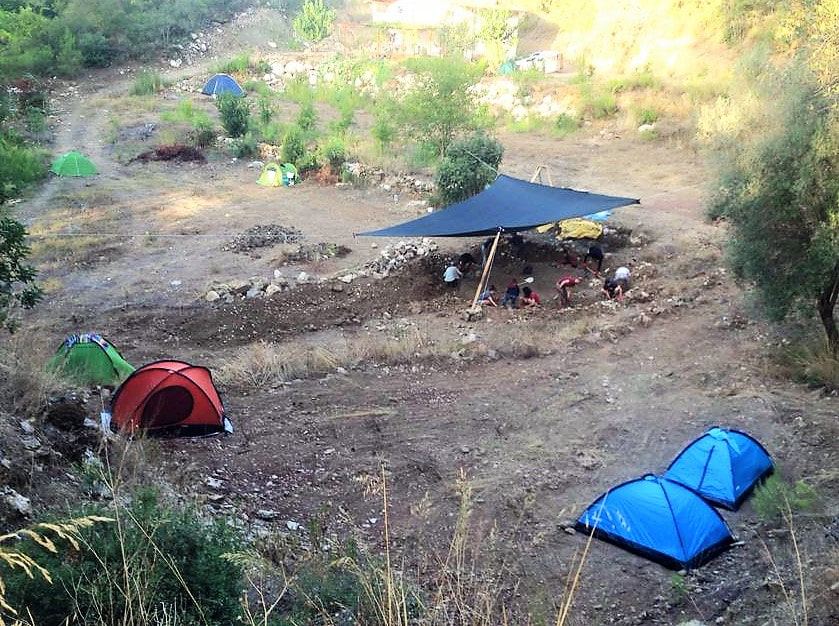 Have your own project in the pipeline? Need inspiration or advice?
The Mud Home’s small, private, and very supportive Facebook group is a safe space for new mud builders and off-gridders. It’s also the most inexpensive way to get assistance from me. It’s filling up, though. The number of members is capped at 100 so I can give everyone the proper help they need. So if you want to be part of it, don't leave it too long. http://www.themudhome.com/mud-home-facebook-group.html |
Many thanks to the Mud Sustainers supporting this site!

Do you find The Mud Home valuable? Please consider supporting the blog on Patreon. For as little as $2 a month (not even a coffee where I'm from), you can join the club.
BENEFITS FOR PATRONS INCLUDE:
Email priority, private Facebook group, review copies of my books, sneak previews of courses and books, Q and As, priority for courses and more. AuthorAtulya K Bingham 
"Beautifully written and inspiring." The Owner Builder Magazine
FREE!
If you want the step by step guide of how I built my house, sign up for the PDF.
WHY NOT? IT'S FREE! Categories
All
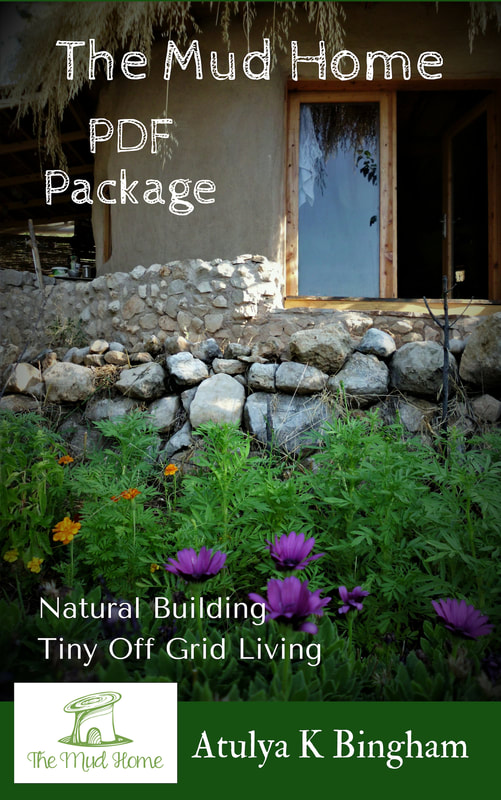
All the Mud Home How-to posts have been compiled into a PDF package with 75 articles and over 200 photos. You can still buy it now, and enjoy lifetime access to all the updates.
“Entranced! Be inspired by one who’s lived and breathed dirt.”
Kim Fraser, Get Rugged |
|
|
The Mud Home takes many hours a week to run, and costs a lot to sustain. If you find this site useful or inspiring, please consider supporting it so that it can continue.

Many thanks to all those who've already become Mud Sustainers.
|
 RSS Feed